

OpenAI Assistant
This guide explores the NicoChat integration with the OpenAI Assistant, which lets you use the power of OpenAI directly in your chatbots. The OpenAI Assistant is a virtual assistant trained on your business data, able to answer user questions effectively.

This guide explores the NicoChat integration with the OpenAI Assistant, which lets you use the power of OpenAI directly in your chatbots. The OpenAI Assistant is a virtual assistant trained on your business data, able to answer user questions effectively.
- OpenAI Assistant: a virtual assistant trained on the business files you uploaded, working as a searchable knowledge base.
- Assistant ID: unique identifier of your OpenAI assistant within NicoChat.
- Model: the OpenAI model used by the assistant (for example, gpt-4o-mini).
- Instructions: additional guidance given to the assistant to refine its responses.
- File uploads: business documents uploaded to train the assistant.
- Access the integration: in the NicoChat dashboard, go to "Integrations" and select "OpenAI".
- API key: enter your OpenAI API key in the settings.
- File upload: use the "Files" tab to upload the documents that will train the assistant. You can upload with a button or by file URL, with a recommended limit of 200 MB.
- Creating an assistant: click "New" to create an assistant. Choose a name, a description and a model (default: gpt-4 turbo).
- Providing instructions: in the "Instructions" field, set the tone and response style you want for the assistant. You can use emojis and write in the first person. (Character limit: 20,000)
- Attaching files: select the uploaded files that are relevant to the assistant's function.
- Saving and syncing: click "Create" to generate the assistant. It will also be synced with your OpenAI account.
- Building the flow: create a flow in NicoChat to incorporate the assistant.
- Question block: add a question block that asks for a user reply, such as "What can I help you with today?"
- OpenAI Assistant integration: under "Integrations", choose "OpenAI" and select "Create Assistant Completion".
- Remember History: the "Remember History" option is optional. If you choose "No", the assistant will not have access to the conversation history, which may limit its ability to give responses that fit the context.
- Assistant ID: enter the ID of the chosen assistant, obtained from the NicoChat interface.
- Model: the "Model" in NicoChat is optional and overrides the model associated with the assistant. Models: gpt-4-1106-preview, gpt-4-vision-preview, gpt-4, gpt-4-32k, gpt-3.5-turbo-1106 and others.
- User input: rename the "Content" label to "User Input" or something similar, to make its purpose clear.
- Additional instructions (optional): if the default instructions are not enough, write more specific prompts in the "Content" field.
- Testing and saving: ask a test question ("What is your offer?") and observe the assistant's response. Save the completion when the result is good.
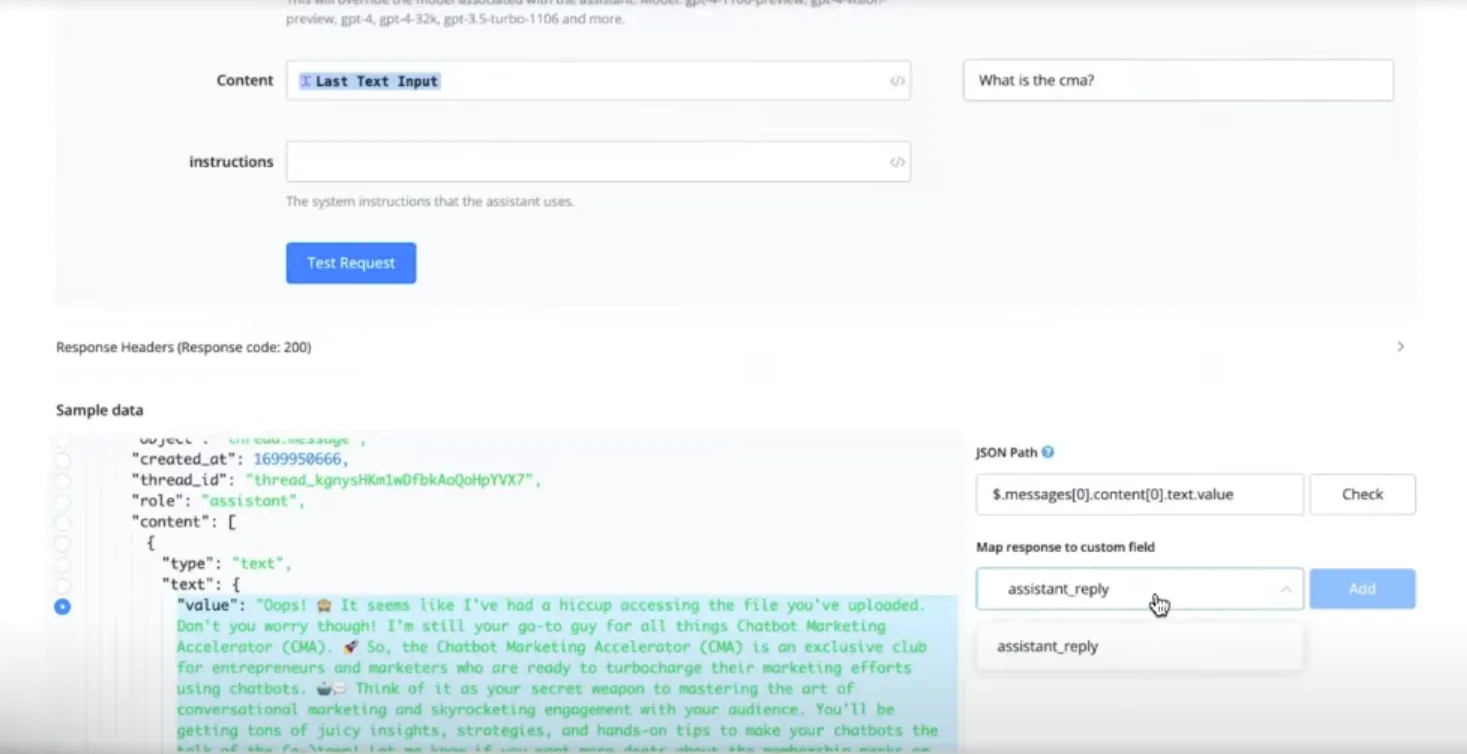
In the "Create Assistant Completion" block, after making the "Test Request", go to the "Sample Data" section.
- Click the "Map" icon and select the assistant response value.
- Give the mapped variable a descriptive name, such as "response", in a custom field of text type.
- Click "Save".
Advanced usage and considerations
- NicoChat offers several individual OpenAI actions for more granular control (for example, list assistant files and create assistant).
- Consider looping the flow back to the assistant completion to allow conversation-like interactions.
- You can use the assistant response inside your text messages, like a custom field.
With the NicoChat integration with the OpenAI Assistant, you can create chatbots able to answer user questions straight from your business knowledge base.
This improves the user experience and simplifies the search for information. Explore the assistant's features and try out the OpenAI actions in NicoChat to make the most of them.