

Boards (Kanban, Pipeline)
In simple terms, boards are tools like Trello or Simple CRM that can be managed inside the NicoChat platform.

In simple terms, boards are tools like Trello or Simple CRM that can be managed inside the NicoChat platform.
In other words, we are managing a group of Users who go through the various stages of a Funnel system, and we see which stage each one is in at the moment.
Some use cases for the Board are:
- Sales pipeline
- Customer support
- Task management
- Project management
For example:
Let's go through the steps of creating a “Board” for the Sales Pipeline.
In the Sales Pipeline, we would position a business's leads in the following stages:
- New Lead
- Contacted
- Demo Scheduled
- Proposal Sent
- Closed Won
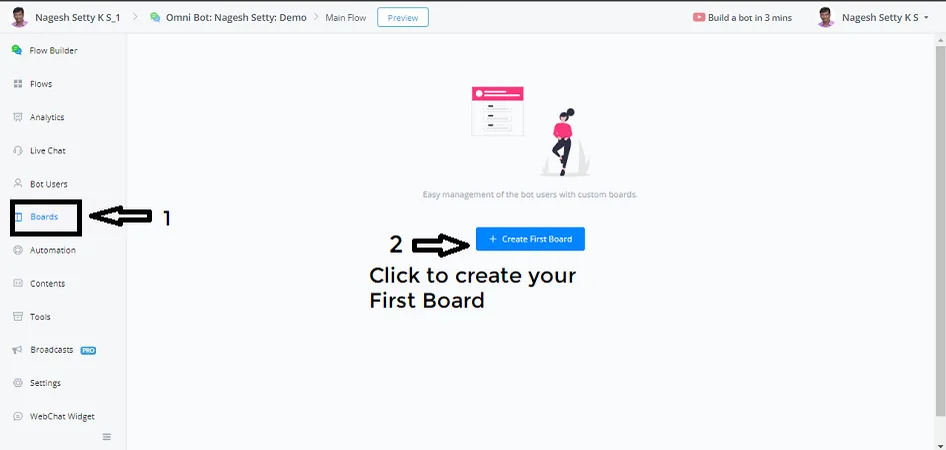
In the Flow Builder menu, on the left-hand side, we find the “Kanban Boards” feature just below the “Contacts” function, almost in the middle of the page.
Now we click on the Kanban Boards feature. We can see a button called “ Create First Board ”
Clicking this button, we move on to creating our First Board.
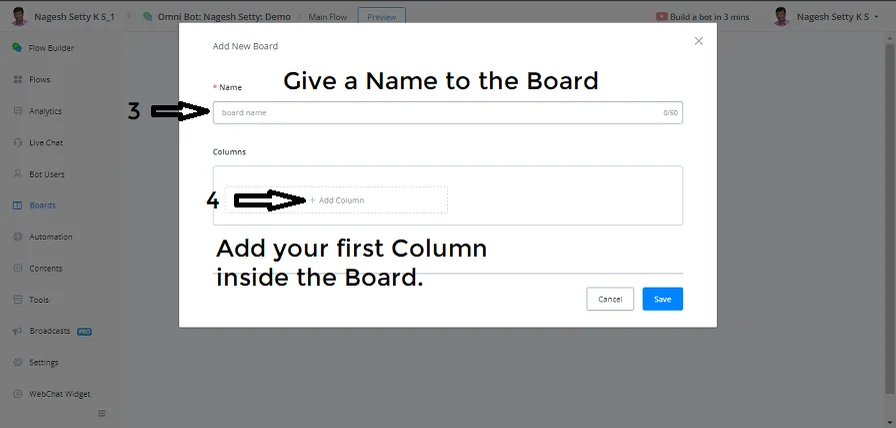
Pop-up window - Add New Board
Under Name: we should give the Board a name. E.g.: Sales Pipeline
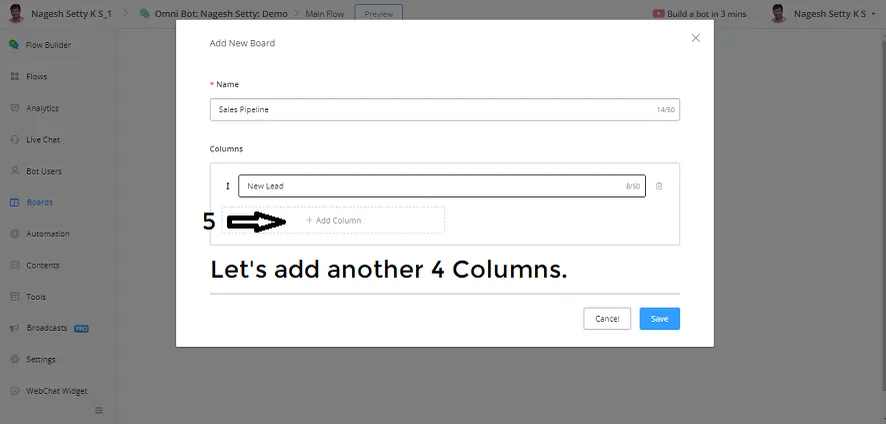
Click “ Add Column ” to add the First Column and let's name it New Lead
Now let's add the other 4 columns the board needs, as mentioned above - the different stages of the sales pipeline.
Adding the other 4 columns to the board
- Contacted
- Demo Scheduled
- Proposal Sent
- Closed Won
After adding the 4 columns, click the Save button.
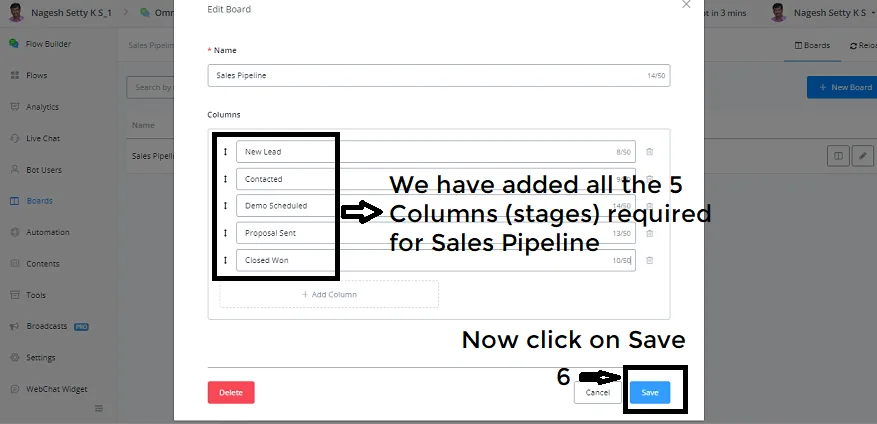
After saving the Board, we can see that the new Board was created and that the five Columns were created inside it.
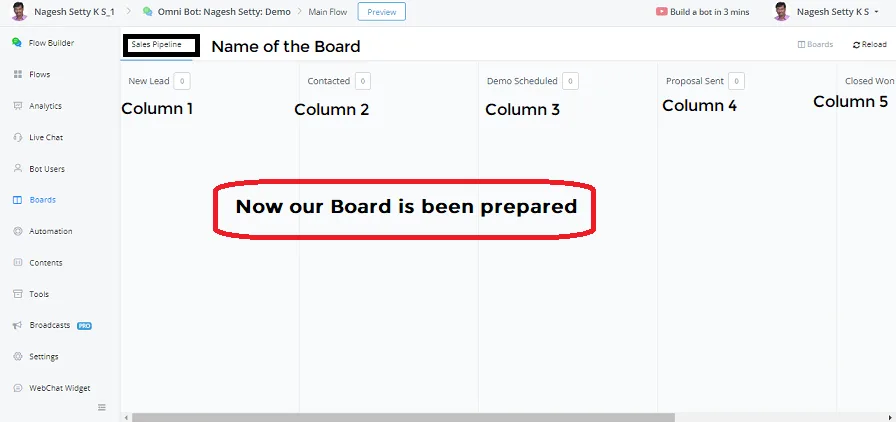
On this board page, you can also create a new column by clicking the “New Column” button in the top right corner.
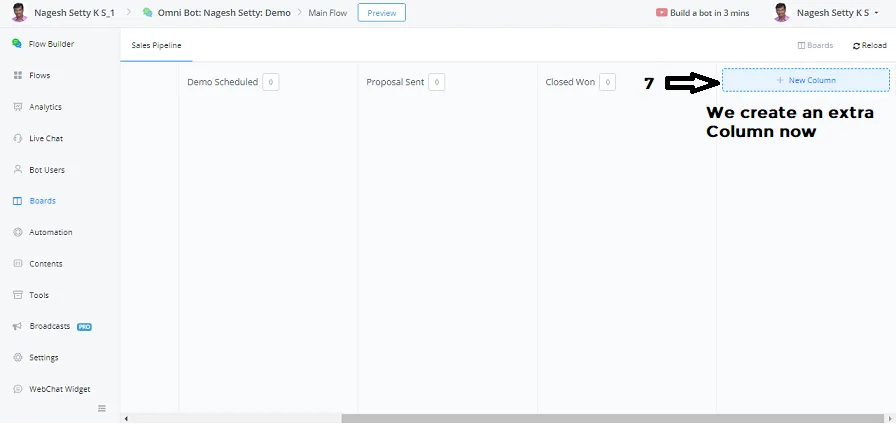
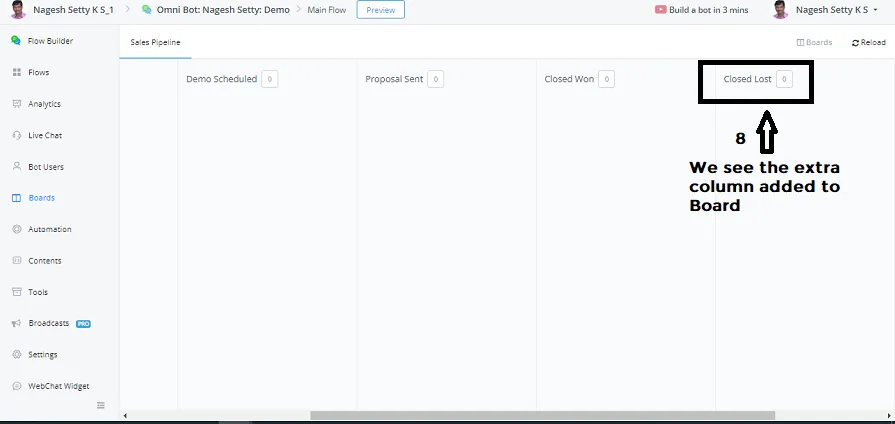
Give the extra column a name and click the Save button. Now we see the Extra Column added to the Board.
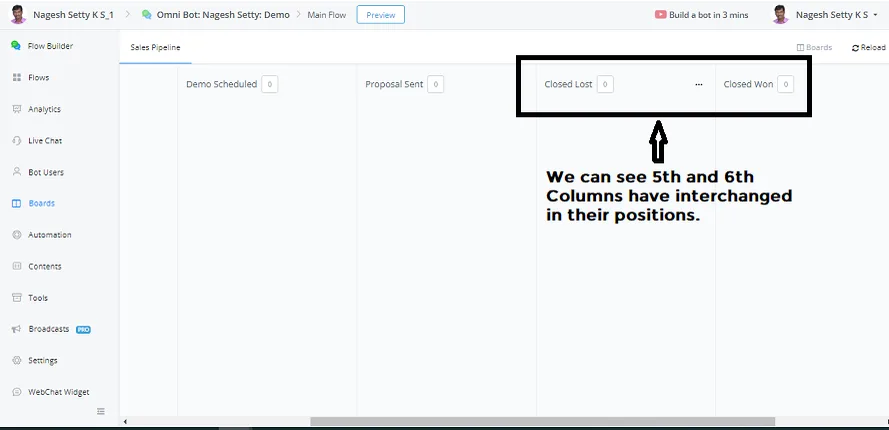
Here, on the Board page, we can move the Columns from left to right or vice versa, dragging them and positioning them in the required order.
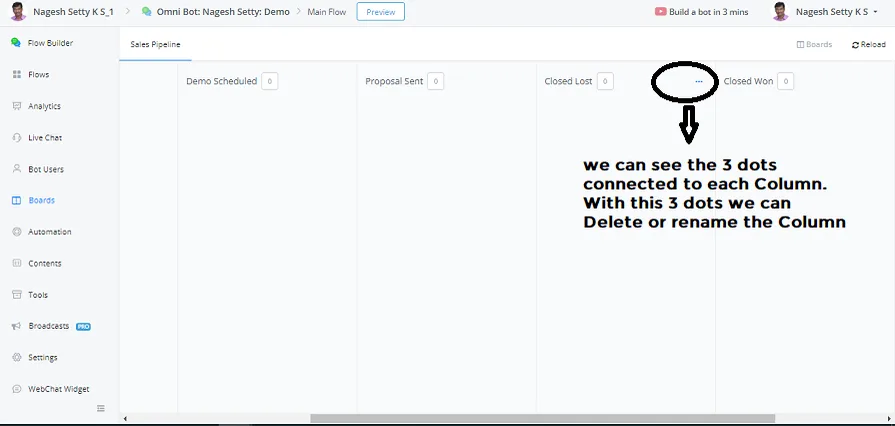
We also see three dots in the top right corner of each column. By clicking them, we can delete the Column or rename it and save it.
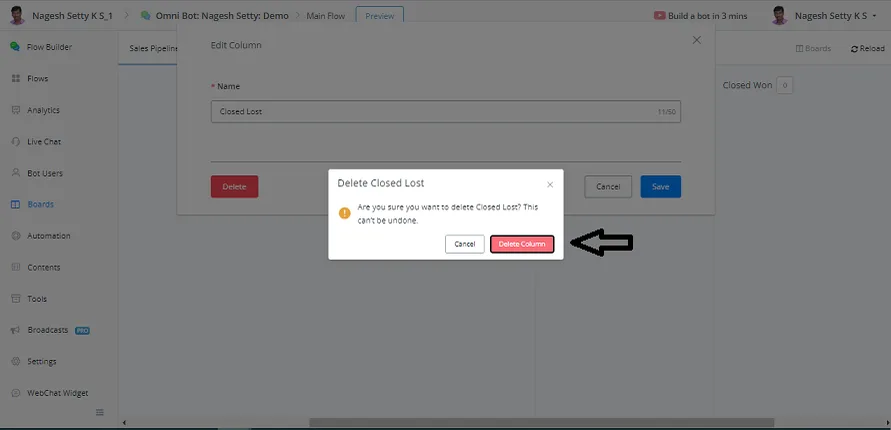
After clicking Confirm Delete, the column will be deleted.
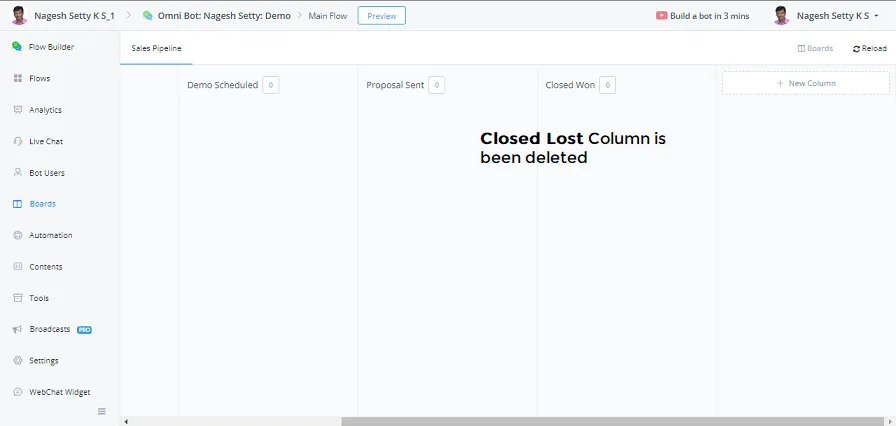
Below you can see that we deleted the 5th column - Closed Lost
Now let's see how to use this Kanban Boards section.
Let's show the Visual Flow Builder.
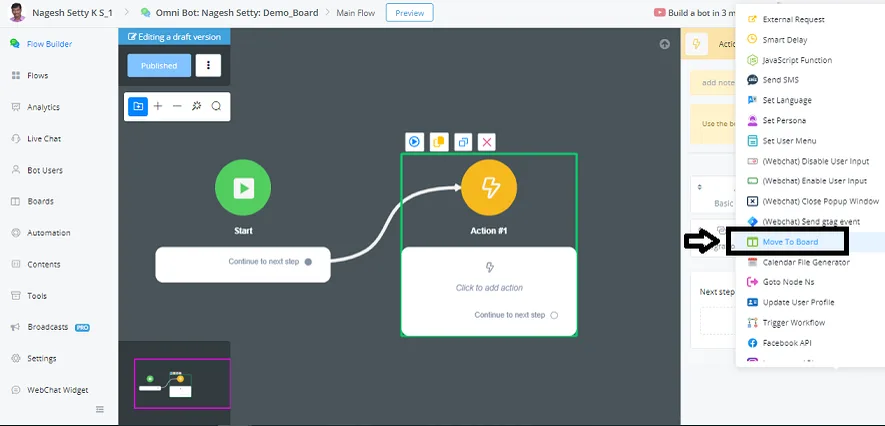
We are just creating the Action Block and adding the Board function to test how it works.
In the Action Block -> go to Advanced Actions -> Move to Board function
Next step -> click Edit Action in the Board function.
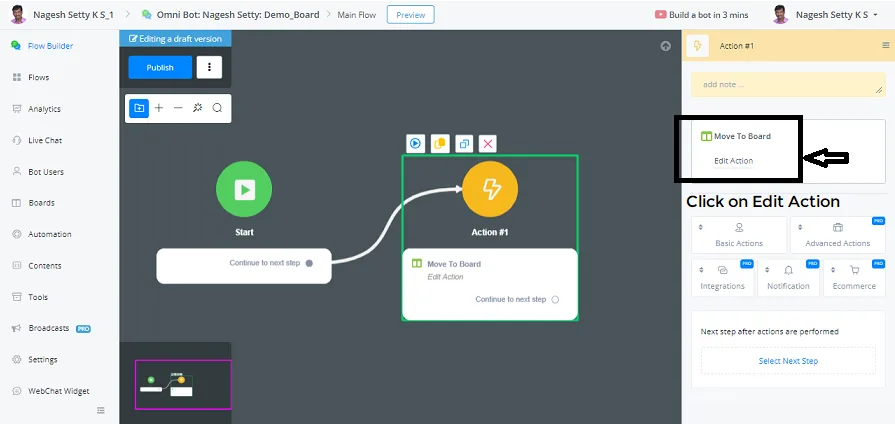
You need to select the Topic to position the User at the end of a Process.
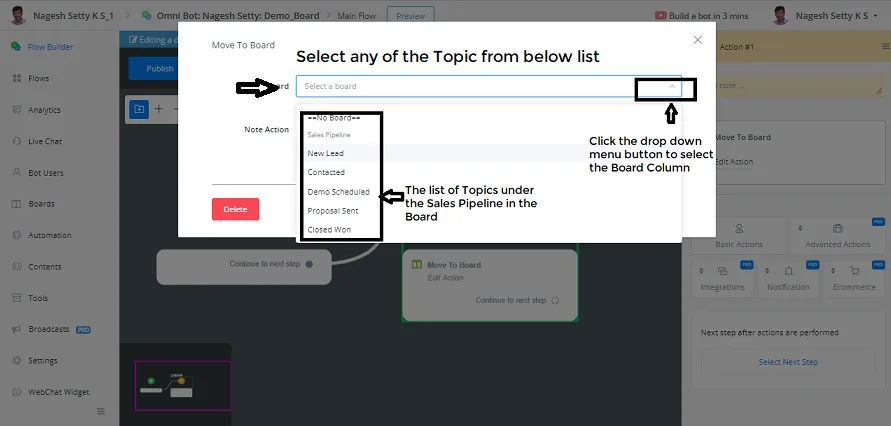
Now let's say we are bringing the user to the platform for the first time; so we select the Topic New Lead.
You can also add a note to the action taken, choosing one of the 3 options in the drop-down menu:
- No Change
- Update Note
- Clear Note
Now let's select Update Note in Note Action and Info in Note Type.
Since we are adding the user as a new lead, leave the note as - {{Nome}} is our new sales lead
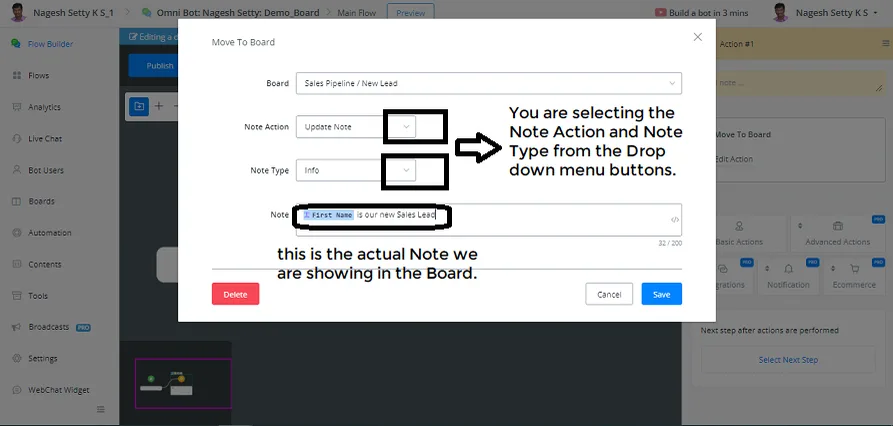
Now we can save the note details above in the board.
Now let's preview this action block with the board function on the pop-up web page.
We don't see any action on the web page, since we are only testing the Action Block.
Now we close the test page, open the board and refresh the page; you can see the magic:
In the New Leads column of the Board, the Guest user has been added. You can also see the Note: Guest is our new sales lead.
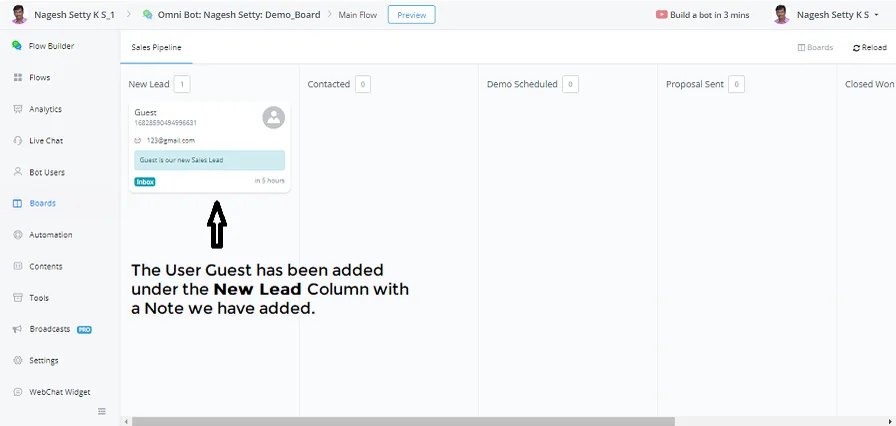
Now you can take a look inside by clicking the Guest User, and you will be able to communicate directly with this User from within the NicoChat platform itself.
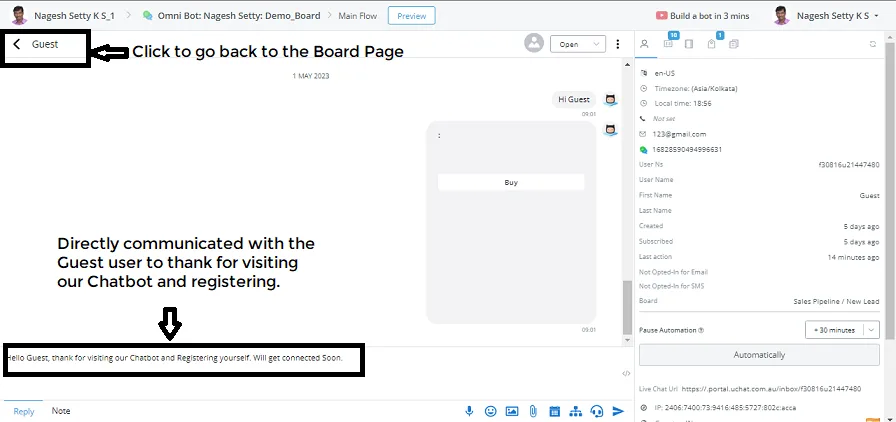
Now you can also drag them manually between the various stages, from left to right and from right to left.
We can also use Automation: each time a user takes a certain action, you can move them to the desired Board. You can move them through all the stages of the Board.
Now we have manually moved the guest user from New Lead to Demo Scheduled.
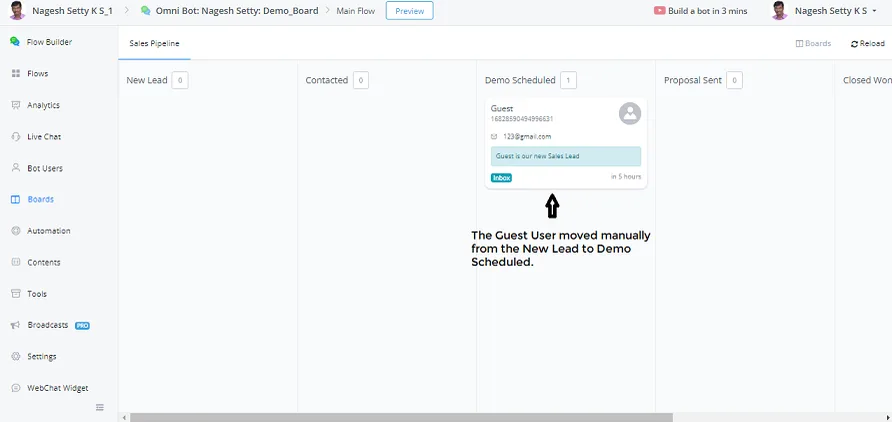
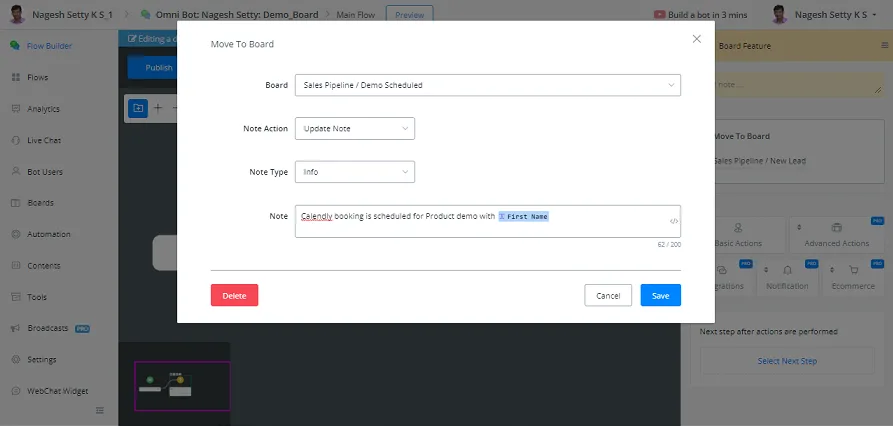
For example, when we want to automate this: if a product demo has been scheduled with the Guest User through the Calendly integration, we can also call an Action with the Board function, in which the following activity is performed:
- Topic or Stage - Sales Pipeline / Demo_Scheduled is selected.
- Note Action: Update Note
- Note Type: Info
- Topic: the Calendly booking is scheduled for the product demo with {{Nome}}
This way, the Board parameters can be set when a Calendly appointment is created.
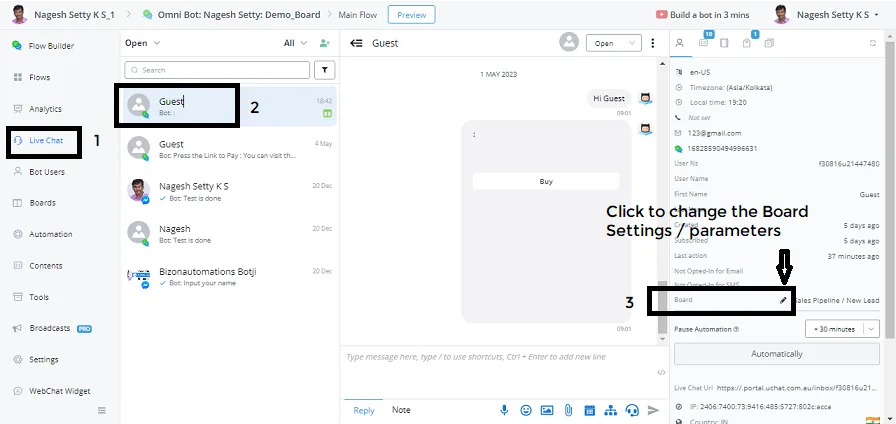
The other way to change the board parameters is by going to Live Chat. In Live Chat, select the User and, in the list on the right-hand side, at the bottom, you will see the Board function.
Click the pencil icon to change the parameters after a Live Chat with the user.
Click the pencil icon to change the parameters after a Live Chat with the user.
For example, as below:
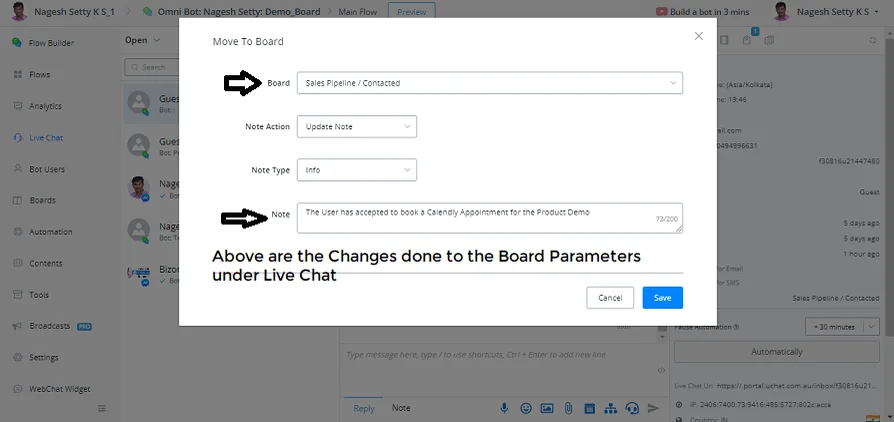
After the changes have been made in Live Chat, as above, we can see the changes reflected on the board page, as below:
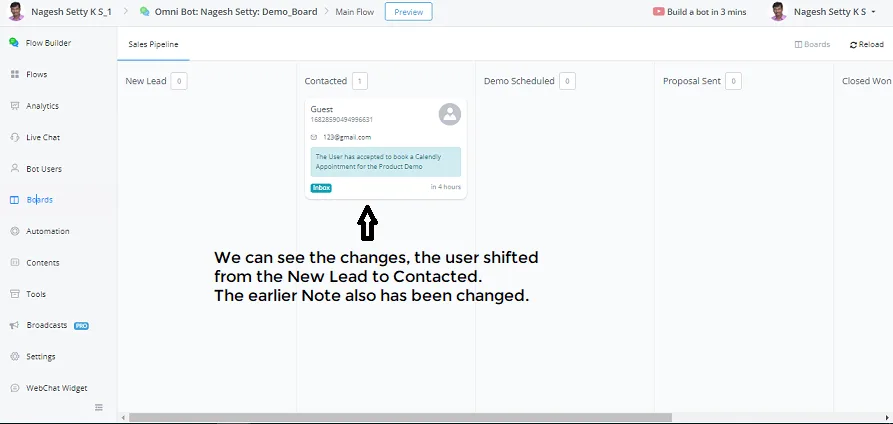
One last way to access the Kanban Boards feature is through the Contacts screen.
Let's see how to access the Kanban Boards feature from Contacts. Click Contacts and select the user for whom we need to access the feature.
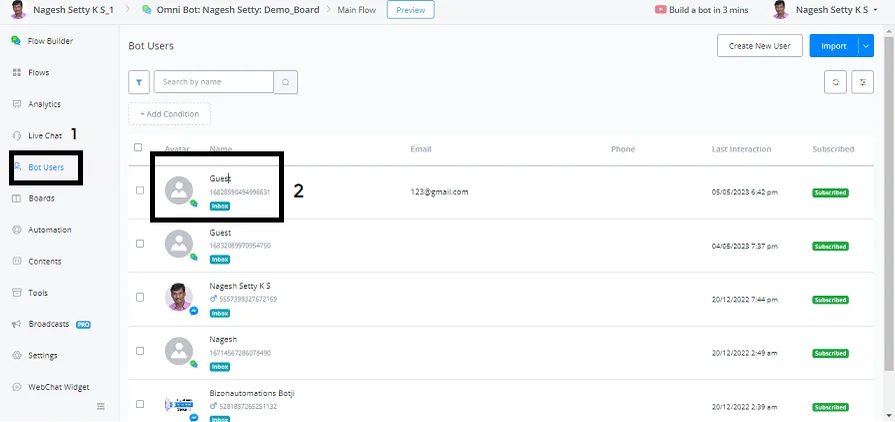
Click the boards pencil icon to access the boards feature for the selected contact.
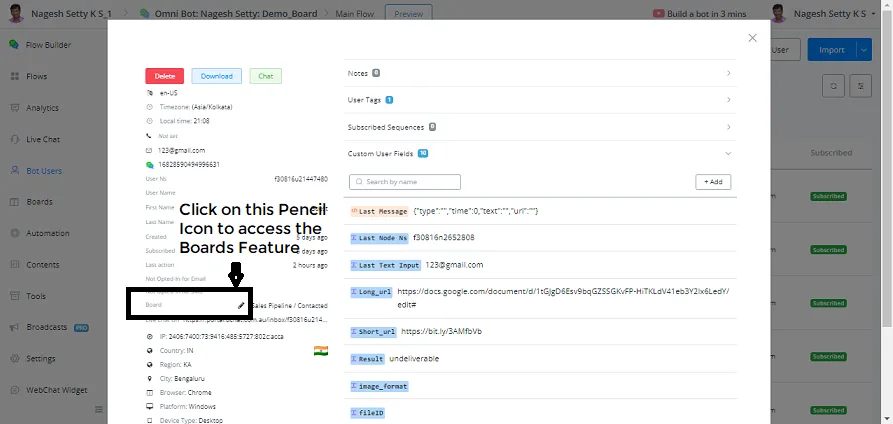
Now, in Contacts, you can do the Targeting of the Users and move them to the Kanban Boards function.
Let's see how to do this.
On the Contacts page, click the filter available in the top left corner. Add a condition to the users.
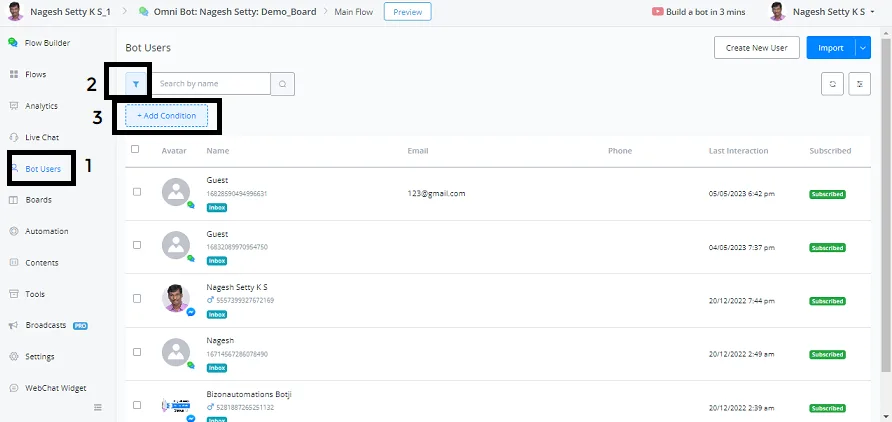
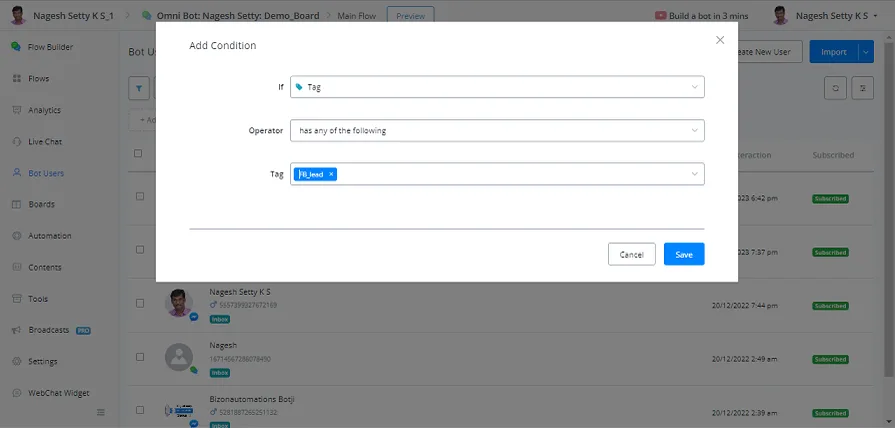
For example: the users who have the FB_leads Tag must be moved to the Kanban Boards.
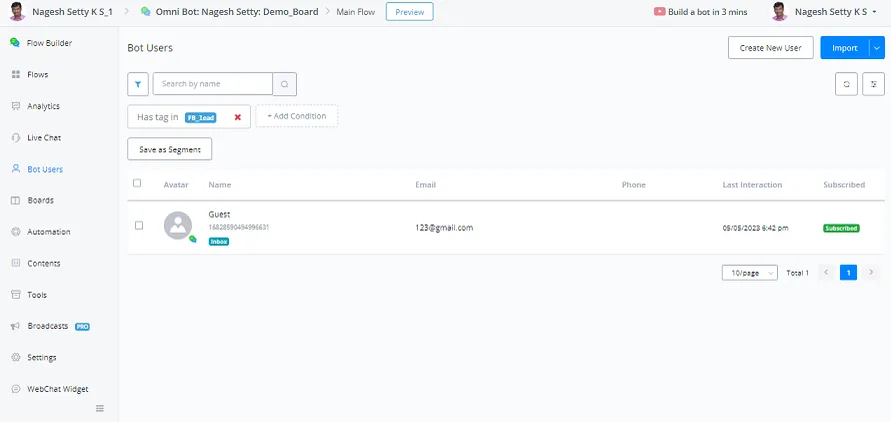
Now, on the Contacts page, we would see the users with the FB_lead tag
Now select the contacts by clicking the checkbox to their left.
Then click the Bulk Action button in the top right corner.
The list of actions will be displayed and, at the bottom, you will be able to see the function Move to Board.
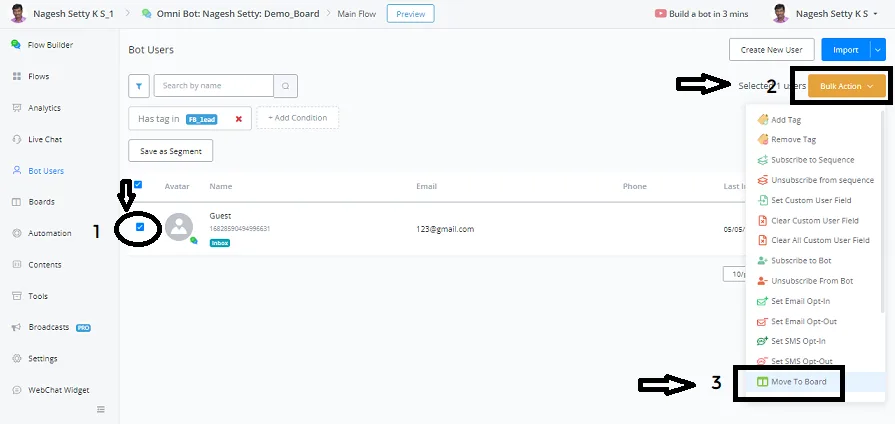
Now you can move the selected contacts to the desired Activity on the Board.
Basically, we use the Kanban Boards feature to create any kind of small CRM system inside NicoChat itself.
This way, you don't have to move or export the context to a CRM system like Hubspot. You can build your own sales pipeline yourself. You can create a new Board for scheduling systems.
In one workspace we can only have one Board. In that Board we can have a maximum of 20 Columns.