

Facebook Lead Generation
You must first connect your Facebook page inside NicoChat.
You must first connect your Facebook page inside NicoChat.
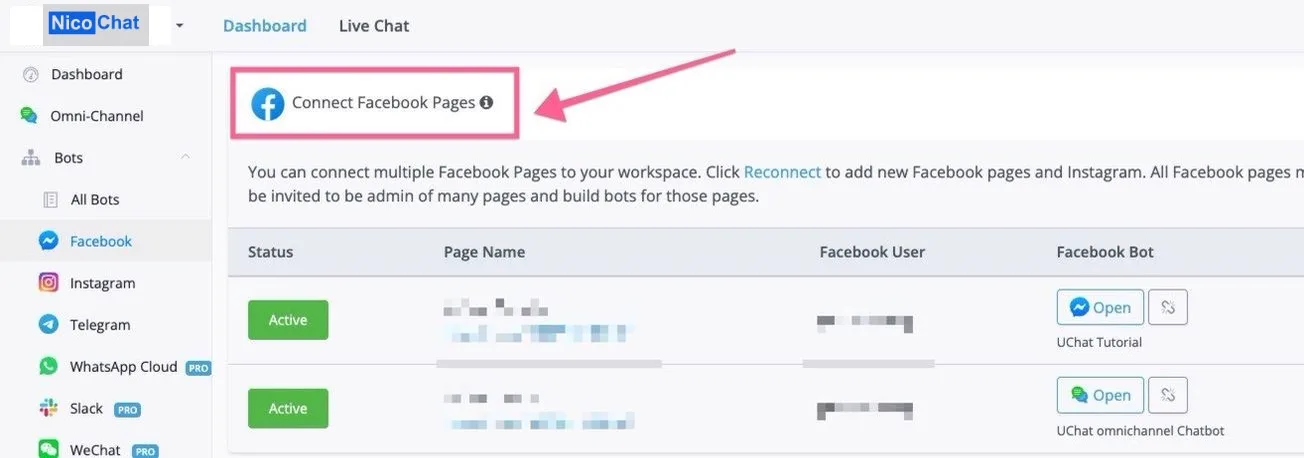
The same page the instant form is linked to.
The same Facebook page linked to the account where you plan to run ads.
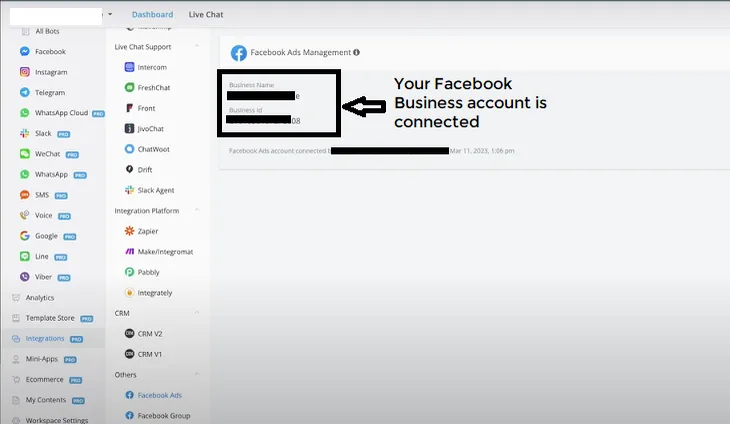
Integrations -> Others -> Facebook Ads
You need to connect your Facebook Ads business account here.
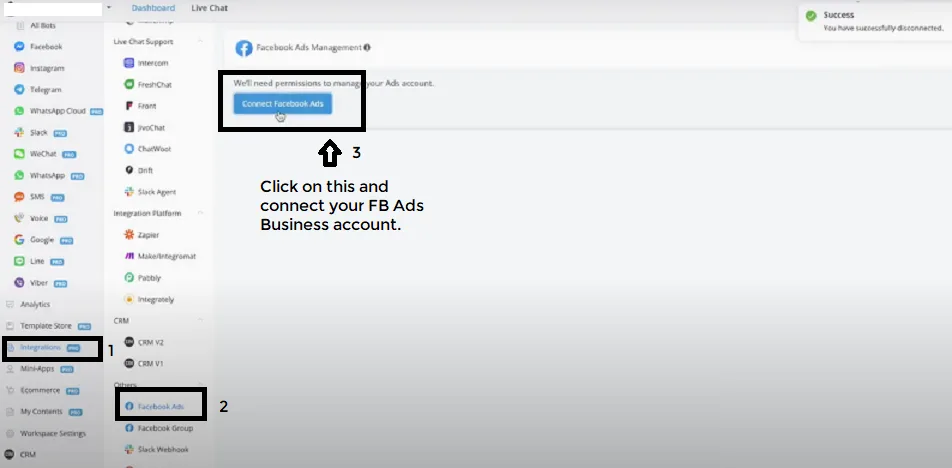
After clicking the button, you will be directed to the FB ad account integration page.
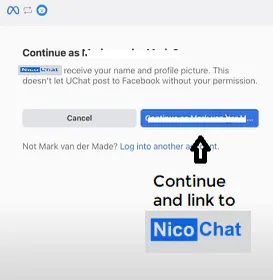
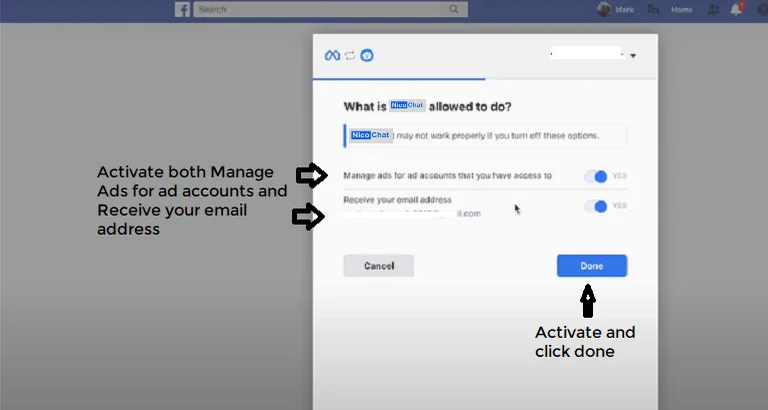
After continuing, another page will appear where you need to enable the items mentioned:
- Manage ads for ad accounts you have access to
- Receive your email address <<email address>>
After enabling, click Done.
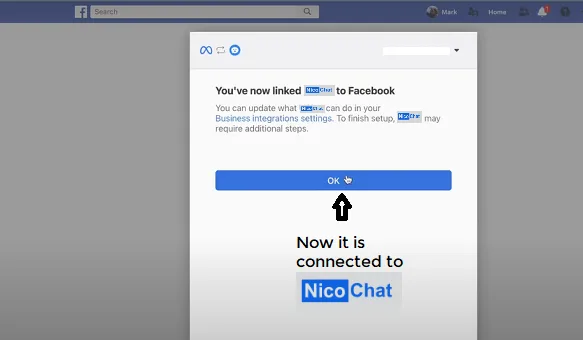
Back to NicoChat Integrations -> Others -> Facebook Ads 👍
You can see that your Facebook Ads business account is connected.
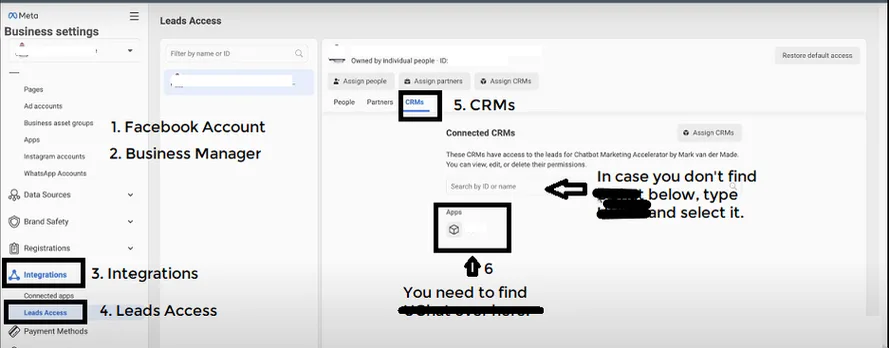
Next, we need to check whether NicoChat has been installed as your CRM system to receive the lead data.
Go to your Facebook account -> Business Manager -> Integrations -> Lead Access -> CRMs:
Here you must make sure NicoChat has been installed, so that it can receive all the lead generation data.
If it does not appear, type NicoChat in the search: you should be able to find it.
Connect your Facebook page inside the NicoChat platform.
Lead generation can only be received on the Facebook Messenger channel or on the Omni-Channel. These are the two channels where we can create this type of automation.
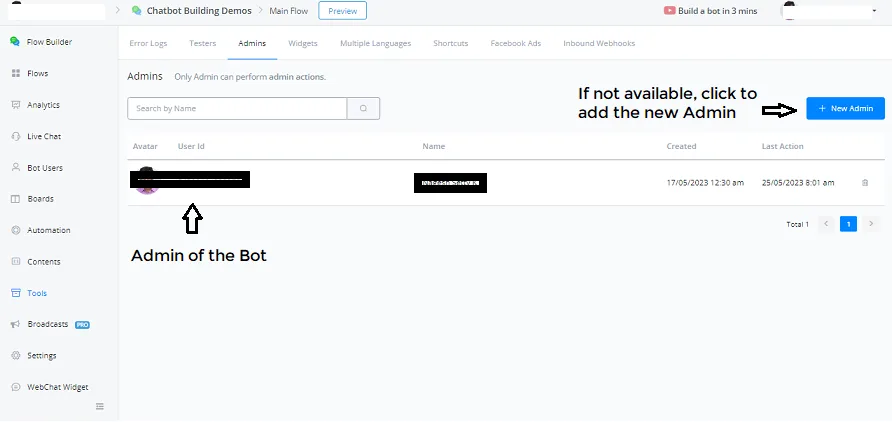
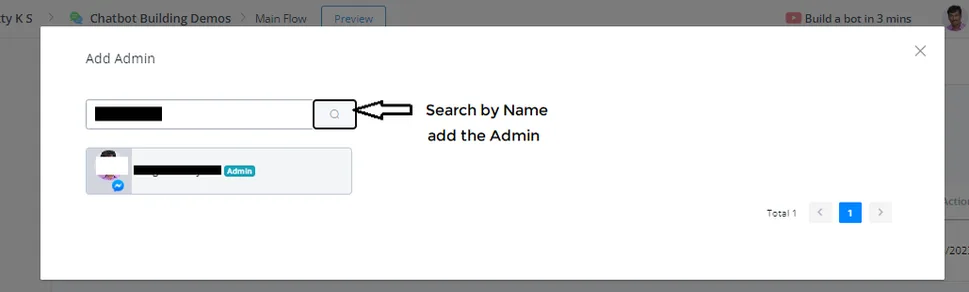
Inside the Chatbot -> Tools -> Admins
It is important that you set yourself as Administrator here, because all the lead generation information will go to that specific Administrator, where you will be able to set up the whole automation.
You can search for a new administrator by name in the contact list and select them.
To receive the lead generation data, you will only be able to use the Messenger profile or the Web Chat profile, according to your preference. Either profile needs to be an administrator of the chatbot.
Now you are ready to receive data from Meta when a new lead signs up through your instant forms.
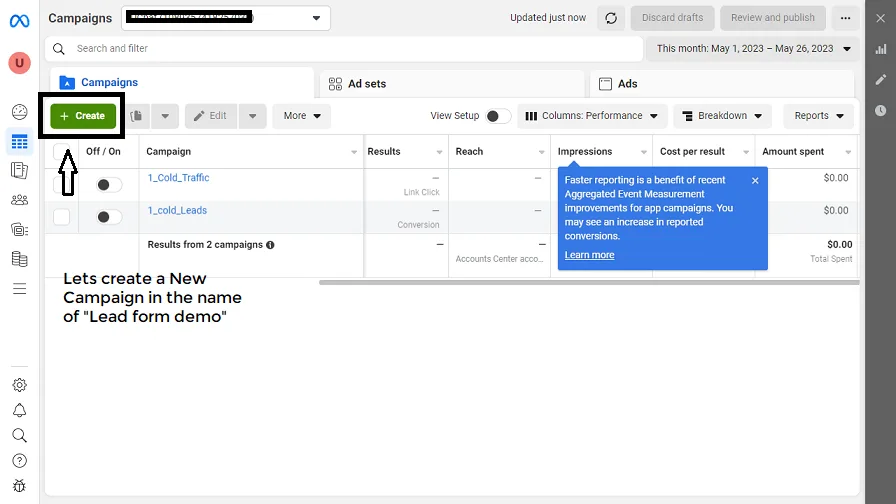
Open your Ads Manager account -> Create a new ad campaign
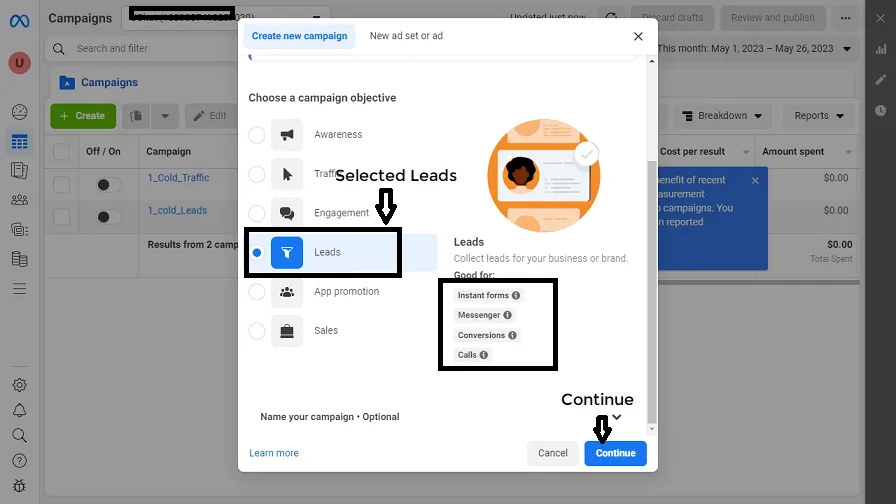
In Campaigns, Create a new campaign -> Choose “Leads” as your campaign objective.
Under Leads you can see:
- Instant Forms - Capture the data and send it to NicoChat.
- Messenger
- Conversions
- Carts
After choosing lead forms, click “Continue” to go to “Choose a campaign setup page”
Now select Manual leads campaign and press Continue.
.webp)
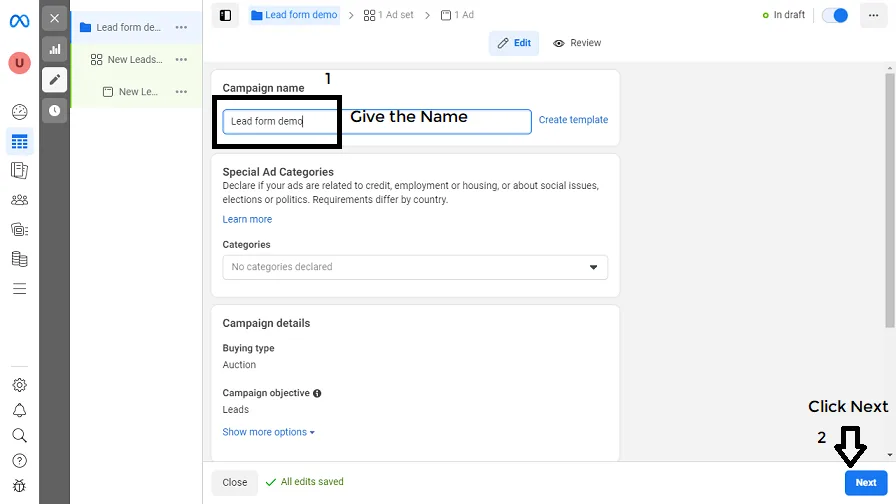
Now let's name the campaign “Lead form demo”.
Special ad categories: no change
Campaign details: no change
Campaign Advantage budget: off
Click the “Next” button to switch to the Ad set section.
The most important thing here is that you will create a FORM. We leave the Ad set section untouched and click the Next button to move on to the Ad section.
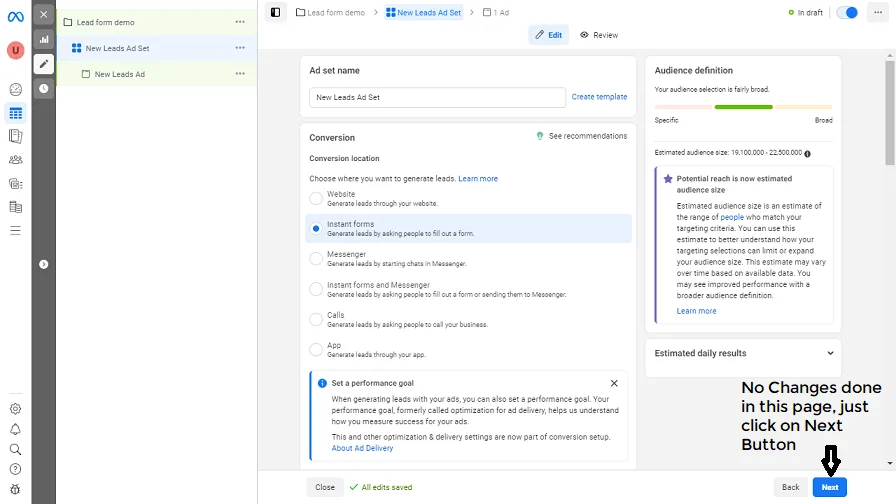
We need to scroll down to the form section called “Instant form”. Let's create a form by clicking “Create form”
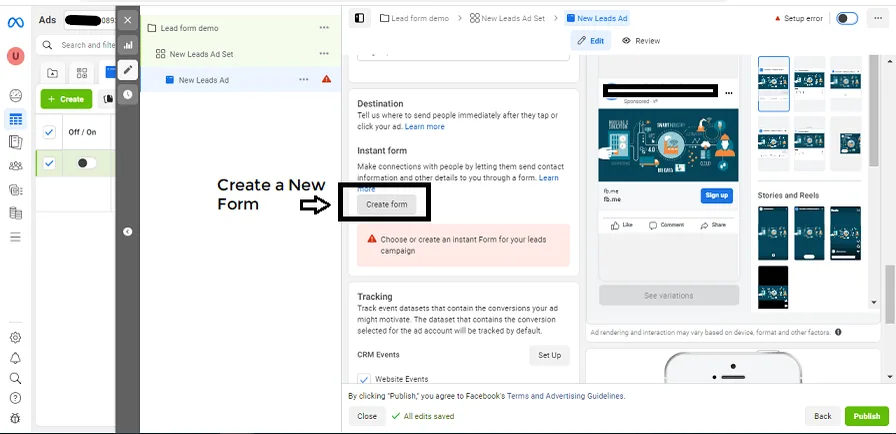
After clicking “Create form”, the following window will appear
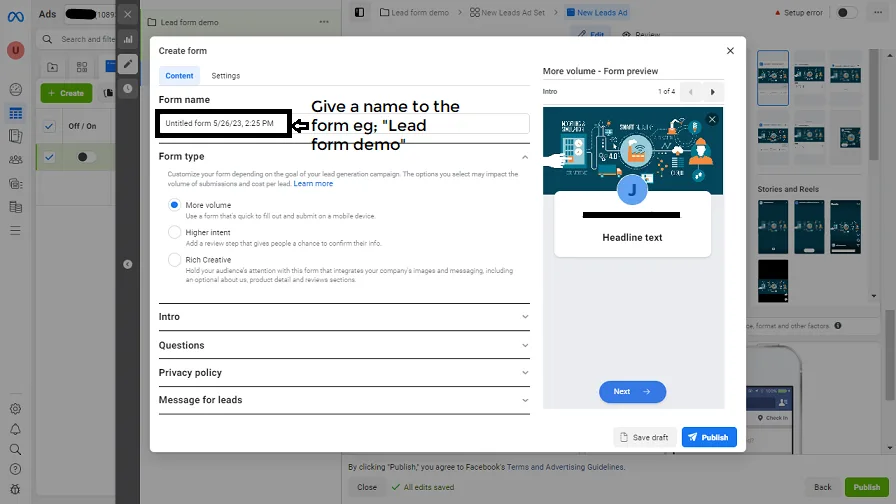
.webp)
Create form (Settings)
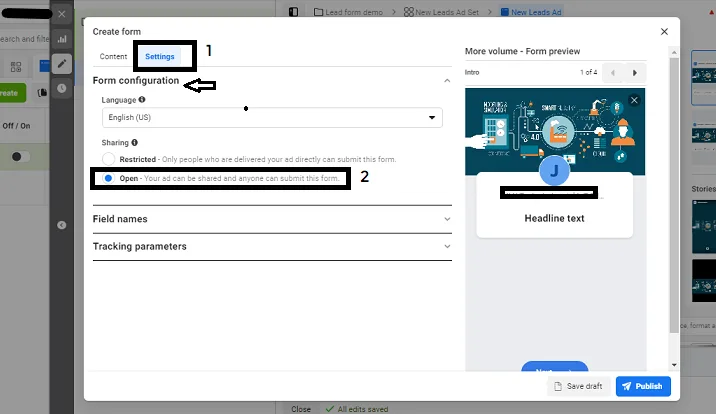
Field names: Email and Full name
.webp)
Tracking parameters: parameter name and parameter value.
.webp)
Create form (Content)
Just fill in your details below and I will send it to you.
.webp)
If you need an additional name, such as the company name, among others, you will need to add a new question.
- Multiple Choice
- Short answer
- Conditional
- Appointment scheduling
.webp)
Prefill questions: this is the data Meta already has. Users just check the prefilled data from the Facebook, WhatsApp or Instagram account and press OK
Description: We keep your data stored securely on our servers and will not share it with third parties.
Just fill in the questions beforehand and add contact fields, such as phone number, first name, last name and email address.
You can rearrange them in the order you need.
They will be filled in dynamically.
.webp)
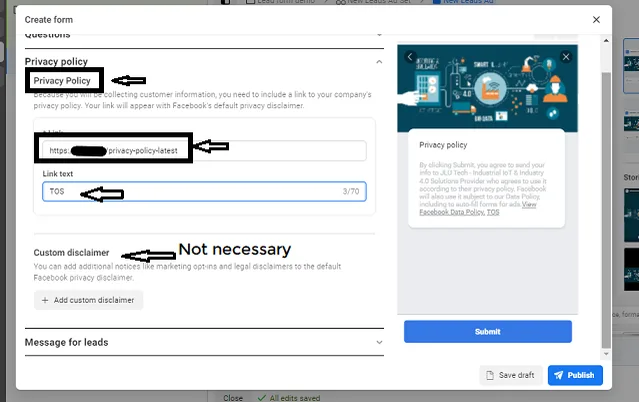
Privacy Policy: It is also important to add the Privacy Policy. You can link your website to any type of privacy policy. Add the link to your website page.
Link text: Terms of Service
Custom disclaimer: you can also add one or leave it as is.
Message for leads
- Headline: Thank you, you're all set.
- Description: You can visit our website or exit the form now.
- Call to action button: View website | Call business | View file
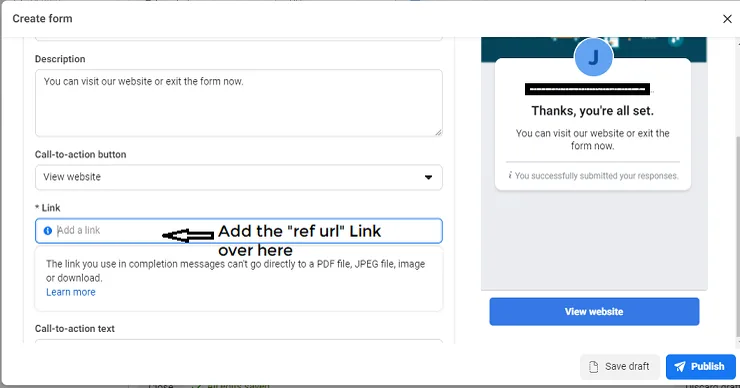
- Link: google.com/
.webp)
Now we have our form published, and you can already set up your own complete ad. Creating ads is not the main purpose of this document.
You should know how to set up your Facebook ads.
.webp)
To test the Lead Form, go to https://developers.facebook.com/tools/lead-ads-testing
.webp)
Note: you need to select the correct page.
Now all the lead forms you created will be displayed. You can preview the form by clicking the “Preview form” link: a window will appear showing your ad along with the created form.
.webp)
All the user data is filled in automatically, with nothing to type. Just go through the data shown in the form, check that it is correct and press the next button.
You can see all the user data, first name, last name, phone number and email in the form.
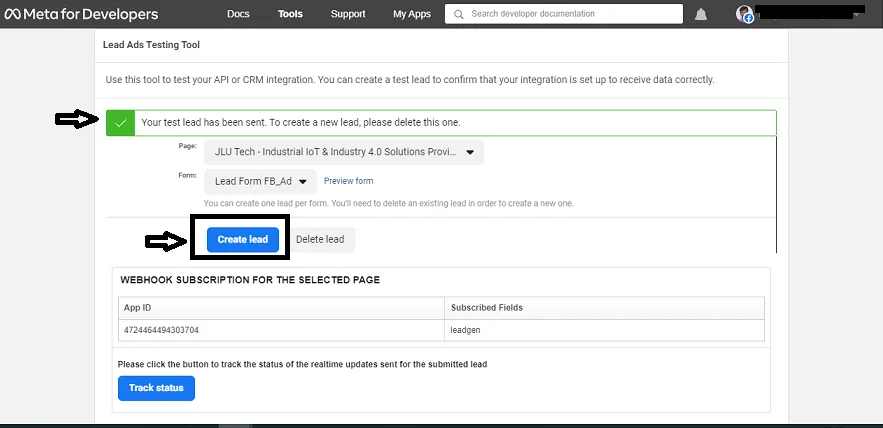
You can also create a lead directly by clicking “Create lead”, and the lead will be created. With that, we will be sending all the data to NicoChat, but first we need to set up the automation.
Let's create a SubFlow called “Facebook leadgen”
As before, we need to go to Automations and create triggers inside Automations.
Now we can create that trigger inside the flow builder.
Click the start node -> Add item -> Add Trigger -> Facebook Lead Generation and enable it.
.webp)
Here you can save the data we receive from Meta into custom fields.
- Webhook payload: </> fb_lead_gen_data (JSON variable)
- LeadGen ID: fb_leadgen_id (text variable)
- Lead form ID: fb_leadgen_form_id (text variable)
You can also apply filters, in case you want to exclude certain people from signing up through the Lead Form.
If you want to exclude them from the automation, that is also possible inside your chatbot in NicoChat.
You can add a Note to this trigger to give more context about what it does. Let's press Save.
Now we have the Facebook Lead Generation trigger enabled directly in this flow.
.webp)
Now we need to fetch the user details.
Review the preload data: use the Message Block to display the entire payload.
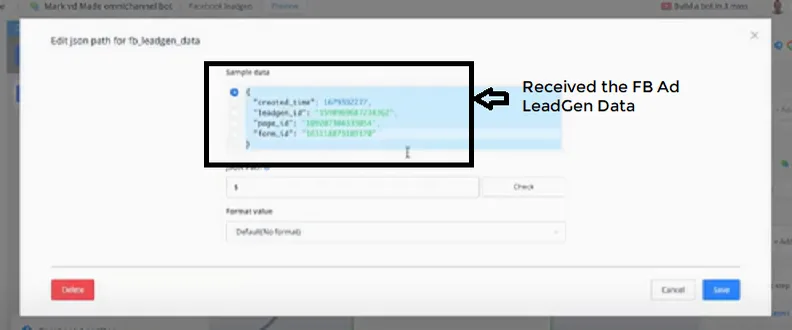
This is used to test the data, since we need to set up our automation to receive sample data.
As soon as I press the “Create lead” button on the FB page “developers.facebook.com/tools/leads-ads-form”, as shown before, the message “your test lead was sent. To create a new lead, delete this one.” appears
Let's check in the Facebook Messenger profile whether I received the payload.
I have just received the payload: inside LiveChat, you will see that we have the creation time, leadgen_id, page_id and form_id.
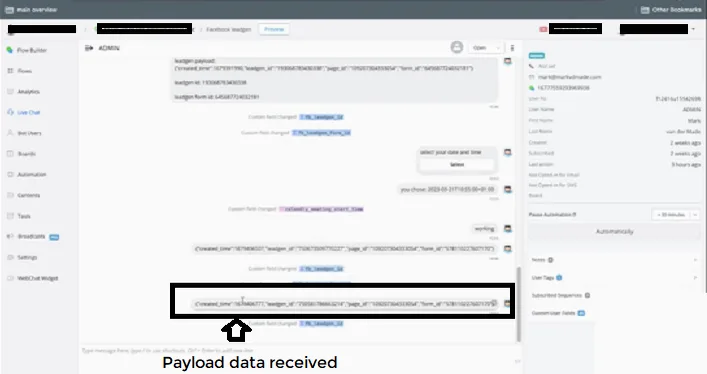
As an example, let's take the “leadgen_id” data
Inside NicoChat, let's remove the Message Block and continue with the API Action.
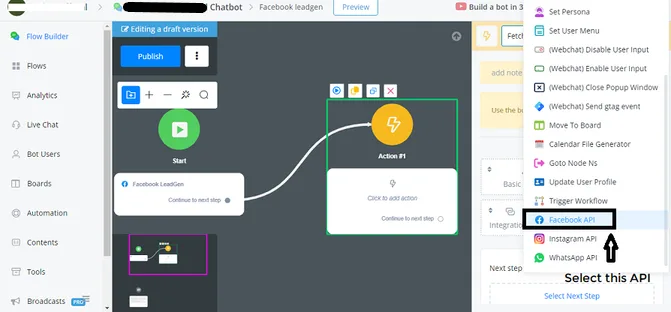
Let's select the Facebook API related to the “Get Lead Gen” action function.
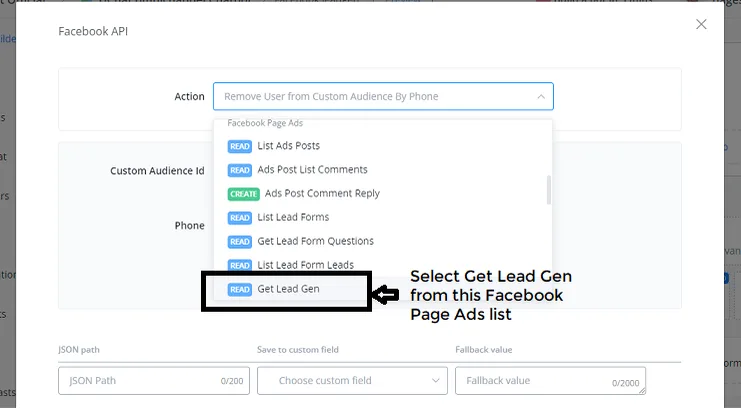
In Lead Gen, we need the lead gen ID, which we stored in the payload. Let's select the Custom Field “fb_leadgen_id” and paste the Test Value into it to create the “Test Request”
We received the complete lead generation data. Now let's map First Name, Last Name, Phone and email.
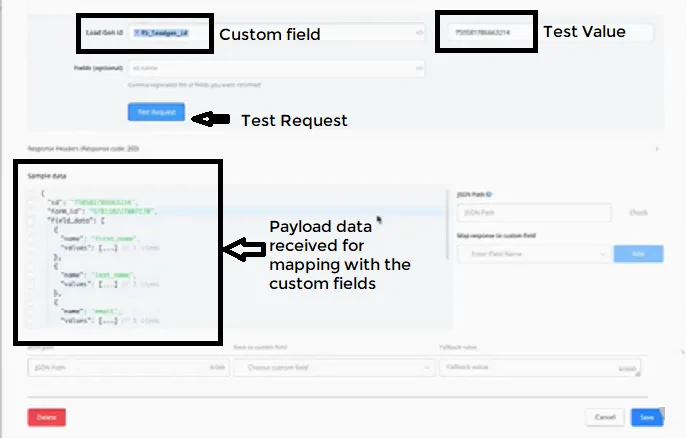
Let's map the necessary lead generation data:
- First Name: $.field_data[0].values[0] -> leadgen_first_name
- Last Name: $.field_data[1].values[0] -> leadgen_last_name
- Email: $.field_data[2].values[0] -> leadgen_email
- Phone number: $.field_data[3].values[0] -> leadgen_phone
In addition, if you want, you can save the creation time:
Creation time: $.created_time -> leadgen_time_stamp
All this data can be exported to a Google spreadsheet. This way, we can do many automations.
Modify the SubFlow in NicoChat for WhatsApp messages. As you saw before, we mapped everything correctly. Now we will see the template use case: sending a WhatsApp message directly to the new lead.
The way to do this is really very simple, as follows:
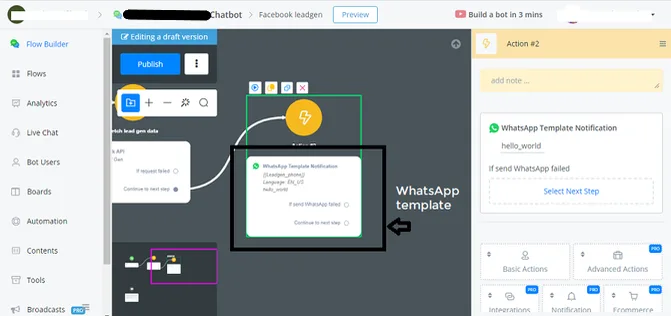
In the previous SubFlow called -> Facebook leadgen, we are adding the following blocks:
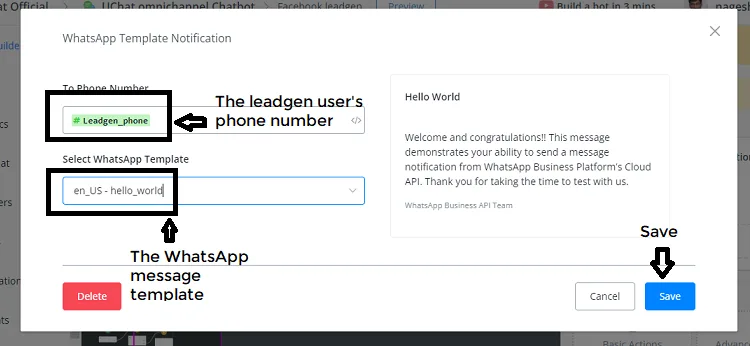
Action block -> Notifications -> WhatsApp template notification
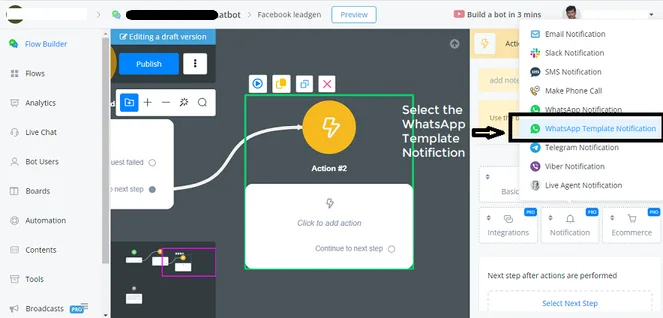
Now you can select the phone number you want to send to.
In our case, we stored that number in the Custom Field “Leadgen_phone”, with a number variable.
You can also select the WhatsApp message template. In the dropdown, you can choose any of the previously created WhatsApp templates.
In our case, let's select the WhatsApp message template “Hello World”.
You can also test receiving the WhatsApp template.
Let's create or modify the SubFlow created earlier to send the SMS during the LeadGen process.
Let's go with the same setup with a few adjustments.
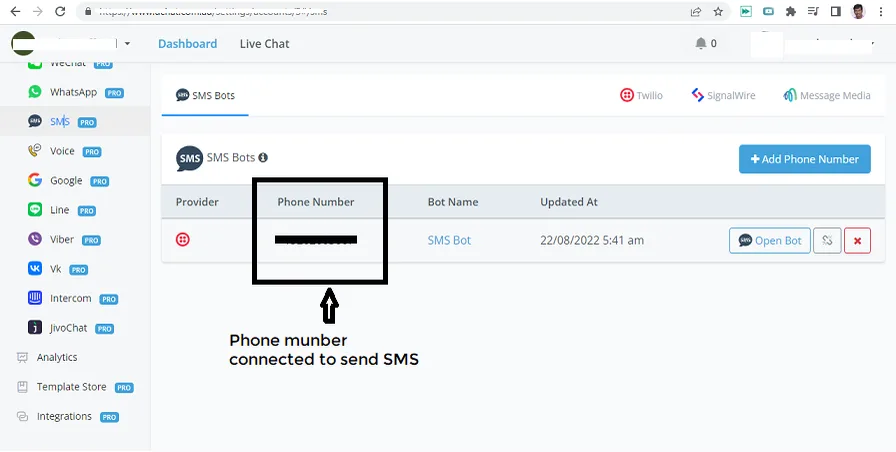
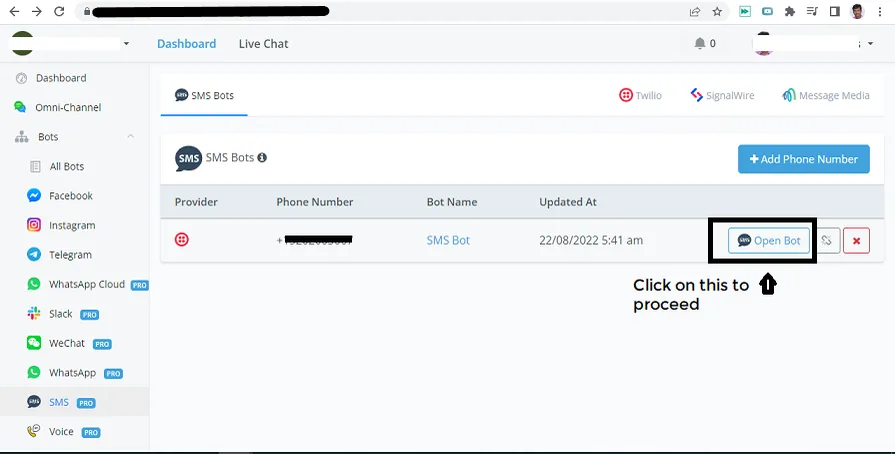
First, we need to make sure you have connected your phone number to your workspace in NicoChat.
The SMS Channel needs to have a phone number connected. In our case, we are connected to a Twilio account to send the SMS message. But you can also see other accounts, such as SignalWire and Message Media.
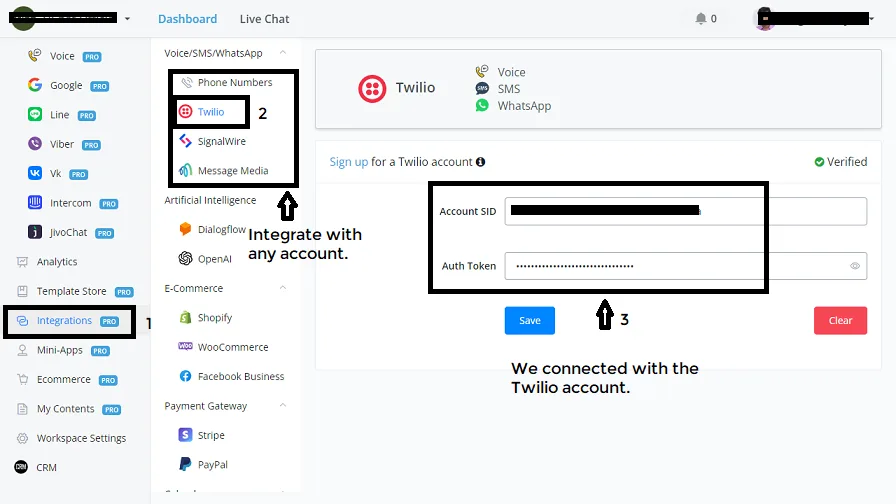
If you have any of these accounts, you will be able to create an SMS Bot. After setting up your SMS Bot, you can use the registered number in any of the chatbots to send an SMS directly to a user or, in this case, to a new lead.
Let's take a look at the flow. Starting from the previous feature, sending a WhatsApp message, we follow the same flow: we remove the action block tied to the WhatsApp message template and add an action block with SMS notification.
Action block -> Notifications -> SMS notifications
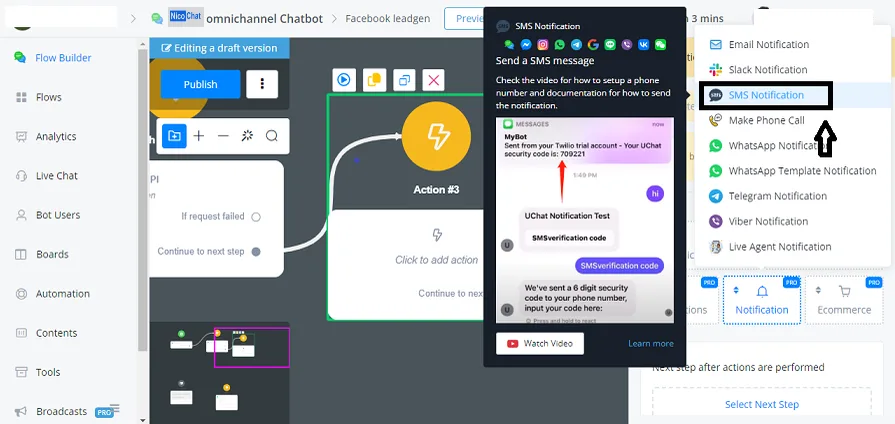
Let's edit the SMS Notification Action block by clicking “Edit Action”
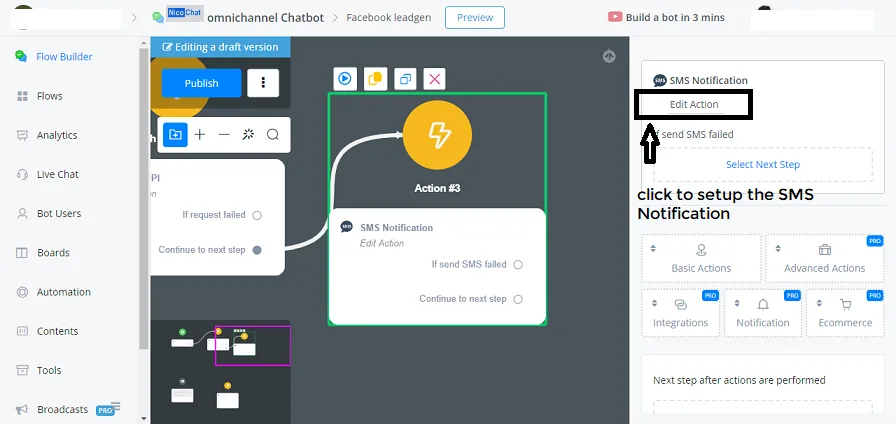
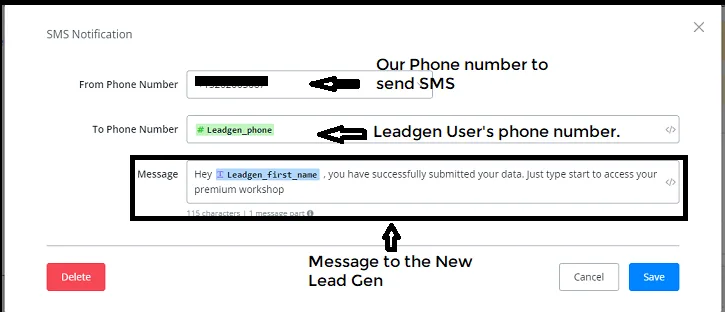
Now we need to set up the SMS notification to send the SMS directly to the lead generation phone number:
- From Phone Number: the registered phone number.
- To Phone Number: Leadgen_phone (the new lead's phone number)
- Message: Hi {{LeadGen_First_Name}}, you have successfully submitted your details. Just type start to access your premium workshop. (same as the WA message template)
Now, in the selected channel, you will be able to set up a flow for this. Let's go to the SMS Channel -> Open Bot.
Now let's set up the flow. Let's go to Automation -> Keywords -> New Keyword.
If the message contains one of the following keywords: start
State: Active
Hotword: selected
Trigger SubFlow: “Lead opt-in workshop”
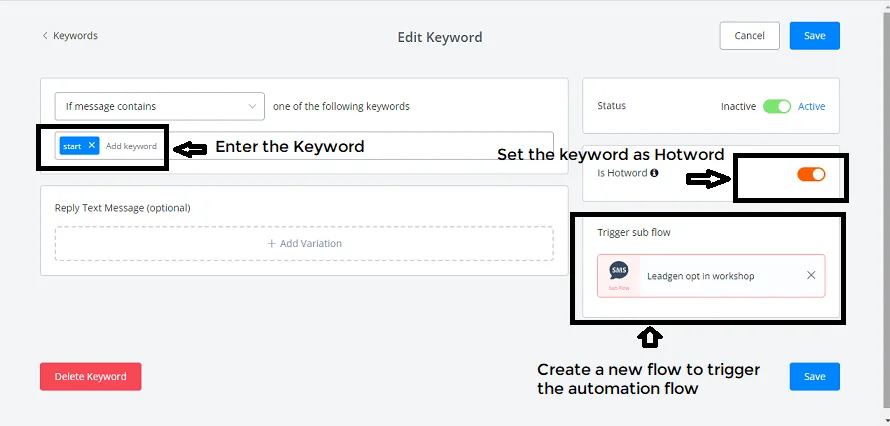
As soon as the Leadgen data arrives, we can use an SMS Notification to send the SMS to the user, and they can reply to that SMS.
From there, we will be able to trigger the “leadgen opt-in workshop” flow by setting up a keyword trigger.
As soon as the user types “start” or replies to the SMS, they automatically become a contact inside the SMS Bot.
It is that easy to send an SMS to a new Lead or also to an existing one.
Let's create a voice call for a new lead who signs up through your lead form in an FB ad, on Messenger, WhatsApp or Instagram, wherever it is being shown. As soon as they sign up, we can call them if we have their phone.
In this use case too, we use the same phone number as the SMS Bot.
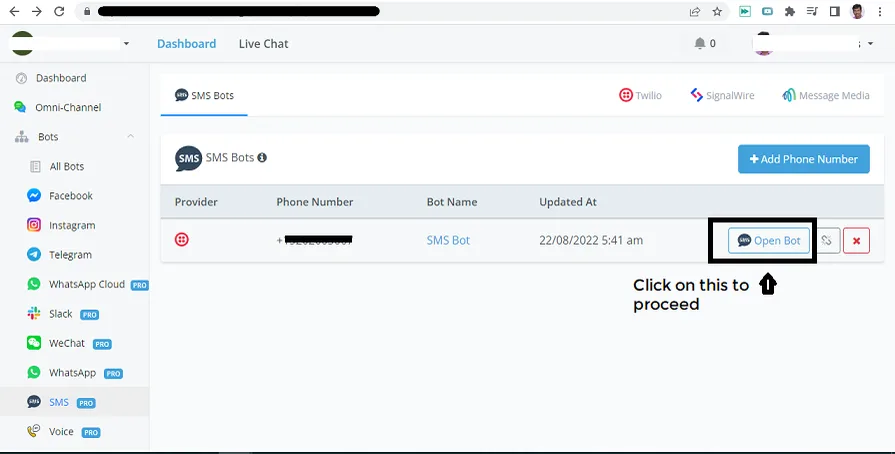
Let's go into the main flow. This voice call is always triggered from the main flow, but we need to know what type of message to send.
Action block -> Notifications -> Phone call.
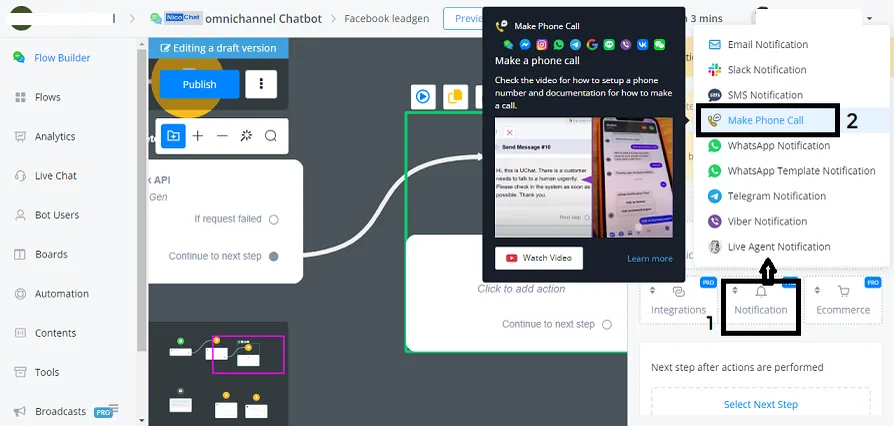
The Ref payload determines what type of message the voice call | Voice Bot will send to the user.
For example, if this is an ad for access to the Premium Workshop, let's say “adworkshop” - this will be the 'ref payload', which will be forwarded to the Voice Bot phone number.
From Phone Number: the phone number registered with the provider
To Phone Number: the leadgen phone number stored in the custom field
Ref payload: adworkshop
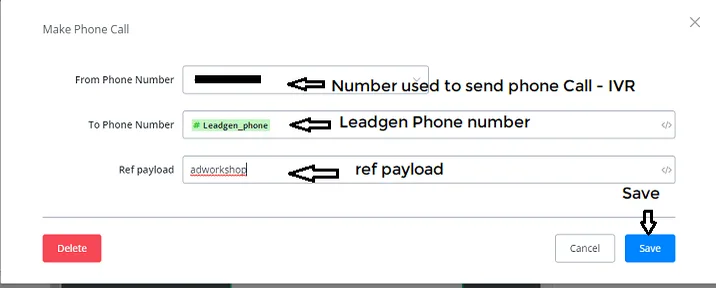
Now let's set up the automation on the Voice Bot side. Let's go to the Voice Bot main flow:
Now we need to determine what type of message to send. By default, whenever the Voice Bot is triggered, the main flow is activated.
From the main flow, you will be able to send the user to the different parts of your Voice Bot.
The trick is to determine the payload we saved in the action block of the previous flow.
In the main flow -> Start node
Save Ref payload in: (the custom variable of our preference) let's say “ref”
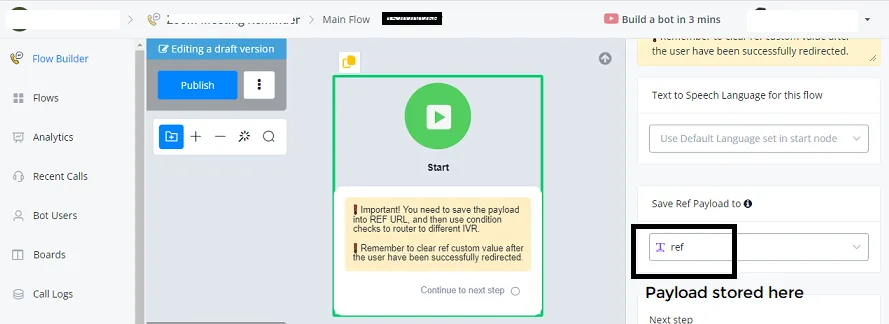
As soon as the user is called, this main flow will be activated. We will have received the “adworkshop” payload.
Now let's set up the automation based on that. We will add a Condition Block.
Condition Block -> if “ref” has any value
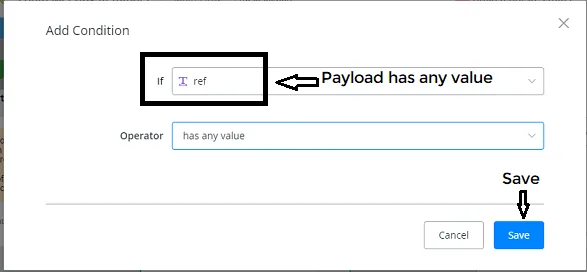
Next, we check what that value is with another condition. If there is no value at all, the flow just goes to the Voice Bot main menu overview, for example.
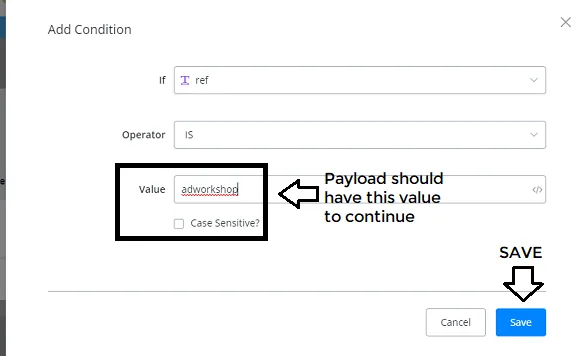
If the “ref” payload is “adworkshop”, we can set up a custom message.
Let's say:
“You have successfully submitted your details. Just type start to access your premium workshop”
Let's select Text and set “Text to Speech Language” to English (US). In fact, you can choose from several countries and several variables in the dropdown. Choose the one you prefer.
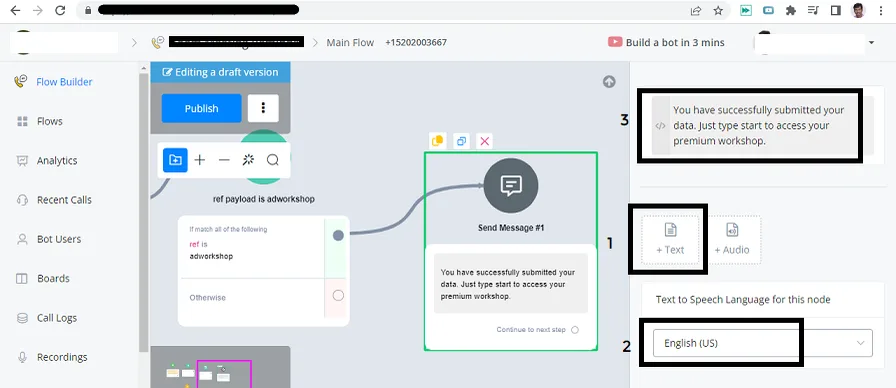
- Text selected
- Text to speech language: English (US)
- Message for the lead:
This is how you activate your Voice Bot in your IVR flow, so you can respond to any new lead that comes into your Omni-Channel chatbot.
Define what type of action you want to take after capturing the lead generation data.
At the end of the Lead Form, we have “Message for Leads”. You can customize this however you want.
Headline and description, and we also have a CTA.
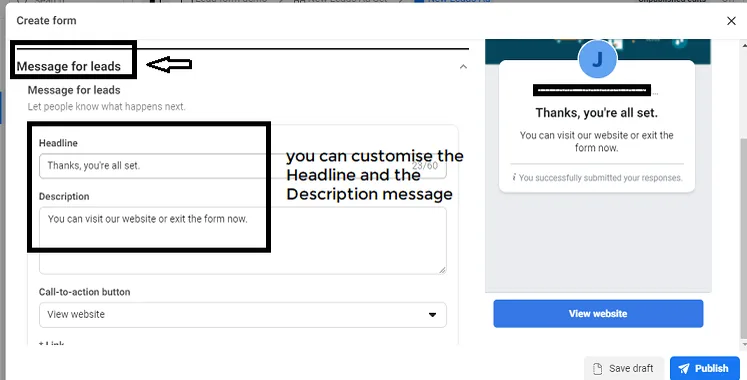
Call to action
- View website: “Selected”
- Call business
- View file
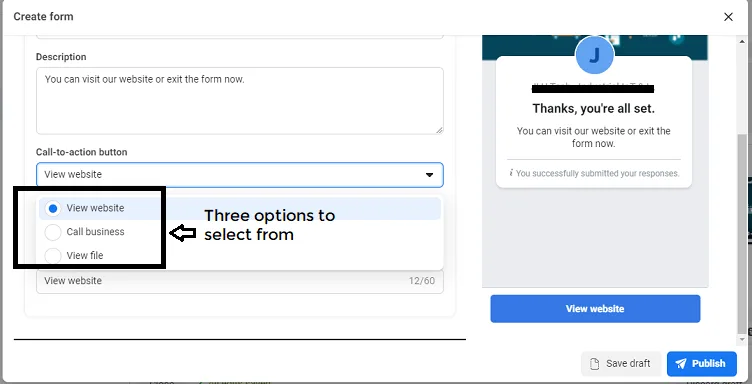
When we select View website, you can add a Ref URL under “Add a link”.
If you want, you can shorten this Ref URL with a link shortener.
This Ref URL can also contain various types of payload, which directly activate certain data inside your own chatbot.
Let's go to the Chatbot.
Tools -> URL triggers -> New Trigger. (Creating a new trigger)
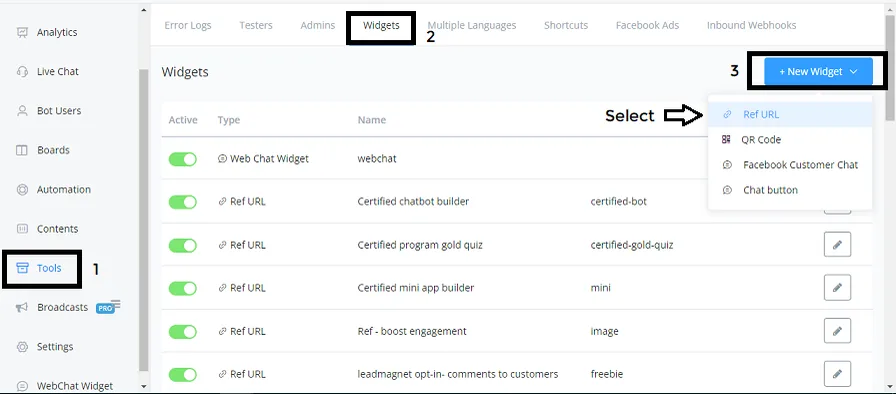
Let's create a new Ref URL trigger.
Name -> ad workshop refurl
Now let's save and edit this new “ad workshop refurl”
The big advantage of this Ref URL is that you can select the channel where you want users to subscribe.
You have different channels: Web | Facebook | WhatsApp | WhatsApp Cloud | Telegram | Line | Viber
- Name: ad workshop refurl
- Channel: Facebook.
- State: Active
- Opt-in Flow: lead generation follow-up
- Custom ref parameter: access-premium-workshop
- Save payload in the user's Custom Fields:
Payload: leadgen_ad_data
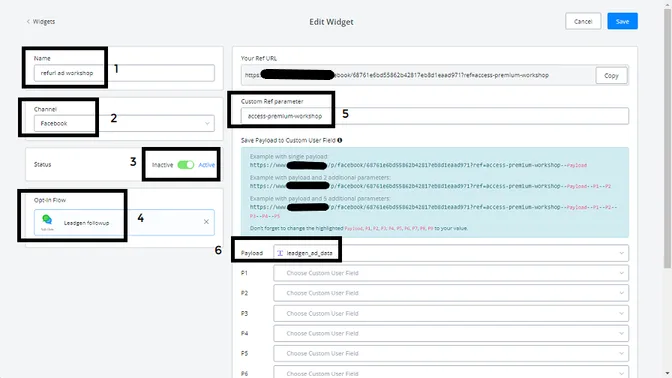
The payload is basically a value saved in the specific CUF you assign it to.
If you have this Ref URL, we can assign a payload, an additional data source, by adding two hyphens ( -- ) and then the payload data.
The additional payload can be something like “Add Workshop”, “Add One”, “Copy One”, etc.
You can add up to 10 different payloads, customize them and save them in your CUFs.
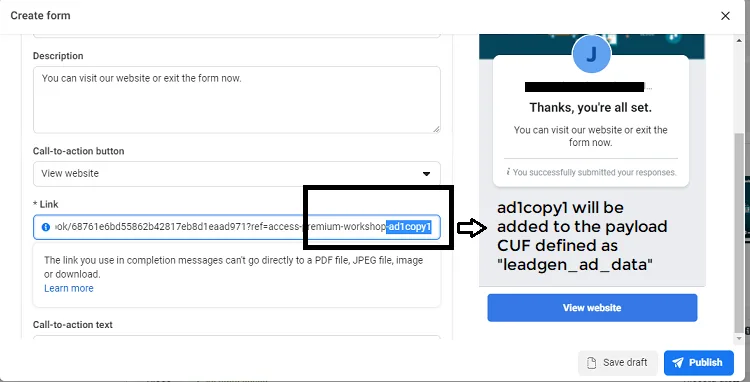
The value “ad1copy1” will then be stored in a CUF assigned in the payload list.
Let's name the CUF – “leadgen_ad_data”. This is the custom field that will store the value “ad1copy1”
In the ad text lead form -> Message for leads -> Call to action text -> “access workshop”
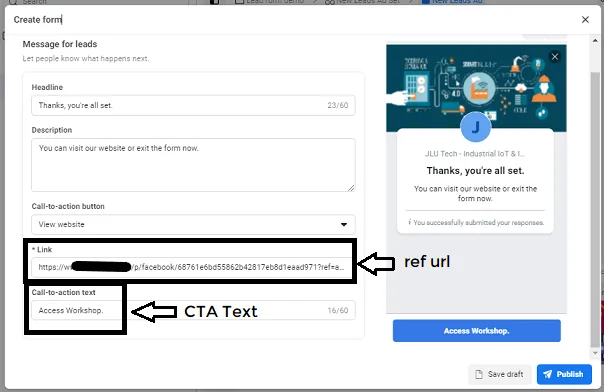
This is an additional method to take users directly back to your chatbot.
Instant forms let you set up all kinds of automation without having to resort to Zapier or Pabbly Connect to define those same types of automation.
You can easily create automations inside the NicoChat platform itself.
Review the preload data: use the Message Block to display the entire payload.
This is used to test the data, since we need to set up our automation to receive sample data.
As soon as I press the “Create lead” button on the FB page “developers.facebook.com/tools/leads-ads-form”, as shown before, the message “your test lead was sent. To create a new lead, delete this one.” appears
Let's check in the Facebook Messenger profile whether I received the payload.
I have just received the payload: inside LiveChat, you will see that we have the creation time, leadgen_id, page_id and form_id.
As an example, let's take the “leadgen_id” data
Inside NicoChat, let's remove the Message Block and continue with the API Action.
Let's select the Facebook API related to the “Get Lead Gen” action function.
In Lead Gen, we need the lead gen ID, which we stored in the payload. Let's select the Custom Field “fb_leadgen_id” and paste the Test Value into it to create the “Test Request”
We received the complete lead generation data. Now let's map First Name, Last Name, Phone and email.
Let's map the necessary lead generation data:
- First Name: $.field_data[0].values[0] -> leadgen_first_name
- Last Name: $.field_data[1].values[0] -> leadgen_last_name
- Email: $.field_data[2].values[0] -> leadgen_email
- Phone number: $.field_data[3].values[0] -> leadgen_phone
In addition, if you want, you can save the creation time:
Creation time: $.created_time -> leadgen_time_stamp
All this data can be exported to a Google spreadsheet. This way, we can do many automations.
Modify the SubFlow in NicoChat for WhatsApp messages. As you saw before, we mapped everything correctly. Now we will see the template use case: sending a WhatsApp message directly to the new lead.
The way to do this is really very simple, as follows:
In the previous SubFlow called -> Facebook leadgen, we are adding the following blocks:
Action block -> Notifications -> WhatsApp template notification
Now you can select the phone number you want to send to.
In our case, we stored that number in the Custom Field “Leadgen_phone”, with a number variable.
You can also select the WhatsApp message template. In the dropdown, you can choose any of the previously created WhatsApp templates.
In our case, let's select the WhatsApp message template “Hello World”.
You can also test receiving the WhatsApp template.
Let's create or modify the SubFlow created earlier to send the SMS during the LeadGen process.
Let's go with the same setup with a few adjustments.
First, we need to make sure you have connected your phone number to your workspace in NicoChat.
The SMS Channel needs to have a phone number connected. In our case, we are connected to a Twilio account to send the SMS message. But you can also see other accounts, such as SignalWire and Message Media.
If you have any of these accounts, you will be able to create an SMS Bot. After setting up your SMS Bot, you can use the registered number in any of the chatbots to send an SMS directly to a user or, in this case, to a new lead.
Let's take a look at the flow. Starting from the previous feature, sending a WhatsApp message, we follow the same flow: we remove the action block tied to the WhatsApp message template and add an action block with SMS notification.
Action block -> Notifications -> SMS notifications
Let's edit the SMS Notification Action block by clicking “Edit Action”
Now we need to set up the SMS notification to send the SMS directly to the lead generation phone number:
- From Phone Number: the registered phone number.
- To Phone Number: Leadgen_phone (the new lead's phone number)
- Message: Hi, {{Leadgen_first_name}}, you have successfully submitted your details. Just type start to access your premium workshop. (same as the WA message template)
Now, in the selected channel, you will be able to set up a flow for this. Let's go to the SMS Channel -> Open Bot.
Now let's set up the flow. Let's go to Automation -> Keywords -> New Keyword.
If the message contains one of the following keywords: start
State: Active
Hotword: selected
Trigger SubFlow: “Lead generation opt-in workshop”
Now we have successfully set up the automation.
As soon as the Leadgen data arrives, we can use an SMS Notification to send the SMS to the user, and they can reply to that SMS.
From there, we will be able to trigger the “leadgen opt-in workshop” flow by setting up a keyword trigger.
As soon as the user types “start” or replies to the SMS, they automatically become a contact inside the SMS Bot.
It is that easy to send an SMS to a new Lead or also to an existing one.
Let's create a voice call for a new lead who signs up through your lead form in an FB ad, on Messenger, WhatsApp or Instagram, wherever it is being shown. As soon as they sign up, we can call them if we have their phone.
In this use case too, we use the same phone number as the SMS Bot.
Let's go into the main flow. This voice call is always triggered from the main flow, but we need to know what type of message to send.
Action block -> Notifications -> Phone call.
The Ref payload determines what type of message the voice call | Voice Bot will send to the user.
For example, if this is an ad for access to the Premium Workshop, let's say “adworkshop” - this will be the 'ref payload', which will be forwarded to the Voice Bot phone number.
From Phone Number: the phone number registered with the provider
To Phone Number: the leadgen phone number stored in the custom field
Ref payload: adworkshop
Now let's set up the automation on the Voice Bot side. Let's go to the Voice Bot main flow:
Now we need to determine what type of message to send. By default, whenever the Voice Bot is triggered, the main flow is activated.
From the main flow, you will be able to send the user to the different parts of your Voice Bot.
The trick is to determine the payload we saved in the action block of the previous flow.
In the main flow -> Start node
Save Ref payload in: (the custom variable of our preference) let's say “ref”
As soon as the user is called, this main flow will be activated. We will have received the “adworkshop” payload.
Now let's set up the automation based on that. We will add a Condition Block.
Condition Block -> if “ref” has any value
Next, we check what that value is with another condition. If there is no value at all, the flow just goes to the Voice Bot main menu overview, for example.
If the “ref” payload is “adworkshop”, we can set up a custom message.
Let's say:
“You have successfully submitted your details. Just type start to access your premium workshop”
Let's select Text and set “Text to Speech Language” to English (US). In fact, you can choose from several countries and several variables in the dropdown. Choose the one you prefer.
- Text selected
- Text to speech language: English (US)
- Message for the lead:
This is how you activate your Voice Bot in your IVR flow, so you can respond to any new lead that comes into your Omni-Channel chatbot.
Define what type of action you want to take after capturing the lead generation data.
At the end of the Lead Form, we have “Message for Leads”. You can customize this however you want.
Headline and description, and we also have a CTA.
Call to action
- View website: “Selected”
- Call business
- View file
When we select View website, you can add a Ref URL under “Add a link”.
If you want, you can shorten this Ref URL with a link shortener.
This Ref URL can also contain various types of payload, which directly activate certain data inside your own chatbot.
Let's go to the Chatbot.
Tools -> URL triggers -> New Trigger. (Creating a new trigger)
Let's create a new Ref URL trigger.
Name -> ad workshop refurl
Now let's save and edit this new “ad workshop refurl”
The big advantage of this Ref URL is that you can select the channel where you want users to subscribe.
You have different channels: Web | Facebook | WhatsApp | WhatsApp Cloud | Telegram | Line | Viber
- Name: ad workshop refurl
- Channel: Facebook.
- State: Active
- Opt-in Flow: lead generation follow-up
- Custom ref parameter: access-premium-workshop
- Save payload in the user's Custom Fields:
Payload: leadgen_ad_data
The payload is basically a value saved in the specific CUF you assign it to.
If you have this Ref URL, we can assign a payload, an additional data source, by adding two hyphens ( -- ) and then the payload data.
The additional payload can be something like “Add Workshop”, “Add One”, “Copy One”, etc.
You can add up to 10 different payloads, customize them and save them in your CUFs.
The value “ad1copy1” will then be stored in a CUF assigned in the payload list.
Let's name the CUF – “leadgen_ad_data”. This is the custom field that will store the value “ad1copy1”
In the ad text lead form -> Message for leads -> Call to action text -> “access workshop”
This is an additional method to take users directly back to your chatbot.
Instant forms let you set up all kinds of automation without having to resort to Zapier or Pabbly Connect to define those same types of automation.
You can easily create automations inside the NicoChat platform itself.