

Question Block
YouTube video (embedding unavailable)
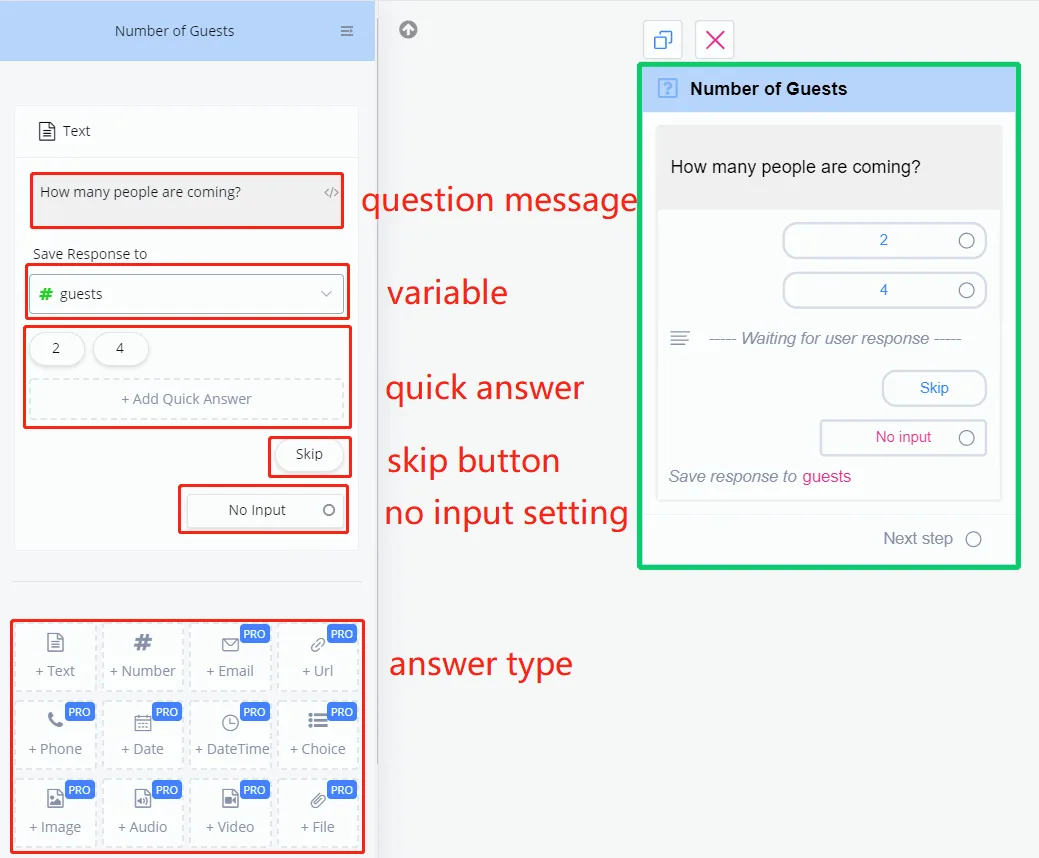
Quick replies are convenient: the user clicks instead of typing. When setting the quick reply:
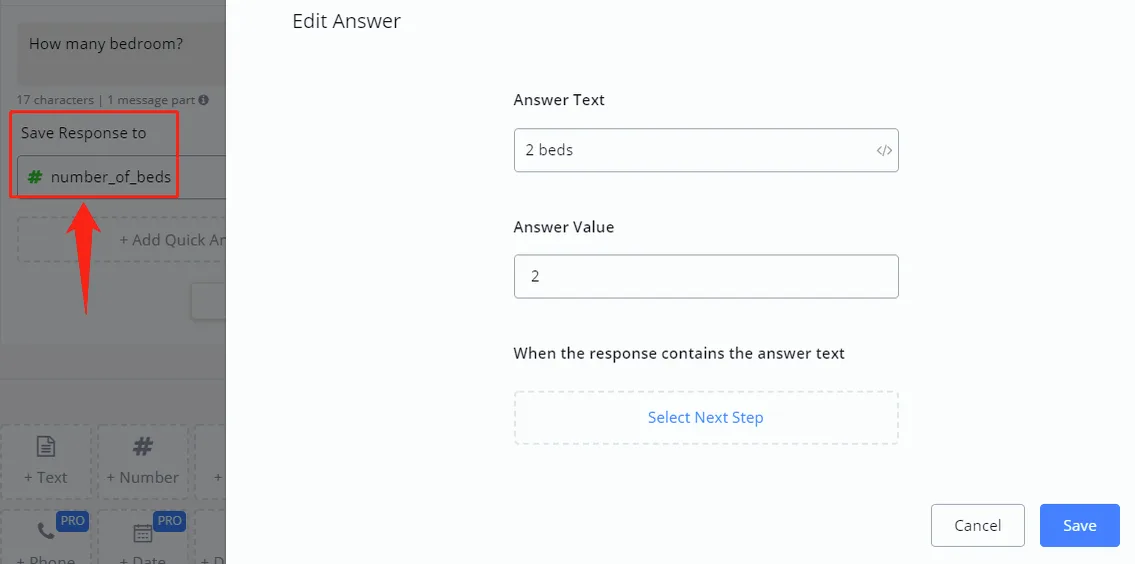
The "Answer Text" is shown to the user, and the "Answer Value" is saved to the variable.
In the question box, for example, write "reply 1 for service A, reply 2 for service B", etc. Then, in the quick reply, set the "Answer Text" to "1", "2", etc. for matching, and the "Answer Value" to "service A", "service B", etc. to save the user’s option.
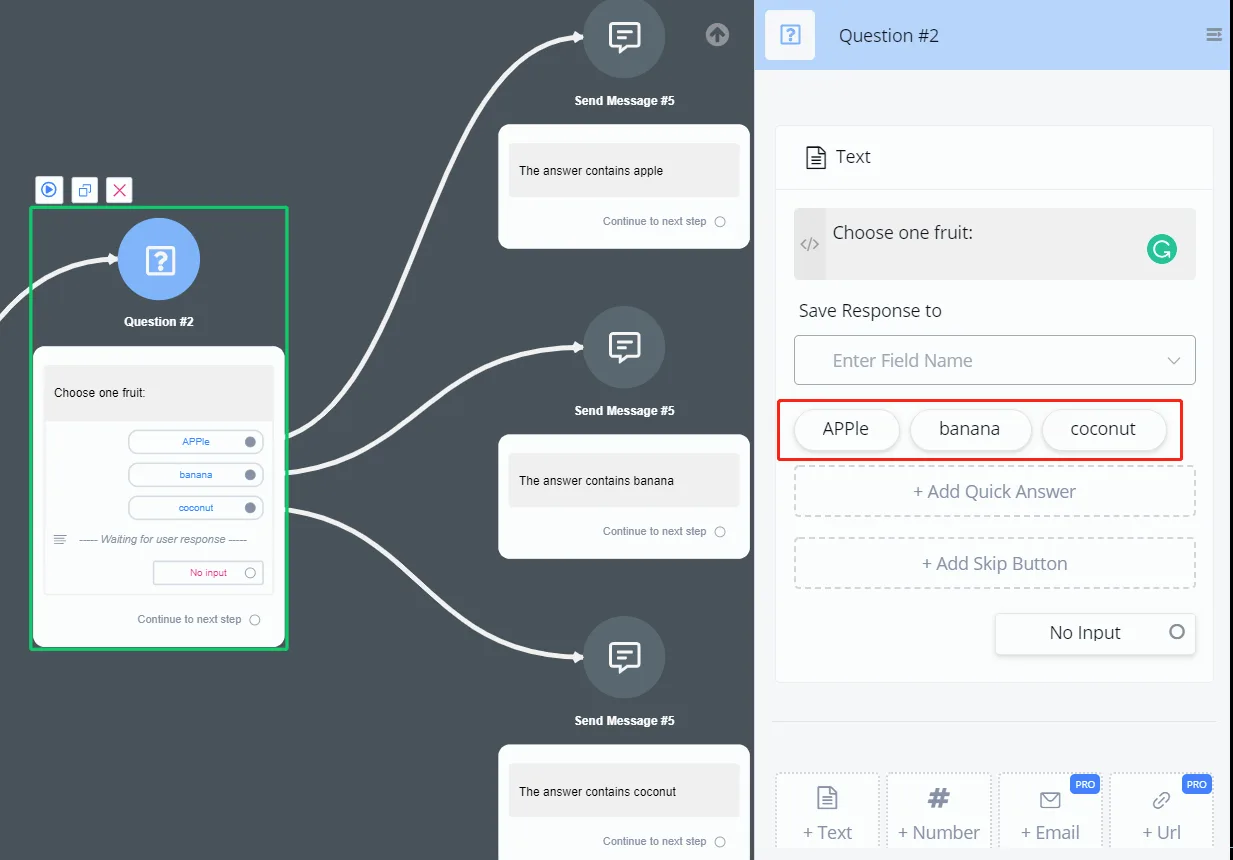
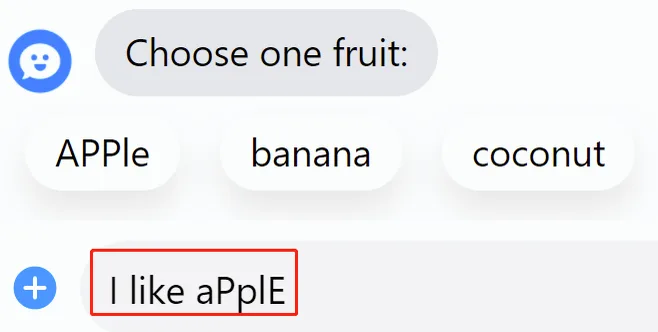
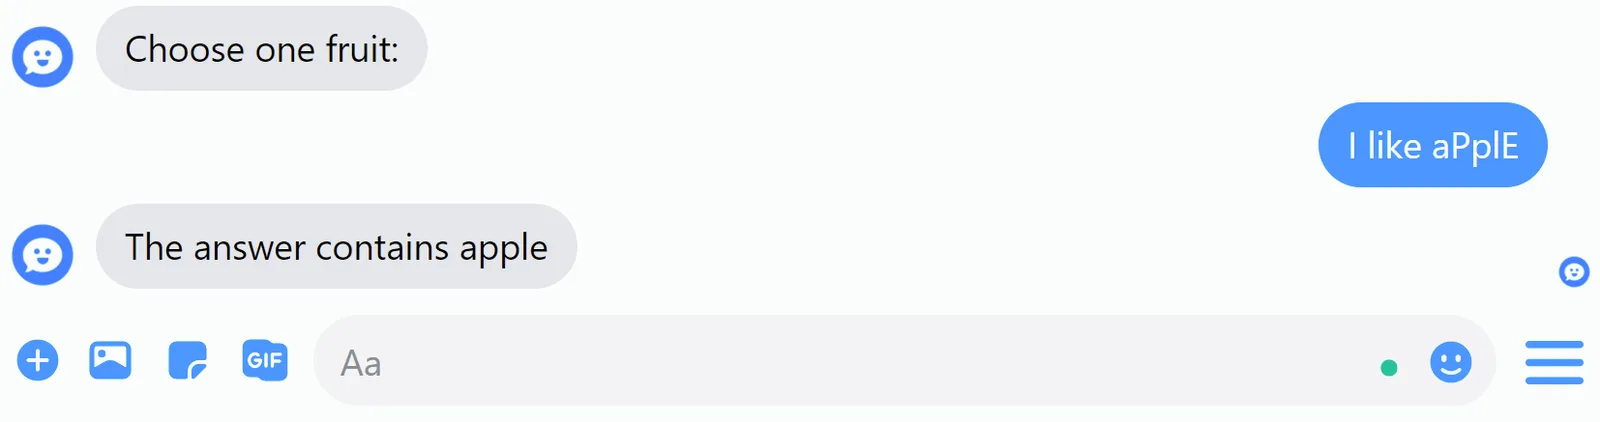
As soon as the user’s input contains one of the "Answer Texts", the quick reply is considered matched (not case-sensitive). The order of these quick replies also matters, because the flow checks them one by one, in order. As soon as a quick reply matches, the check stops.
Add the Skip Button if the question can be skipped. The button label is also editable.
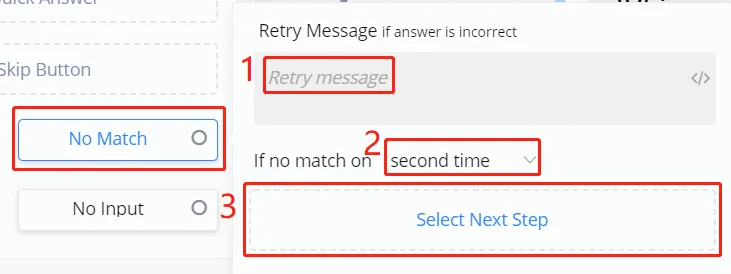
"Wrong Answer" is a very practical feature, because each answer type has its own pattern. An email address, for example, has to be “xxx@xx.xx”. You can use something like "Wrong email, try again" as the retry message and go to another step if there is no match after a few attempts.
However, the "xxx@xx.xx" format only filters out wrong emails, not fake emails. To check whether an email is real, use the NicoApp with a third-party verification tool.
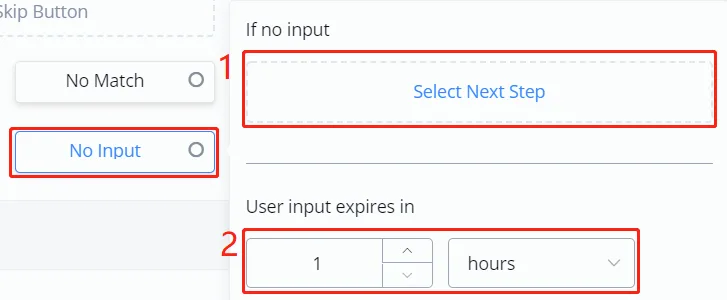
Similarly, "No Input" helps redirect the flow when the user’s input times out. By default, a question expires in 1 hour. Shorten this time if needed.
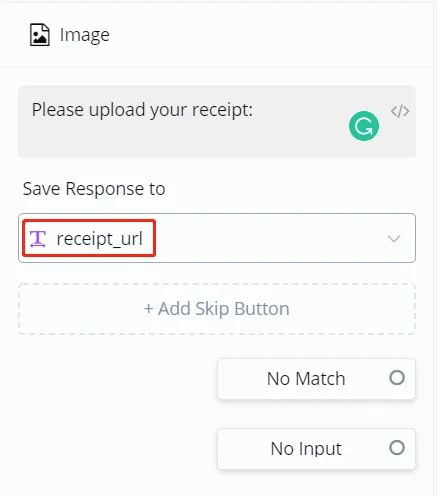
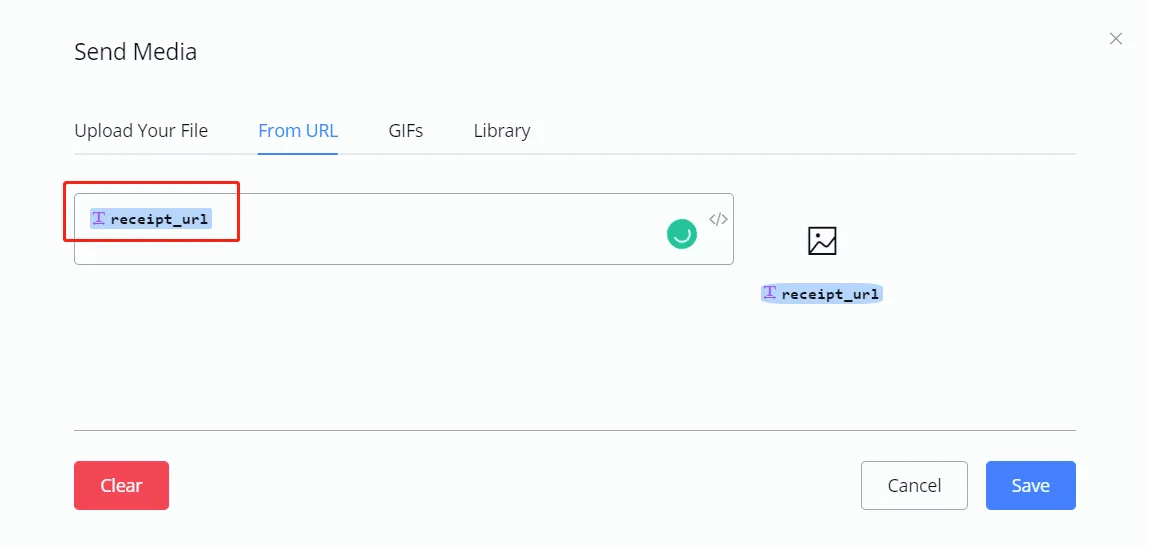
When the user sends a document, what is saved in the variable is a URL pointing to the document, not the document itself, because a media file can be very large. Later, if you want to send that document in the send message step, choose "Send Media from URL" and enter the variable there.
In this question type you list a limited set of quick replies, and the user can only choose one of them. When asking for the property type, for example, list only house, townhouse and apartment as quick replies. That way, if the user does not click one of these three, the retry message appears.
The basic validation of the phone number question is:
- only these 11 characters are accepted: 0, 1, 2, 3, 4, 5, 6, 7, 8, 9, +.
- the “+” sign is only accepted at the beginning of the phone number
- the value must have more than 6 characters
The basic validation of the email is:
- the value must have
@ - the value must have
.
This is the question format exclusive to the WhatsApp channel.
For now, it only works with on‑premise WhatsApp numbers.
When this question is triggered, WhatsApp requests access to the user’s current location; if the user shares the location, the latitude and longitude are saved in the user Custom Field you have defined.
Silent Input is a type of question node that captures several inputs from the user over a set period and then joins everything into a single response.
One characteristic that sets Silent Input apart from the other question nodes is that you do not have to ask the user a question to capture the answers.
The input collection duration can be adjusted in “Advanced Settings”.
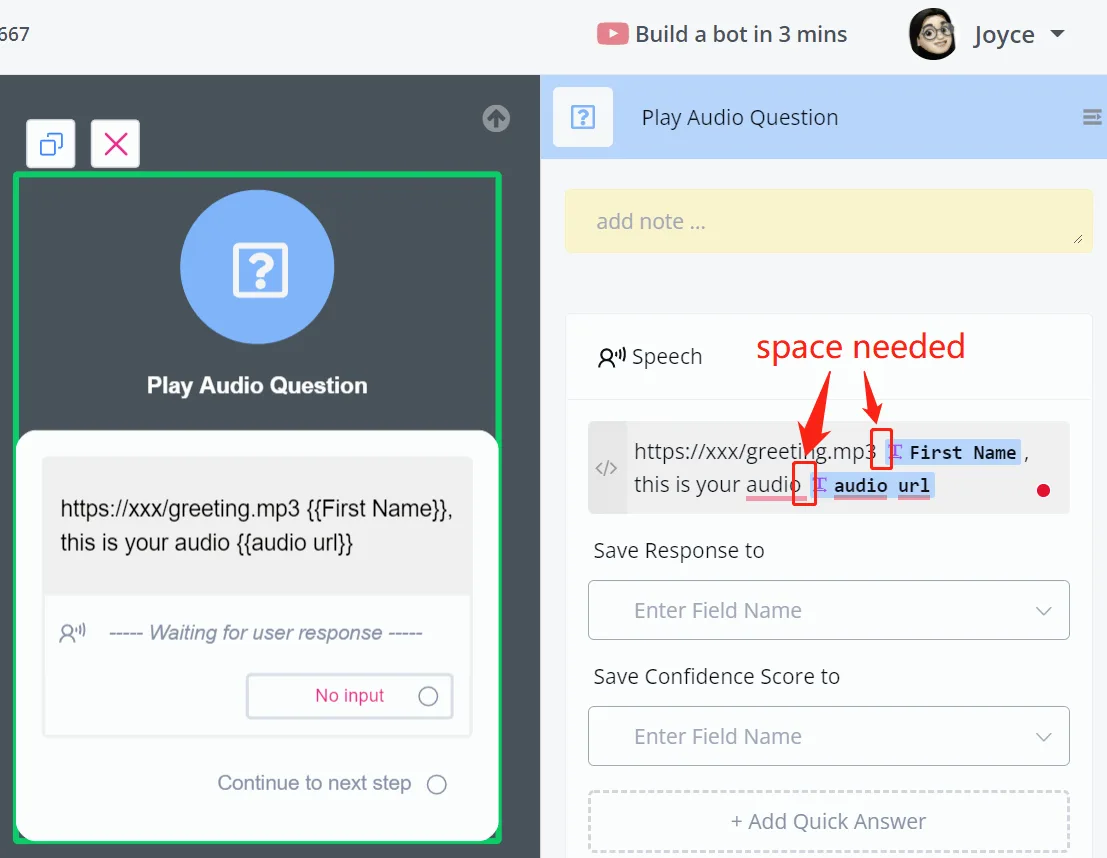
Speech is usually used to get short answers. When the flow asks for a speech input, it listens to what the user says and converts the speech into text, with a confidence score. The score is between 0 and 1. The closer to 1, the more reliable the speech analysis was.
Use the "Advanced Settings" to improve the conversion:
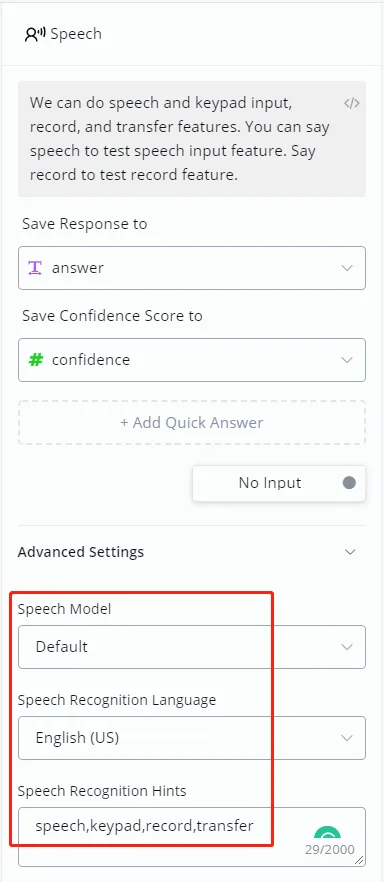
Select the matching speech model and language. The "Numbers and Commands" speech mode helps improve the recognition rate when the answer is a string of numbers, for example. Note that Twilio charges for the use of this mode. And, most importantly, give the flow some hints: keywords that may appear in the speech (separated by commas and with no space).
DTMF is the input from the phone keypad: the numbers 0 to 9, * and #. It is normally used to build the main menu of your Voice Bot, like those messages you have already heard: "Hello, press 1 for xxx, press 2 for xxx, ..."
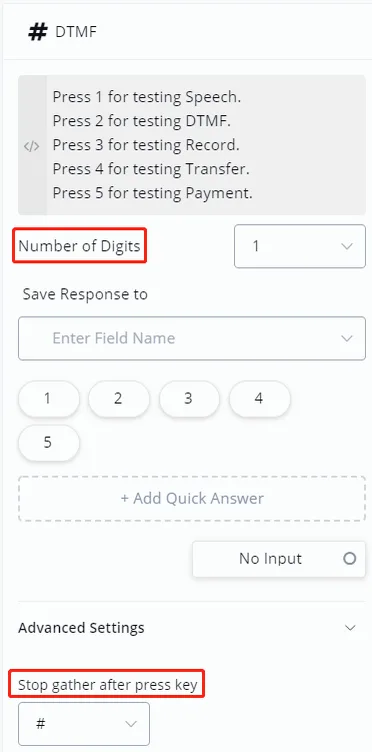
"Number of Digits" is the number of digits you expect to receive. A credit card number, for example, has 14 or 16 digits, while a postal code has 4 or 6.
The "Stop Key" is "#" by default, but it is also editable. You will need the "Stop Key" when you do not know how many digits to expect. Do not forget to mention the “Stop Key” in the question box. 🤖🤖
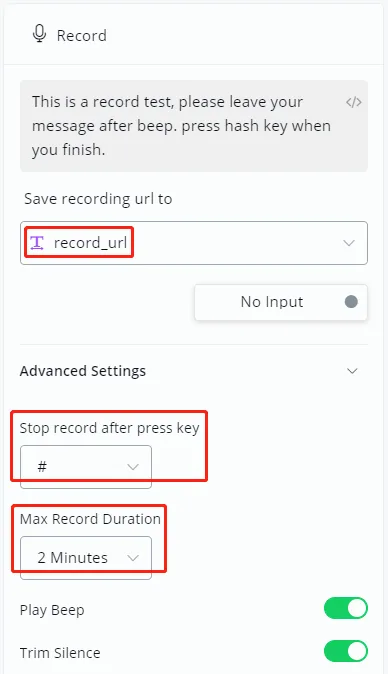
Just as when asking for an image, audio, video or file, here you also need a text variable to save the URL of the recording file. See the Advanced Settings for more details, such as "Stop Key" and "Max Recording Duration".
You can access the recording file through the URL or manually, in the "Recordings" section shown below:
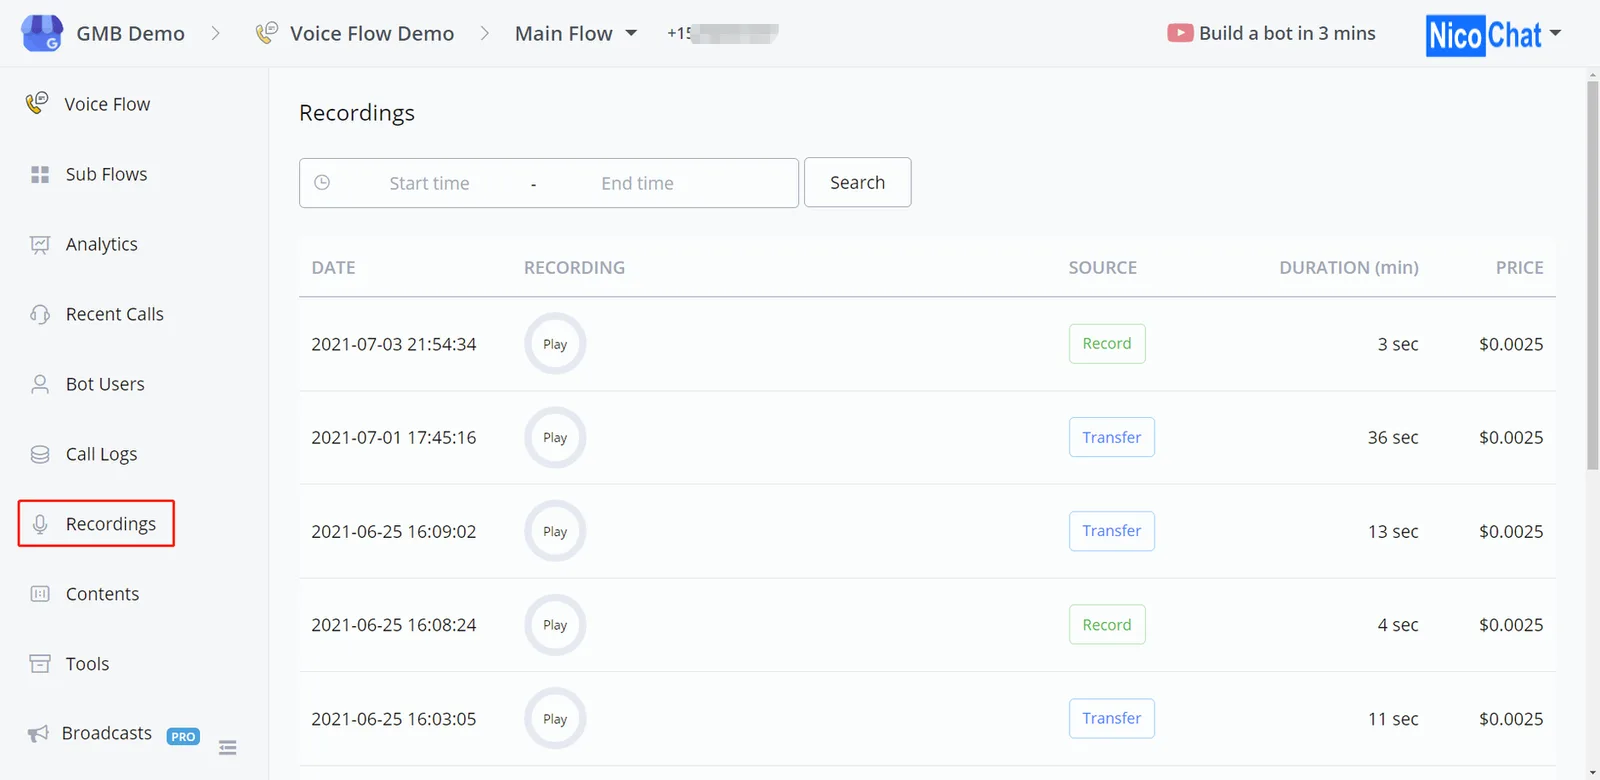
Here you see all the recordings from "Record Question" and "Transfer", with a "Play" button to listen to the audio.
Transfer works more like an action than a question. Since the actions of the Action step are shared by all channels, we placed transfers in the Question steps.
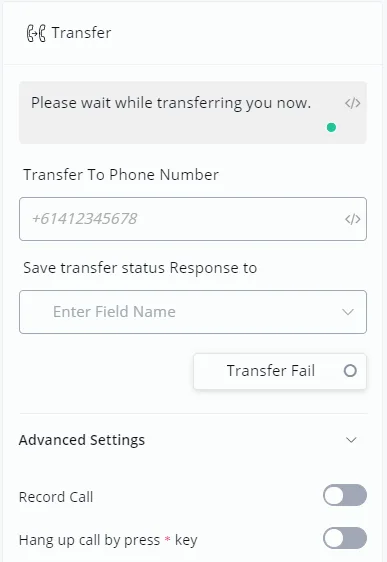
You can record the conversation after the transfer, for training, for example. The recording is also kept in the "Recordings" section, in the left sidebar.
Worth mentioning: if your clients need to come back to the flow after the transferred conversation, there are 2 ways to do this:
- the transferred party hangs up first
- your clients press the star key (the option must be enabled in the Advanced Settings)
Either way, do not forget to warn your clients before the transfer.
Add an extension to a phone number using the "#" sign. For example: +553188887777#wwww1234. Each "w" waits half a second.
Say I have a Voice Bot on the number +553188887777 and I have placed a DTMF question right after the start point of the main flow. The extension "1234" will be considered the input of that DTMF question. This is how you route calls automatically.
You can put several numbers in the "Transfer To Phone Number" field, separated ONLY by commas. For example: +553188887777,+553188887778#wwww1234,+553188887779
The flow calls these 3 numbers at the same time; the first person to answer receives the transfer, and the other numbers stop ringing. Your telephony provider charges for a single call, because only one number was transferred successfully.
Payment works more like an action than a question.
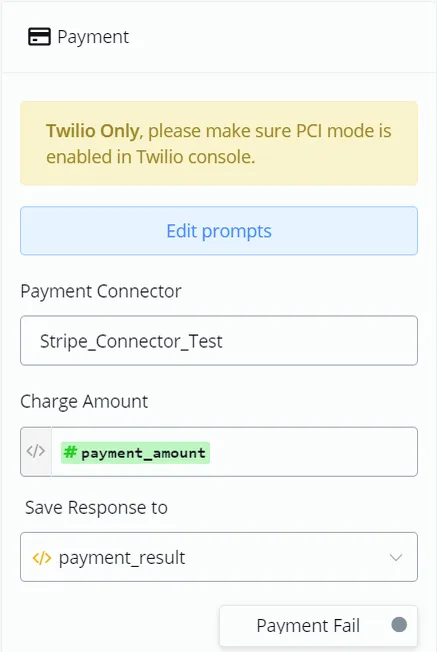
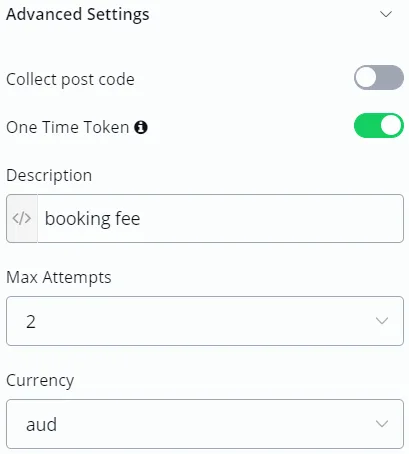
If you use Twilio, you will need to enable PCI mode in your Twilio account to capture a payment, both in test mode and in production.
Search for "Voice Settings" in your account,
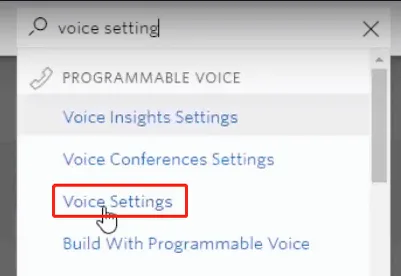
click the "Enable" button:
.webp)
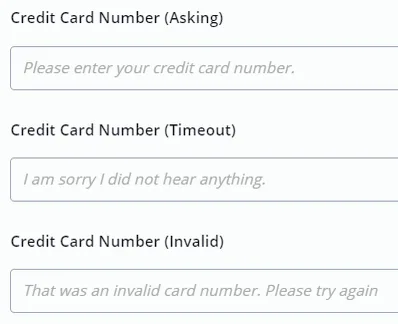
All prompts come already set in English. Feel free to change them if you need to — to switch language, for example. There are 4 pieces of information to collect from a card.
- Credit card number
- expiration date
- CVV
- postal code (if needed, enable the option in the Advanced Settings).
Each piece of information has 3 speeches to configure: the question, the timeout and the invalid value:
To get a "Payment Connector", which is a "Unique connector ID", you need to access your phone number provider and your payment service provider. With Twilio and Stripe, for example, go to twilio.com and follow steps 1 to 4 in the 2 images below:
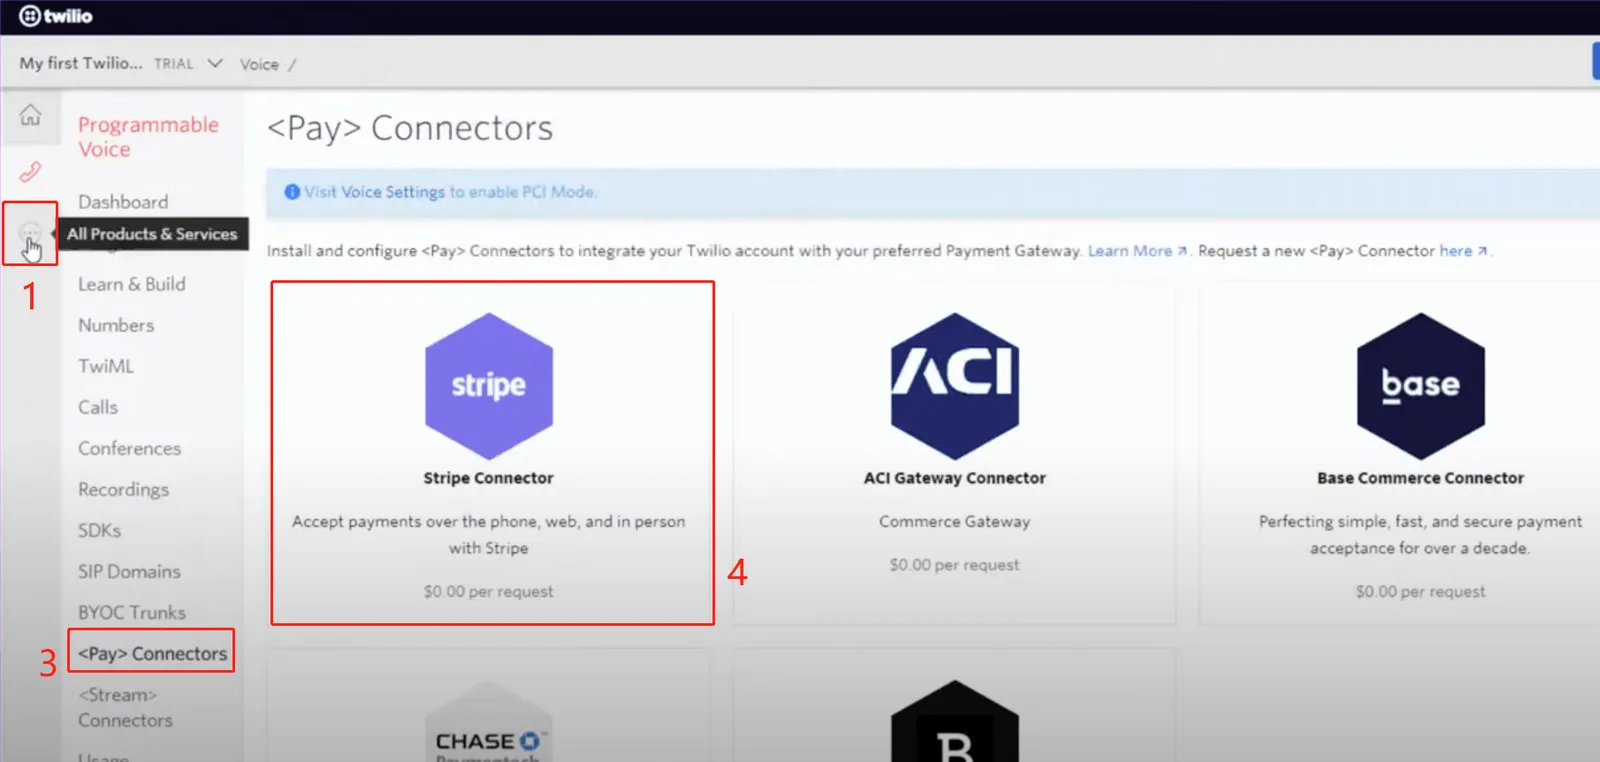
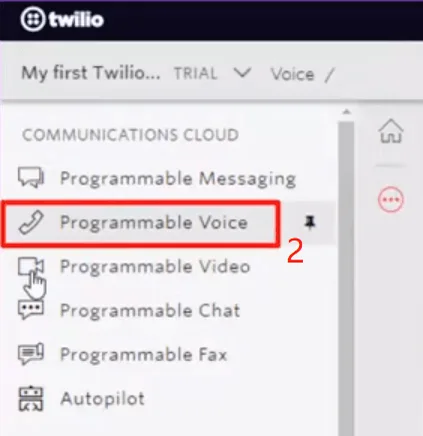
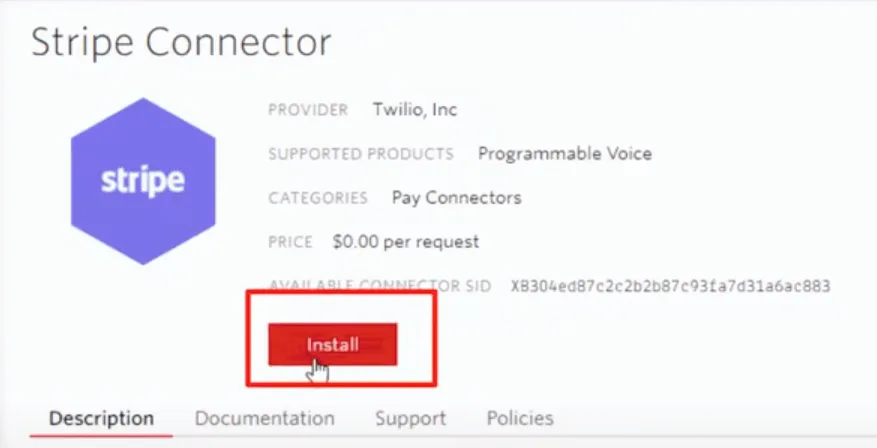
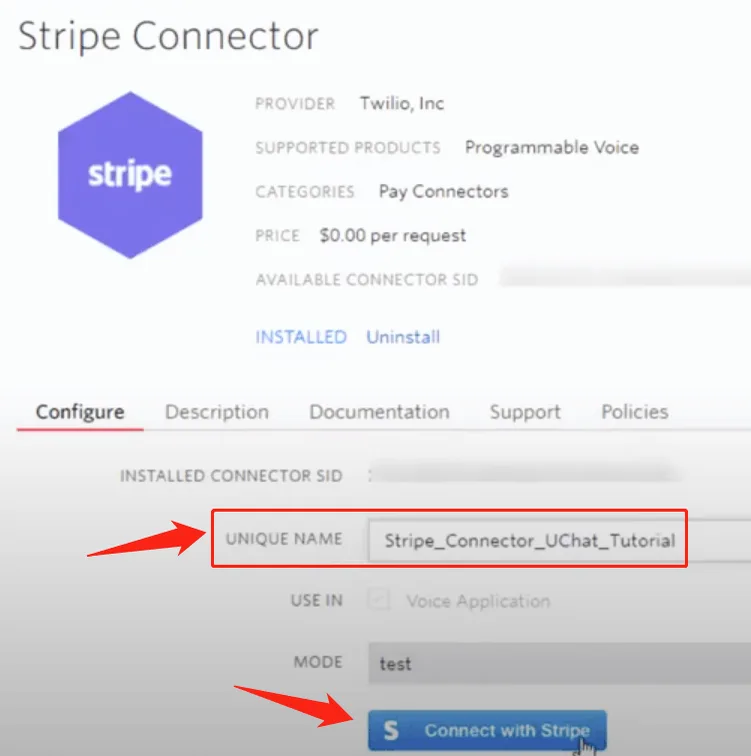
Install, give yourself a "UNIQUE NAME" and click "Connect with Stripe". This "UNIQUE NAME" is your "Unique connector ID": copy it back to NicoChat.
Put a direct number here, such as "99.99", or a number variable.
You will need a JSON variable to hold the payment result. This is an example response, with some card details, the confirmation code and the payment result.
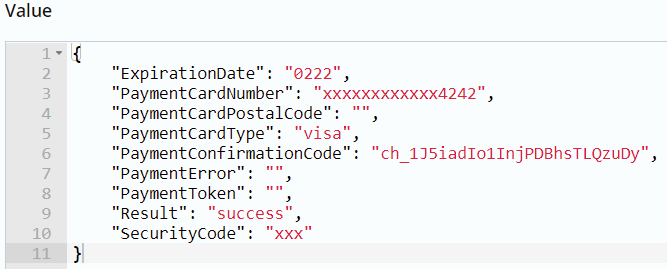
You can handle this situation through the “Payment Fail” option. For example: send "Something went wrong" and go back to the Payment step.
You can choose to capture a payment now or later.
- If you want to charge right away:
- If you want to receive the payment later:
When you set the charge amount to "0": if the "One Time Token" option is enabled in the Advanced Settings, you get a one-time token; otherwise, you get a reusable token.
The combinations of the Charge Amount and the "One Time Token" option give different payment results:
0
Enabled
get a one-time token
> 0, e.g. 5
Enabled
charge US$ 5
0
Disabled
get a reusable token
> 0, e.g. 5
Disabled
charge US$ 5
In other words: whenever you set a charge amount greater than 0, it does not matter whether the "One Time Token" option is enabled or not — you charge the client right away and get a payment confirmation code. If you are using Twilio, this code starts with “ch_”.
The one-time token, in turn, starts with “tok_” if you are using Twilio. And the reusable token is the customer ID, which starts with “cus_” if you are using Stripe.
Check your payment service provider’s documentation on how to create a charge. We will use Stripe as an example, to make a payment with a reusable token.
.webp)
In the example, a POST request is sent to Stripe with a test API key, a charge amount, the currency and the reusable token, that is, the customer ID.
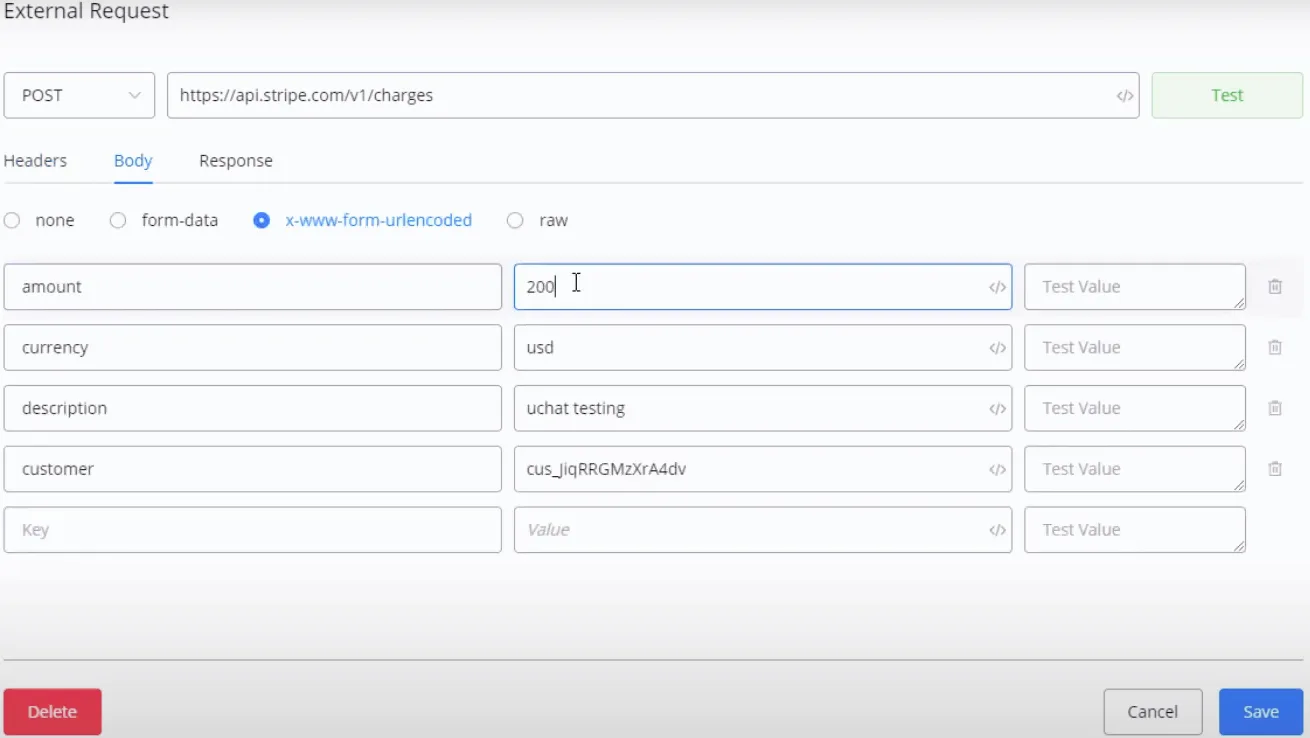
After clicking the test button, this is the response on success:
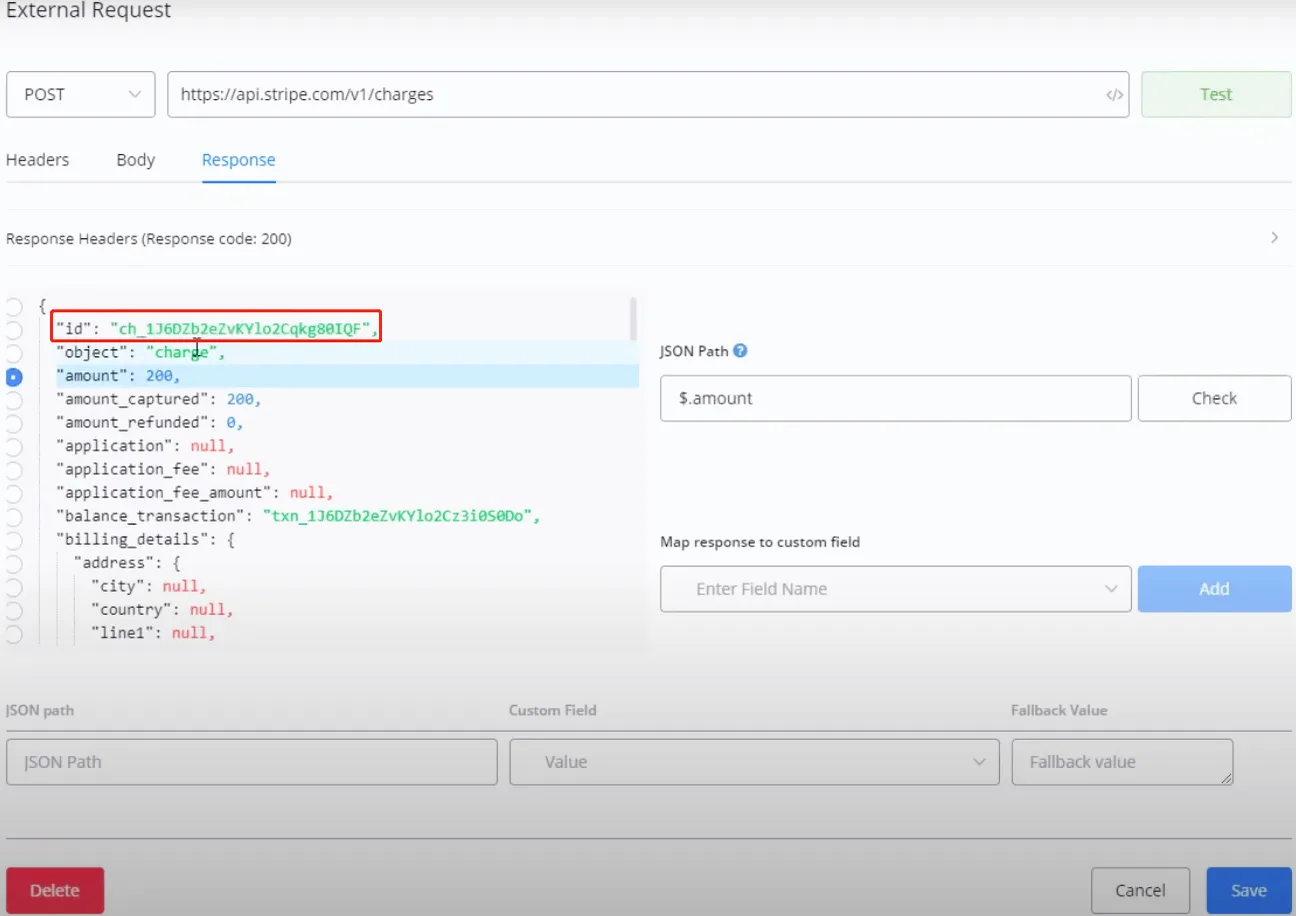
In the response you see an id starting with "ch_", which is the payment confirmation code. That means the payment was made successfully.
The "Description" is submitted along with the payment details. For example, you can put “Payment of $20.52 submitted from phone number (xxx)-xxx-xxxx” to create a record showing which call generated the payment.
Use the following card details for testing, if you need to:
Expiration date (MM/YY): 12 25 (pick a date in the future)
Postal code: 94105
CVC security code: 333