

WhatsApp API
Embedded signup is a convenient way to register your sender on the WhatsApp Business API directly from the NicoChat website. After registration, you can start using the API with the help of NicoChat to enhance your customer relationship experience.
However, this is not mandatory.
If you do not have one yet, you can create a new Meta Business Manager during the process.
Before you start using the WhatsApp Business API, you will need the following:
- A Facebook account.
- Administrator access to your Meta Business Manager account. If you do not have a Meta Business Manager account, you can create one during the embedded signup process. The Meta Business account must also not be blocked (here you can see whether there are any restrictions on your Meta Business account).
- Credit card (Mastercard / Visa → No American Express!)
- A phone number that can be registered as a sender. This number cannot be connected to any WhatsApp account (personal or WhatsApp Business API). You will need access to this number to receive an SMS or a verification voice call. If you already have an account on this number, see the instructions to delete it here.
In this video, you will find a step-by-step guide on how to set up the WhatsApp API:
Coming soon
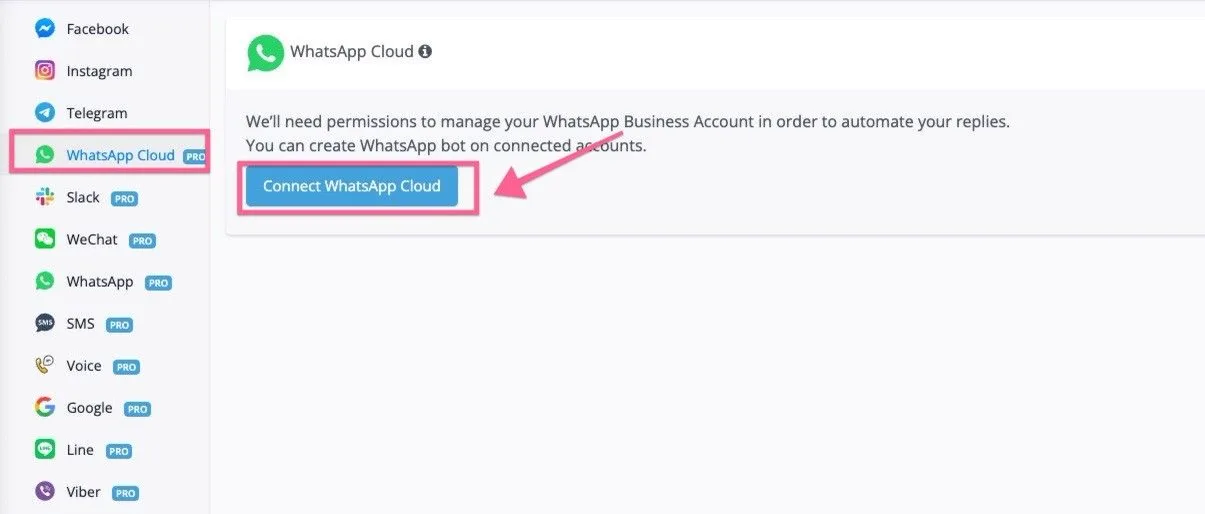
To start the process, log in to the NicoChat platform, go to the “Dashboard”, click “WhatsApp API” in the left sidebar and then the “Connect WhatsApp Cloud” button:
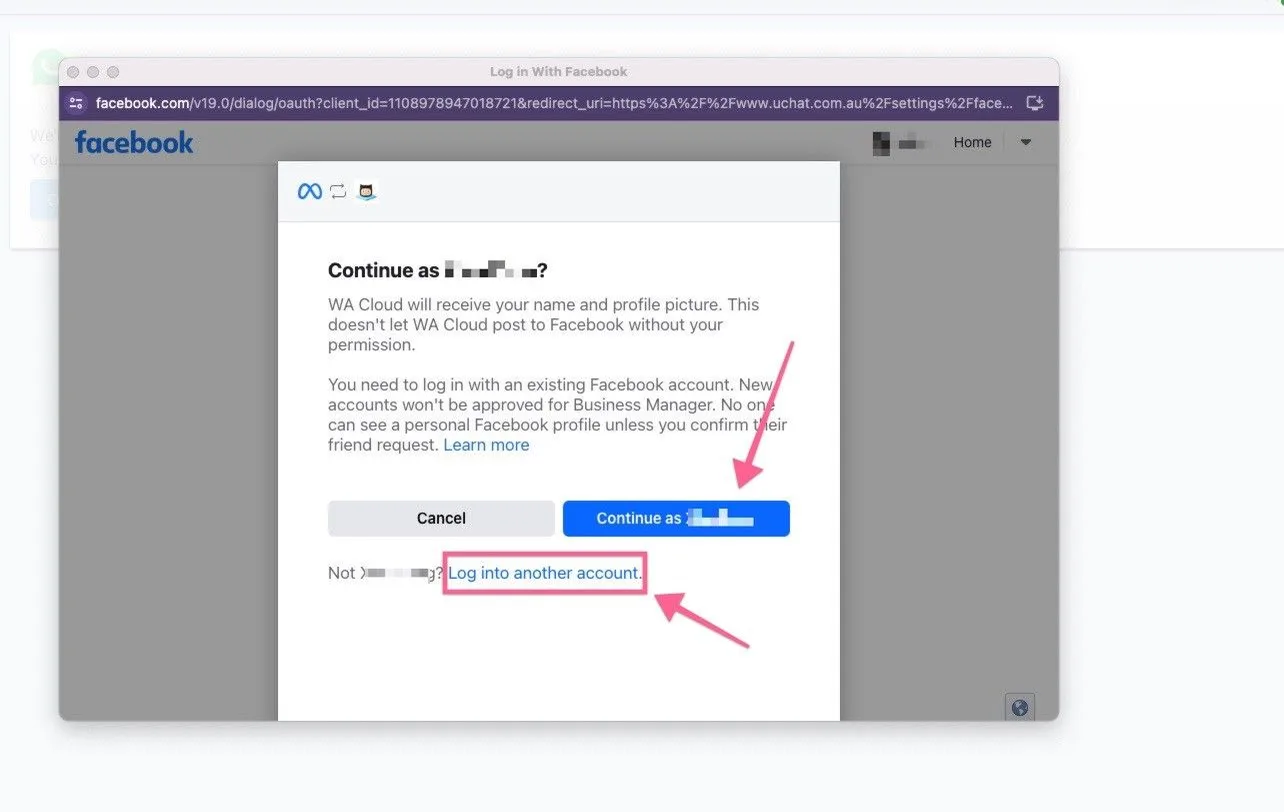
In the pop-up window, log in to your Facebook account or select the account that is already connected in your browser.
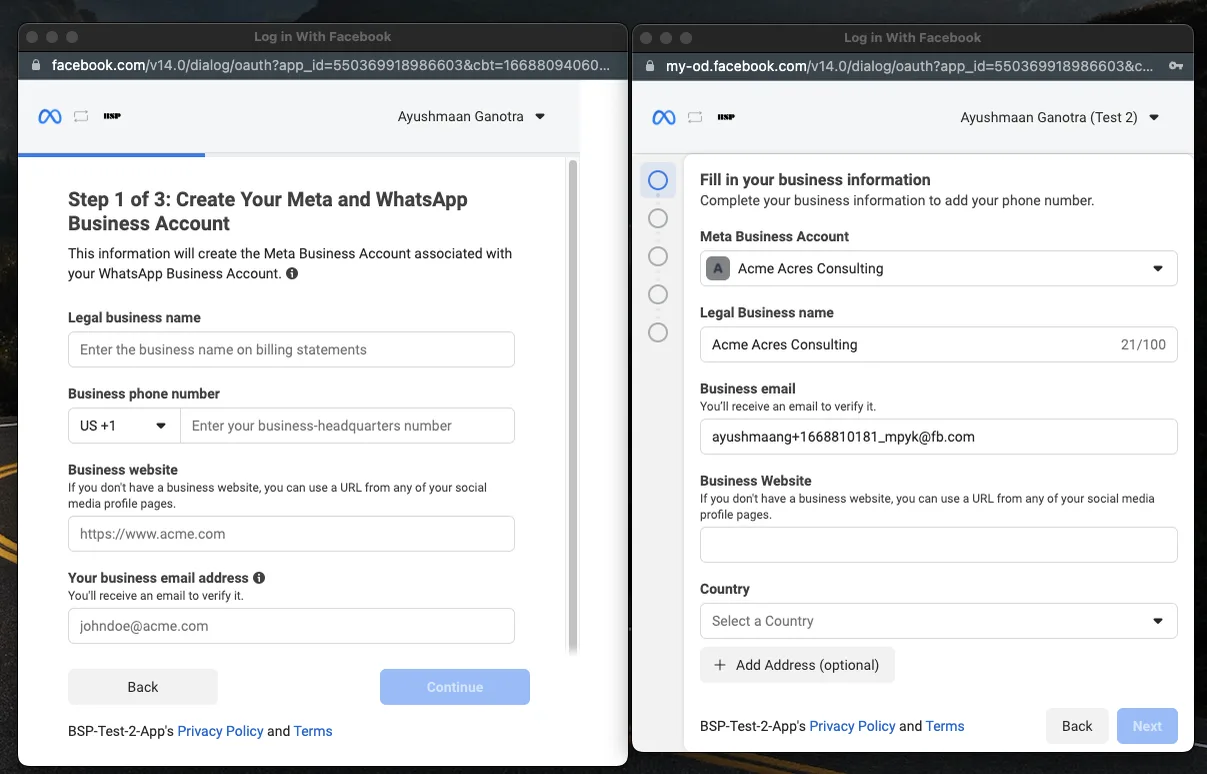
You can select an existing Meta Business Manager account on which you have administrator permissions or create a new Meta Business Manager account. To create a new account, you will need to prepare the following information:
- Legal business name
- Business phone number
- Business website
- Business email address
- Country
- Corporate address
- City
- State / Province / Region
Note that the newly created Meta Business Manager will be “unverified”. We recommend that you verify your Meta Business Manager as soon as possible. To do so, follow the instructions in Meta Business Verification.
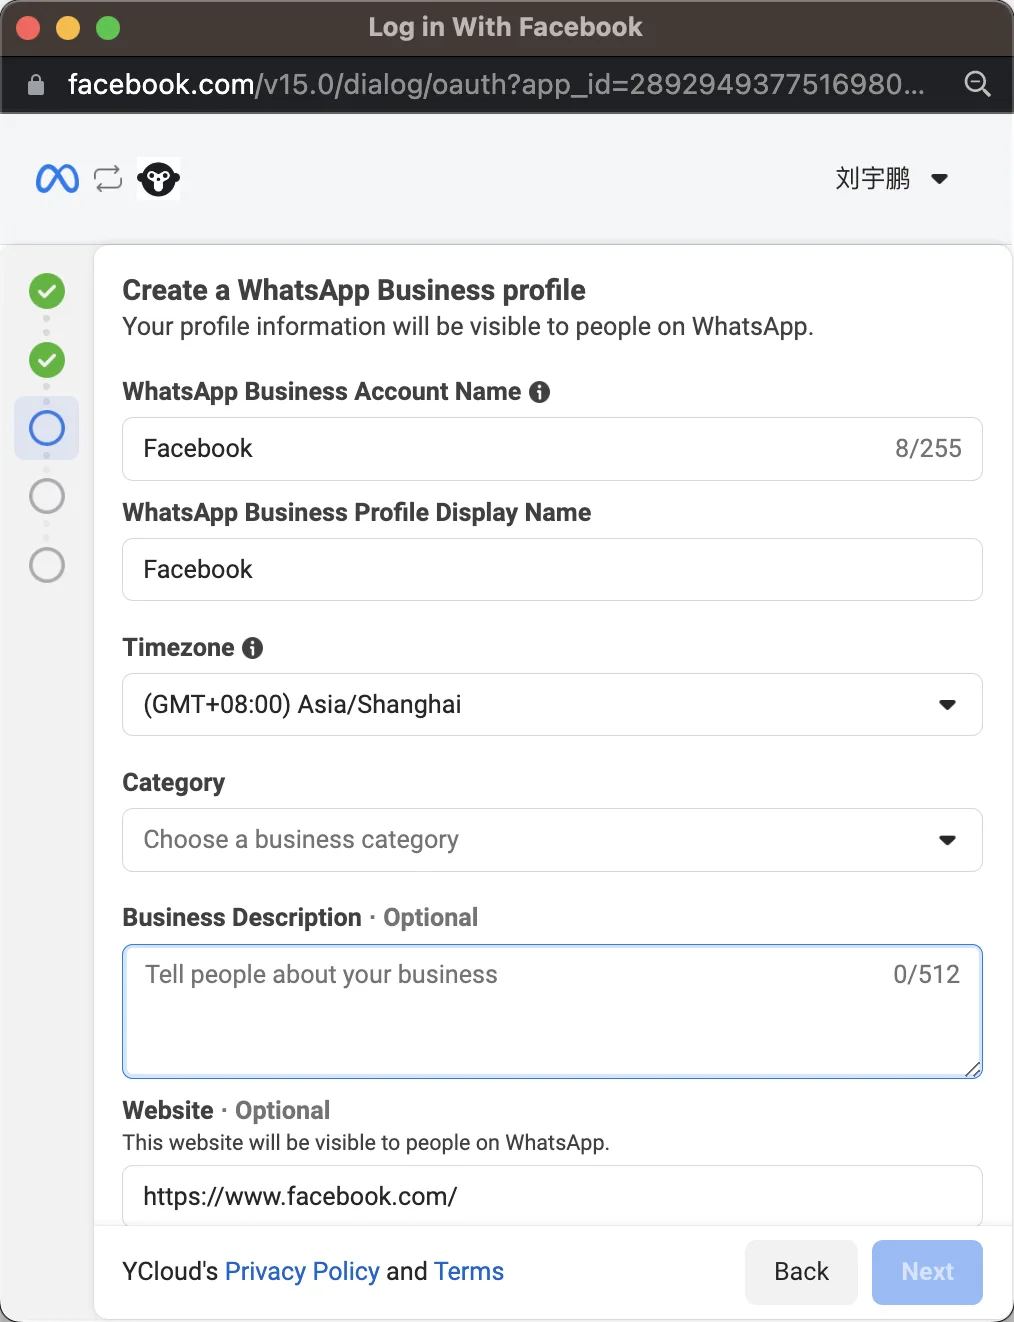
1. Enter the name of your WhatsApp Business Account (WABA)
Your audience will not see this information on your WhatsApp profile.
2. Enter the display name of your WhatsApp business profile
Display names need to be reviewed by Meta, and this is one of the important factors for increasing the number’s messaging limit.
A display name must have a brand identity consistent with external sources (for example, the company’s website or marketing material).
Display names must be related to your business and must not violate WhatsApp’s commerce and business policies. In addition, the display name must comply with WhatsApp’s display name guidelines.
3. Choose a business category from the list
4. Enter a description for your business
You can edit the description at any time, including after sender verification.
- Enter the phone number you want to use as your WhatsApp business number. Note that this number cannot be in use on any WhatsApp service.
- Choose one of the following verification methods:
- SMS
- Voice call
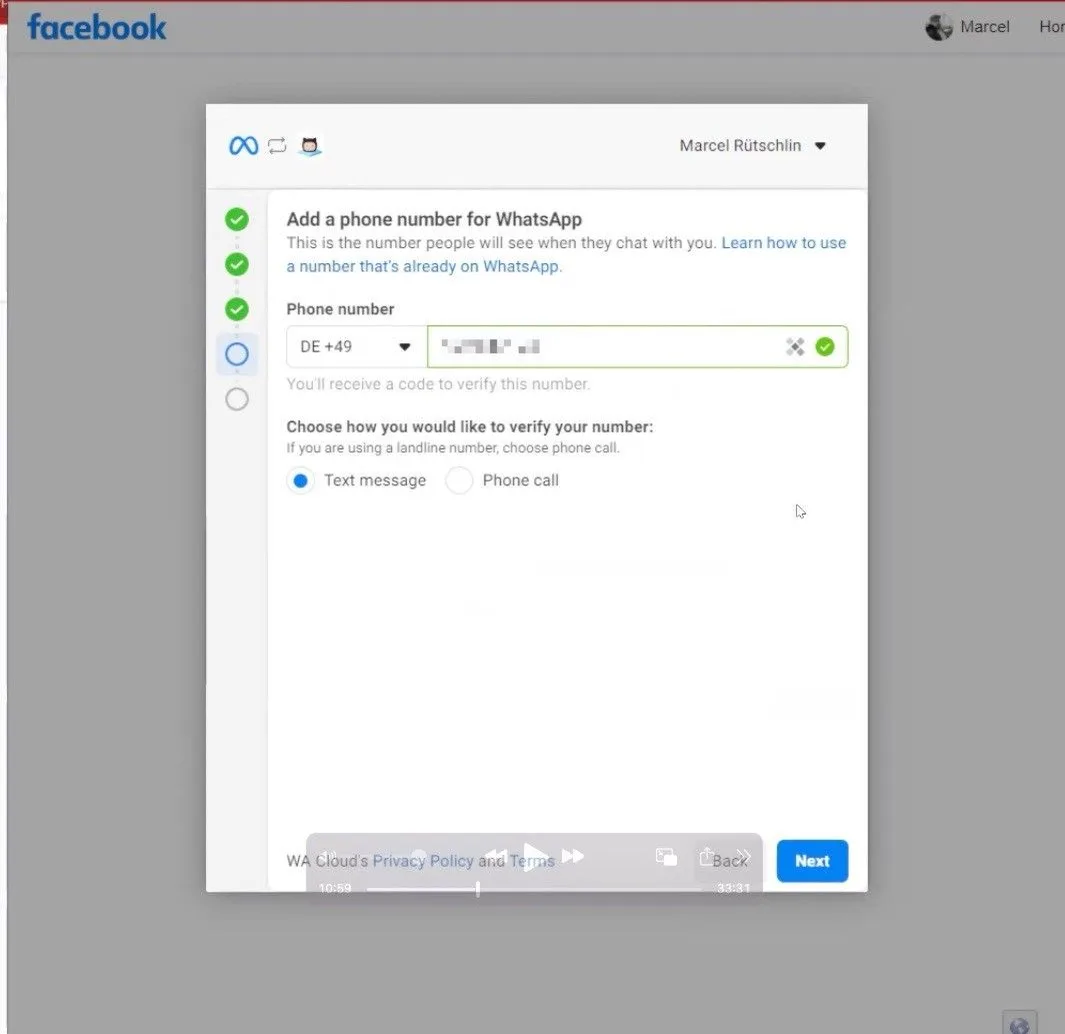
Once your number is verified,
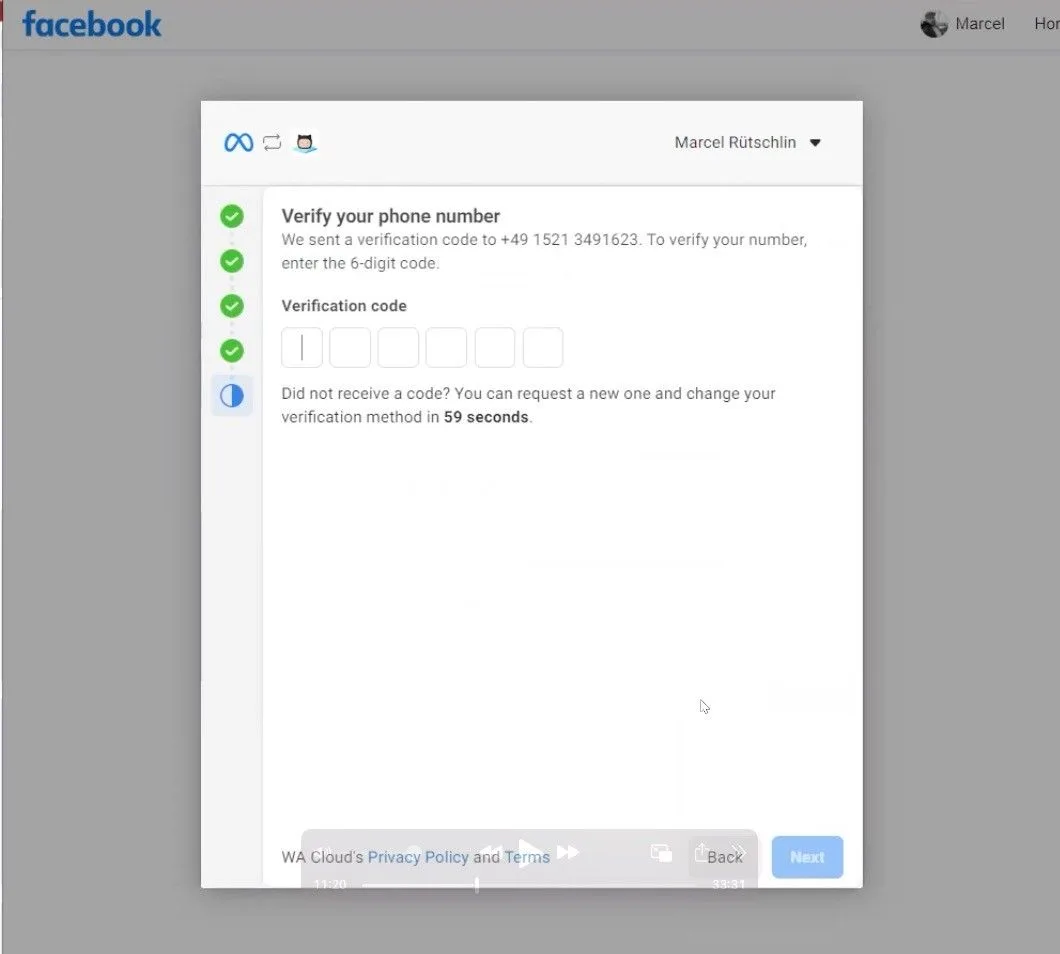
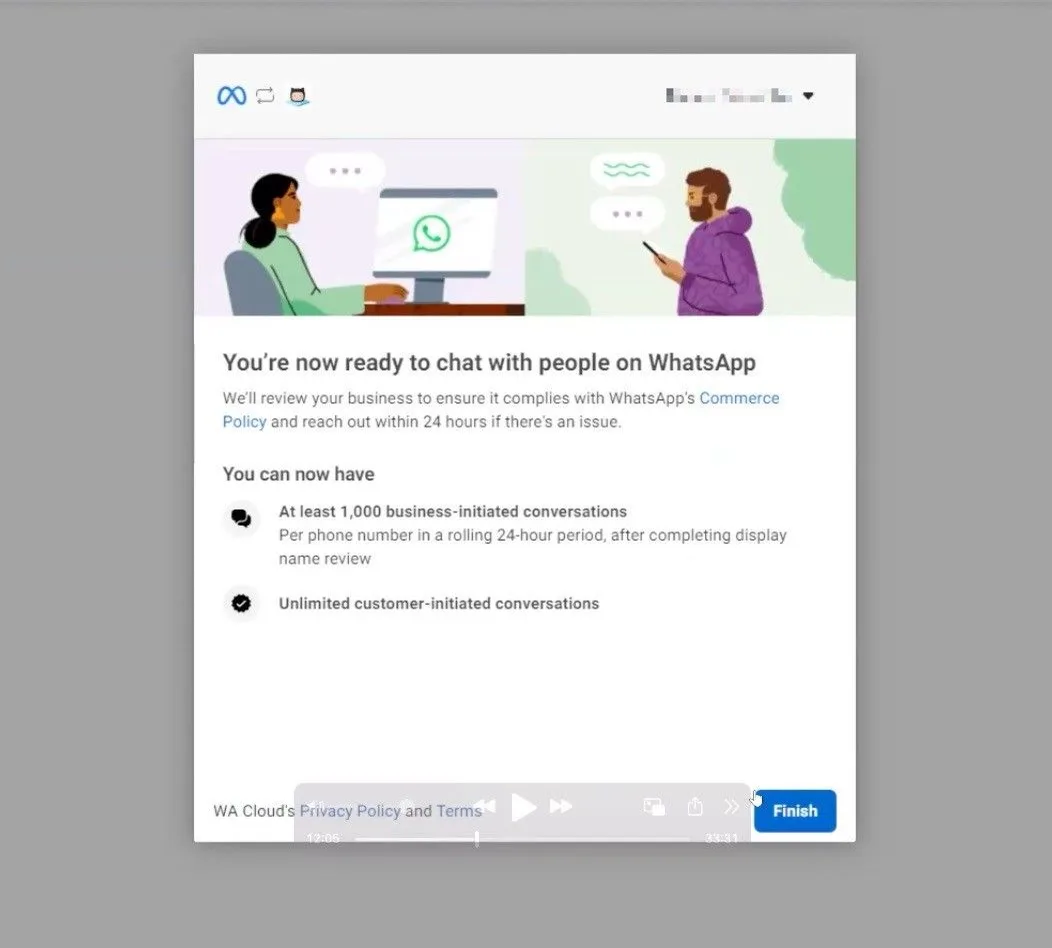
you will be redirected to the screen below. Click the “Finish” button to return to the NicoChat platform.
Once you are redirected to the NicoChat platform, you will see the screen below. Click the “Sync Numbers” button:
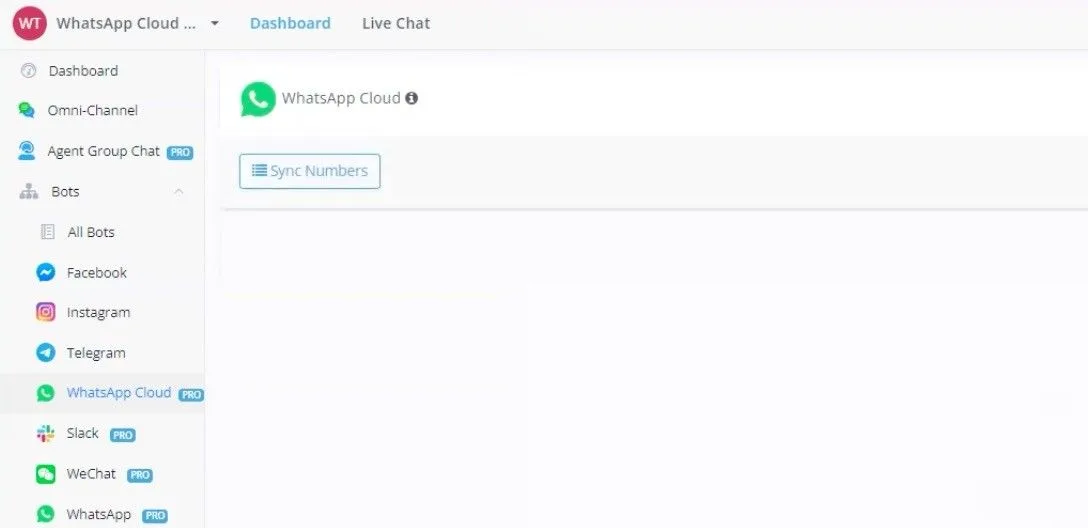
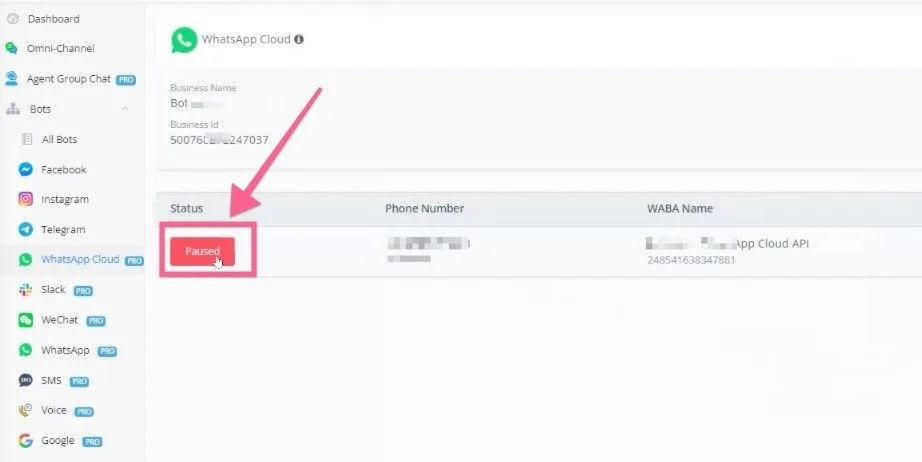
and you will see the numbers you have just registered on the NicoChat platform. By default, the status is “Paused”; you need to change the status to “Active”.
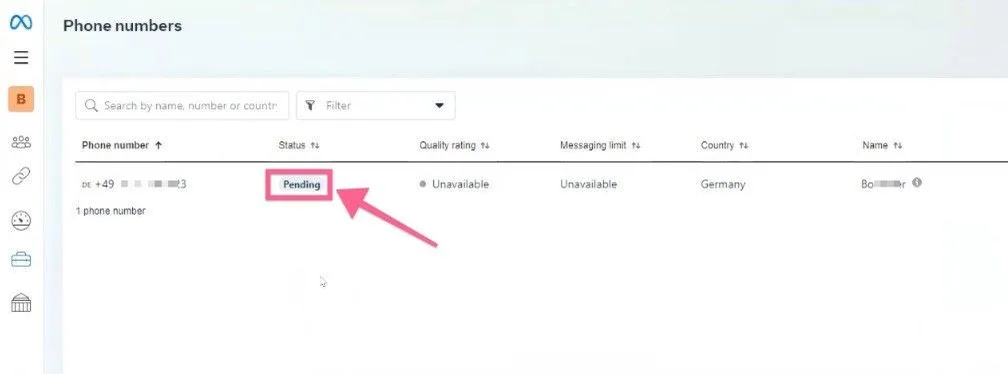
By default, if you go to “WhatsApp Manager” and then “Phone Numbers”, you will notice that the status is “Pending”, as in the image below:
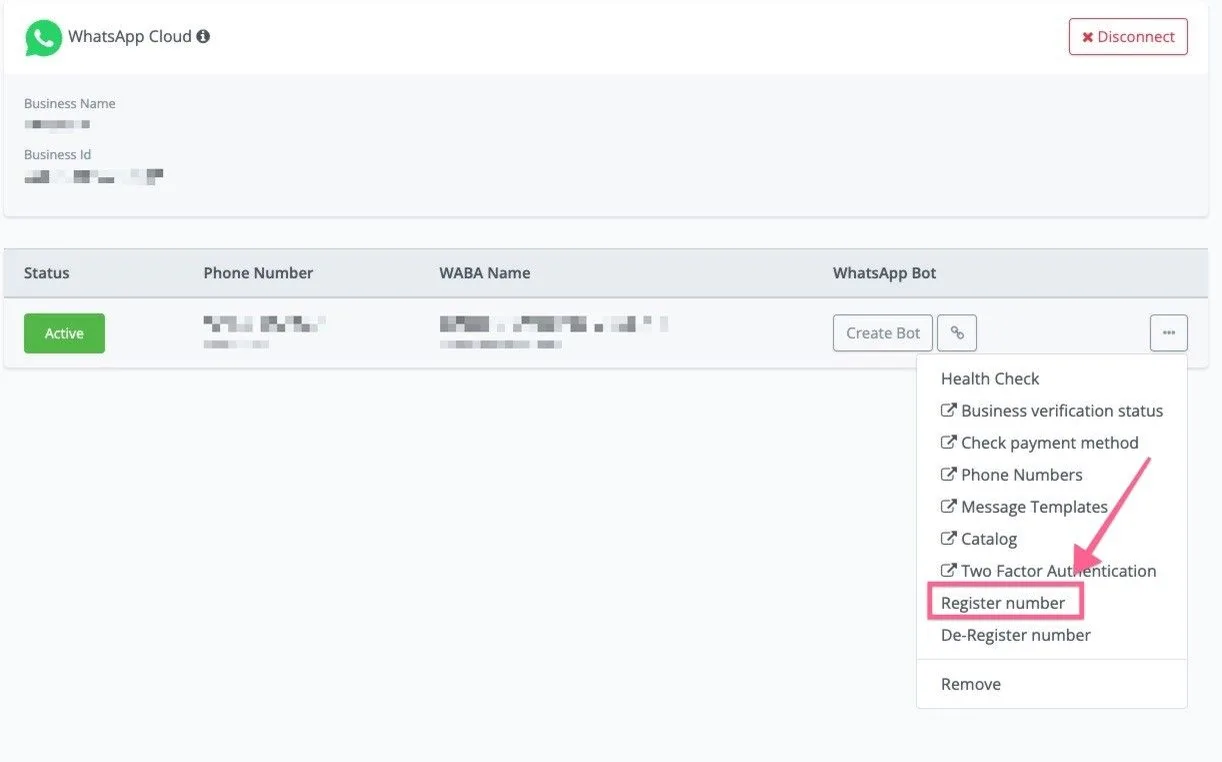
Now, go back to NicoChat and click “Settings”, as in the image below. Then, click “Register Number” and register your number:
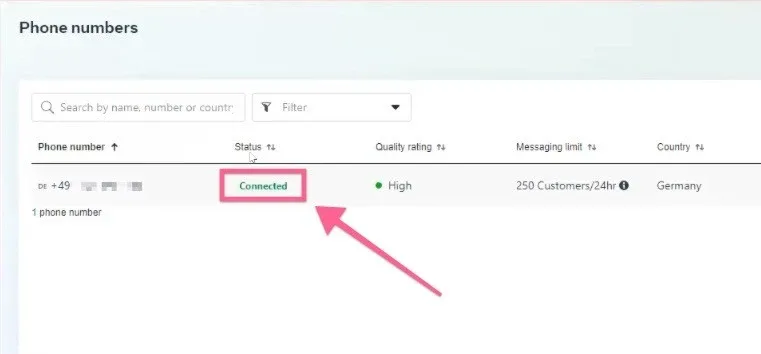
And, once you complete the registration, you will see that your phone number status is “Connected”.
Now your channel is ready to be tested!
But before you start testing, it is very important to set up your billing and verify your Meta Business Manager (it is not mandatory, but it is highly recommended).
Also, you risk having your number or your Meta Business Manager account restricted if you do not have a verified Meta Business Manager.
Once the WhatsApp number is connected, you can click “Create Flow” and create a simple flow inside your main flow.
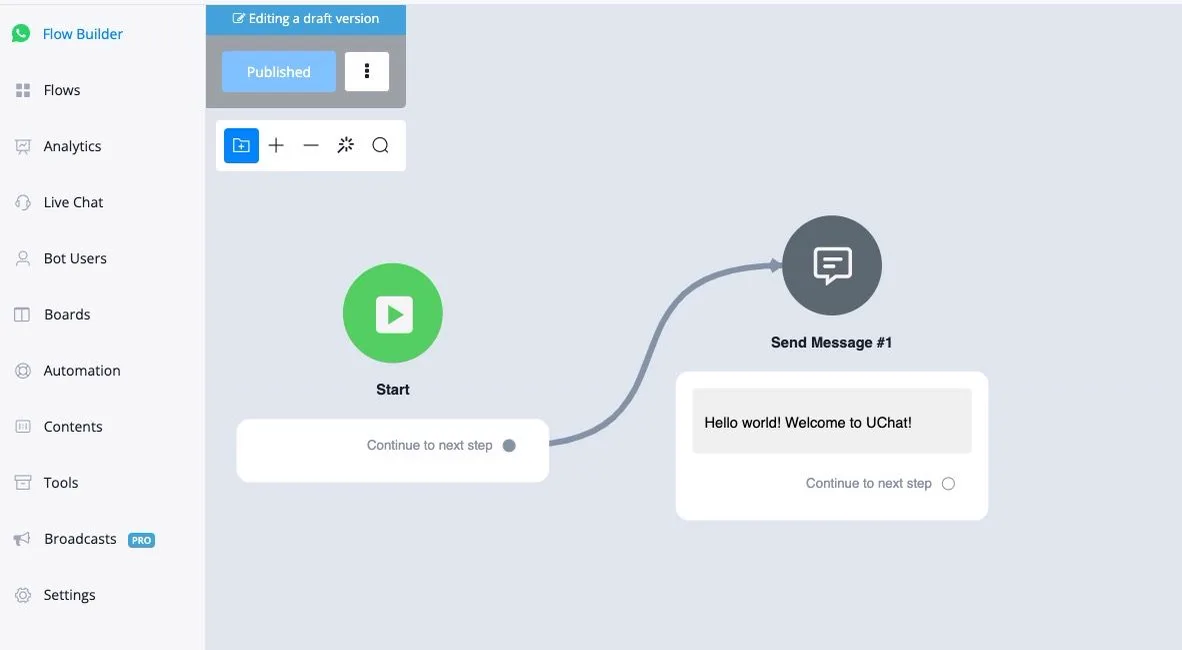
Click the “Publish” button to publish the flow and then send any message from your personal WhatsApp number to this WhatsApp Cloud API number.
You should receive the text message back. If you see the message, the connection is working. Your channel is responding and working well.
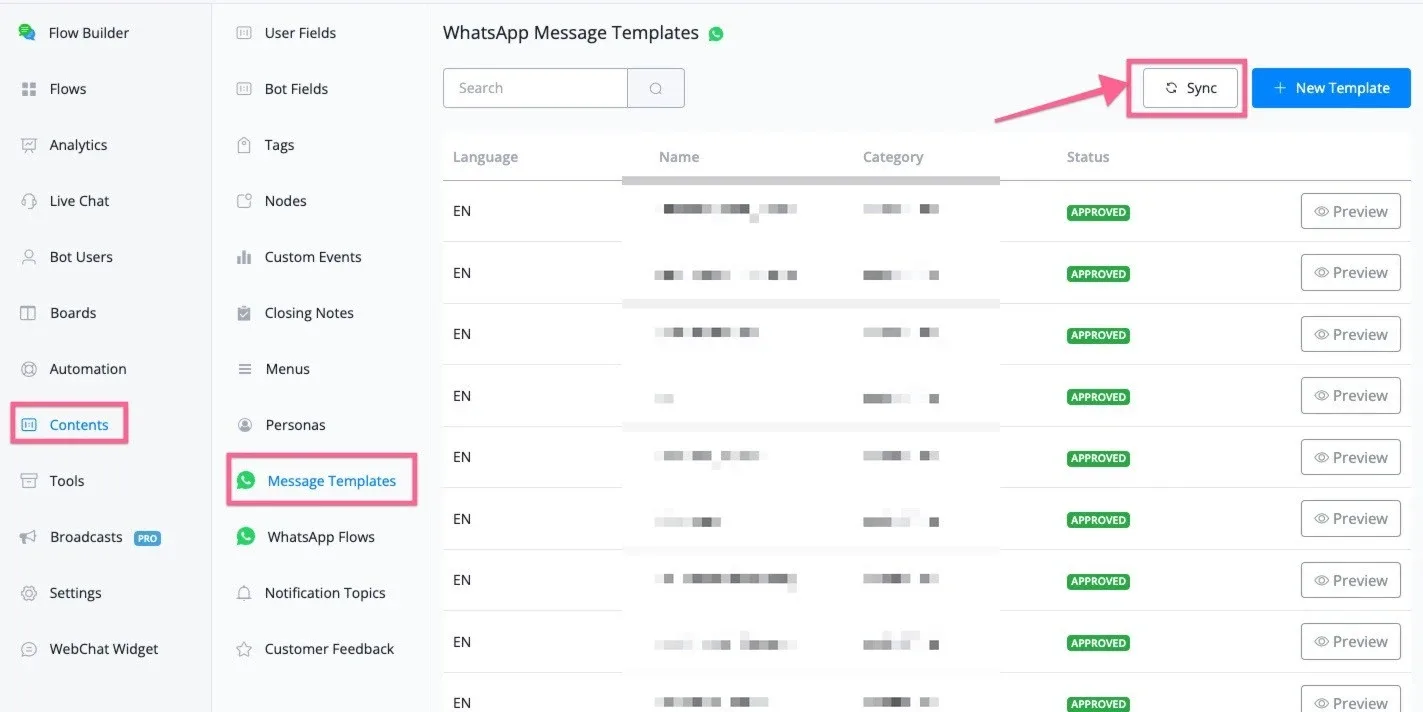
Now go to “Content” and “Message Templates” and click the “Sync” button. If no error message appears, the WhatsApp message templates are working as well.
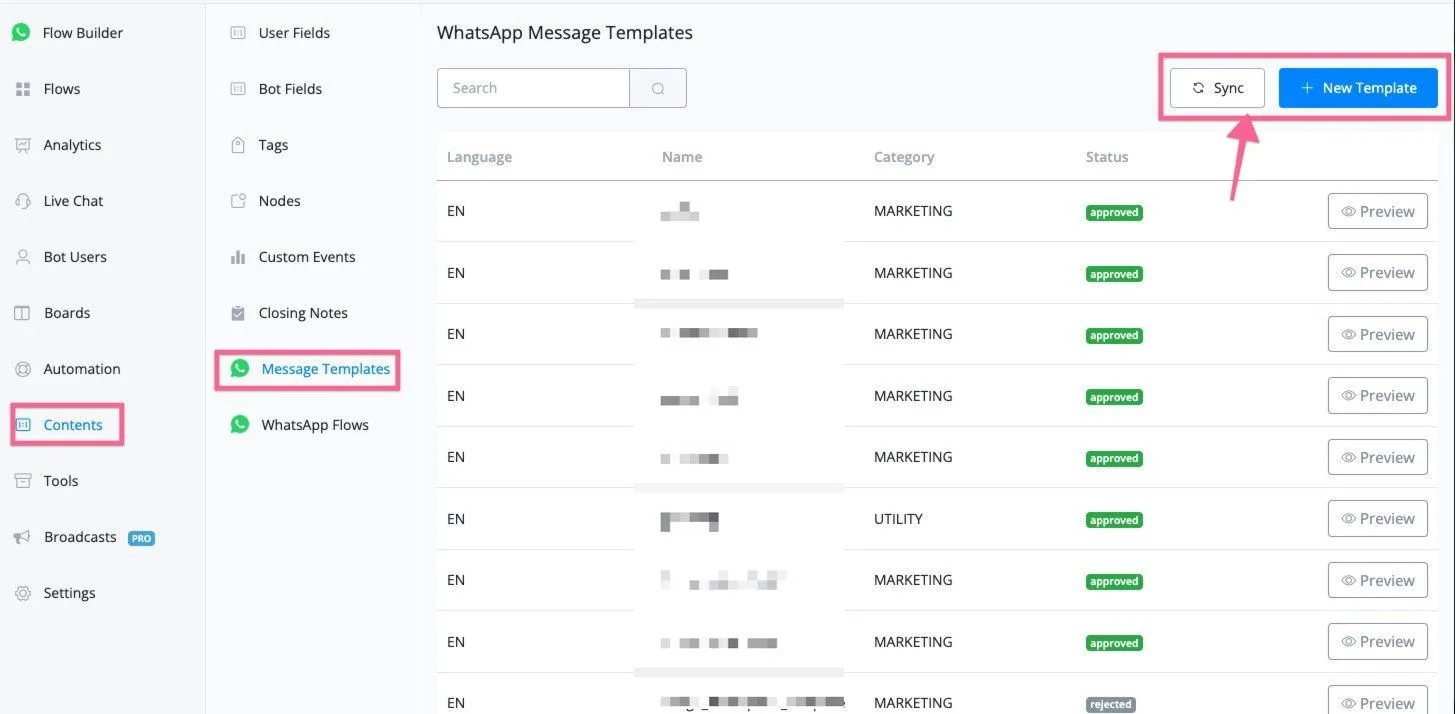
Note that, at the beginning, no message template will be synced to NicoChat. You can also click “+ New Template” and create a new WhatsApp message template directly from NicoChat.
Finally, you can go to “WhatsApp Manager” in your Meta Business Manager, connect a valid credit card to billing and then test sending a WhatsApp message template to a WhatsApp user.
If your billing method is valid, the message template should be delivered without any issues.
If you have done all the tests, your WhatsApp Cloud API is correctly connected.
NicoChat offers a few settings that help you manage your WhatsApp API easily. By clicking the three dots on WhatsApp API, you will find the settings below:
- Health Check
- Business Verification Status
- Check payment method
- Phone Numbers
- Message Templates
- Catalog
- Two-Factor Authentication
- Unregister Number
If you have not completed the business verification process, you will be limited to associating only two phone numbers and may have a maximum of 250 conversations per day.
If this limit is exceeded, the account will be automatically canceled after 15 days.
However, during this period you can still test the service. Once your business is verified, you will be able to associate the WABA with up to 20 phone numbers and the conversation limit will increase to 1,000 per day.
The first thing to do is to connect a valid credit card to your WABA numbers. If you have not connected a valid card and still send WhatsApp message templates, you will see the error below:
[ { "error_code": 141006, "error_description": "There is an error with the payment method.", "possible_solution": "There was an error with your payment method. Please add a new payment method to the account." } ]
You just need to connect a valid credit card to your WABA numbers.
You will need to go to Meta Business Manager and find the WhatsApp account.
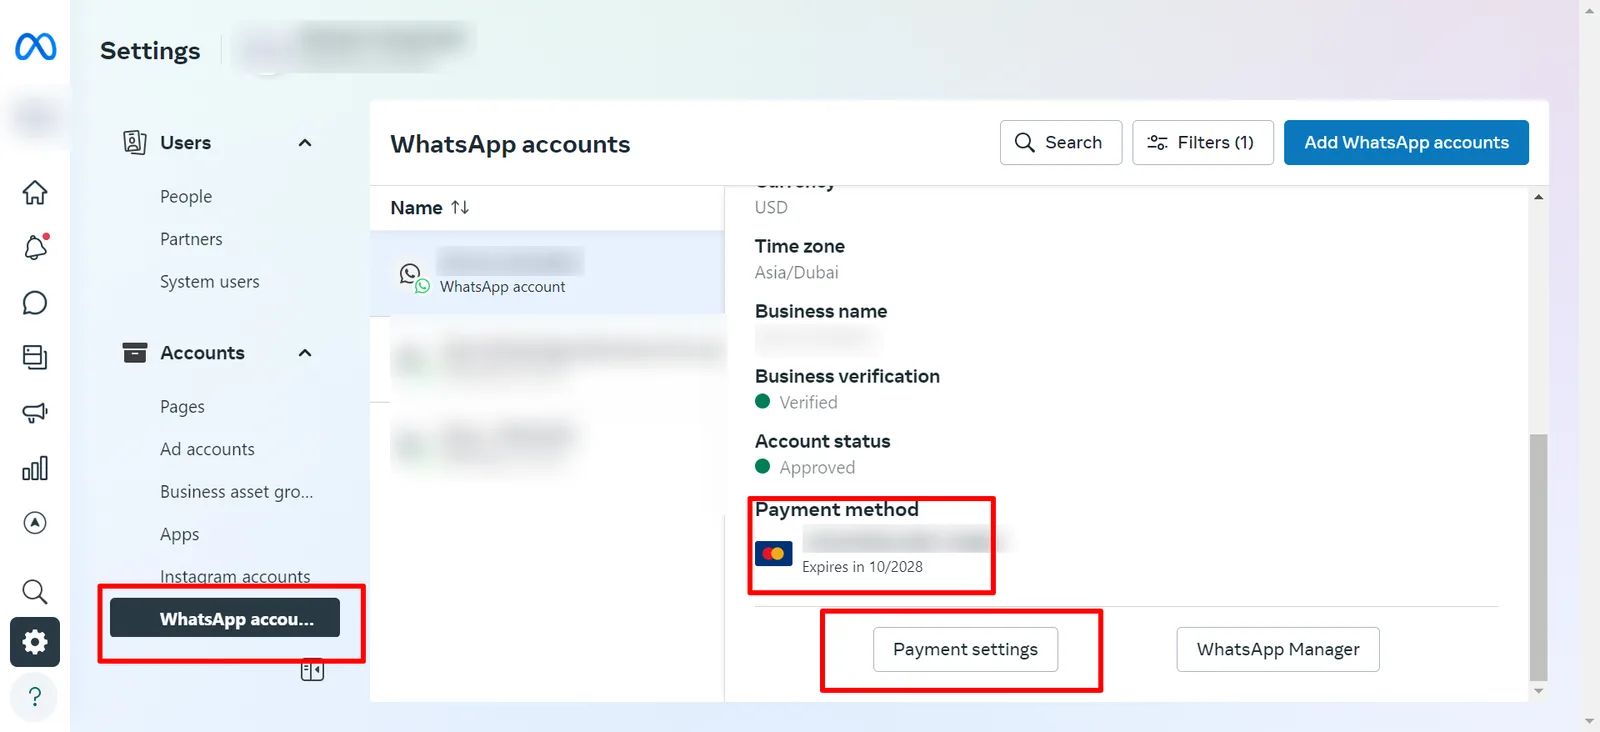
When you click Health Check, you will see the screen below:
This will give you an overview of your phone number status, your WABA status and your Meta Business account status.
A WhatsApp Business Account (WABA) needs a valid phone number dedicated to using the WhatsApp Business Platform.
This guide introduces how to choose phone numbers, add them to your account and what the related sending limitations are.
When you click this option, you will be redirected to “Phone Numbers” in your WhatsApp Manager. Your phone number status will fall into one of the categories below:
The status is classified as follows:
- Connected: the sender works normally.
- Flagged: this status occurs when the sender’s quality rating reaches a low (red) state. During this state, it is not possible to upgrade the messaging limit tier. If the quality rating improves to a medium or high state within 7 days from the day the sender status changed to Flagged, the status returns to Connected. If the quality rating does not improve, the sender status returns to Connected, but the messaging limit drops to the next lower tier. The lowest tier for verified businesses is Tier 1.
- Restricted: this status occurs when the sender reaches the messaging limit. During the Restricted phase, you will not be able to send proactive messages (notifications) until the 24-hour window resets. You will only be able to reply to messages initiated by end users.
- Pending: you can click “Register Number” to connect your phone numbers.
Add a phone number to a WABA
Currently, each verified Meta Business Manager can have up to 20 phone numbers, regardless of the number of WABAs.
If you want to add a new number, add it through the embedded signup process.
Change the display name
Each phone number has its display name, and this name must be related to your company or brand name. The display name will be reviewed by Meta. To change it, go to Meta.
Delete a phone number from a WABA
For complete removal, follow the steps below:
- In Business Manager, go to the Business Settings page.
- Go to Settings > Business Settings > WhatsApp Accounts > WhatsApp Manager > Phone Numbers.
- In WhatsApp Manager, find the phone number you want to delete. Click the trash can icon under Delete, in the top right corner.
This link takes you to the WhatsApp templates section in WhatsApp Manager. There you can create and submit the template and, once it is approved, go to NicoChat to sync the template back.
You can also click the “New Template” button in NicoChat and create and submit the template directly there.
Businesses can use Catalogs to share products with customers through single-product or multi-product messages. They can also display their products and services in the WhatsApp app, allowing customers to browse and add items to the cart without leaving the conversation — a seamless and convenient shopping experience.
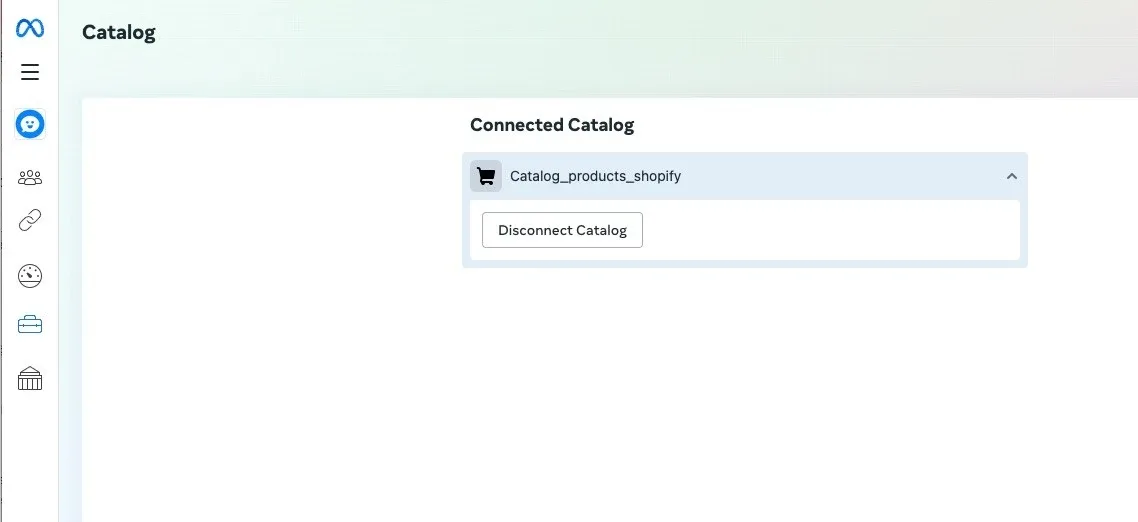
When you click the “Catalog” link, you will be redirected to WhatsApp Manager. Click “Catalog”, then “Choose a catalog” and, in the dropdown menu, select the catalog you want to connect.
Click “View catalog” if you want to view or manage the catalog. Click “Connect catalog” to connect these WABA numbers to the catalog.
If you want to sync the Facebook product catalog with NicoChat’s native ecommerce, go to “Integrations”, find the “Ecommerce” category, click “Facebook Business” and log in to your Facebook account.
After logging in to your Facebook account, you will be redirected back to NicoChat and must click the “List Business Catalogs” button.
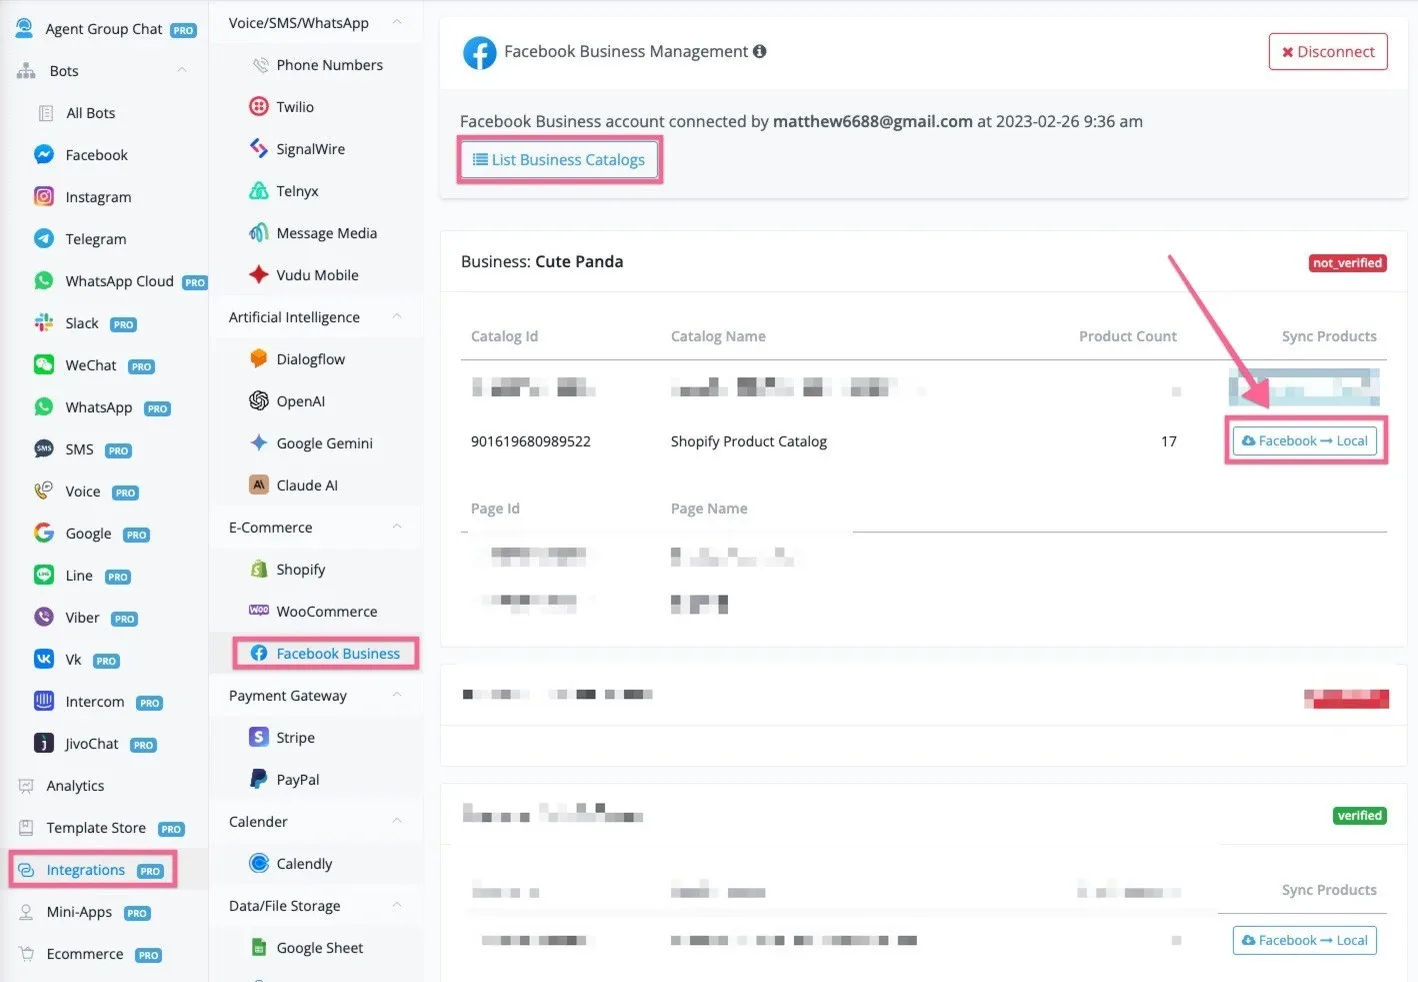
Find the catalog linked to your WABA numbers and click the “Facebook → Location” button. Your catalog products will be synced to NicoChat Ecommerce → Products.
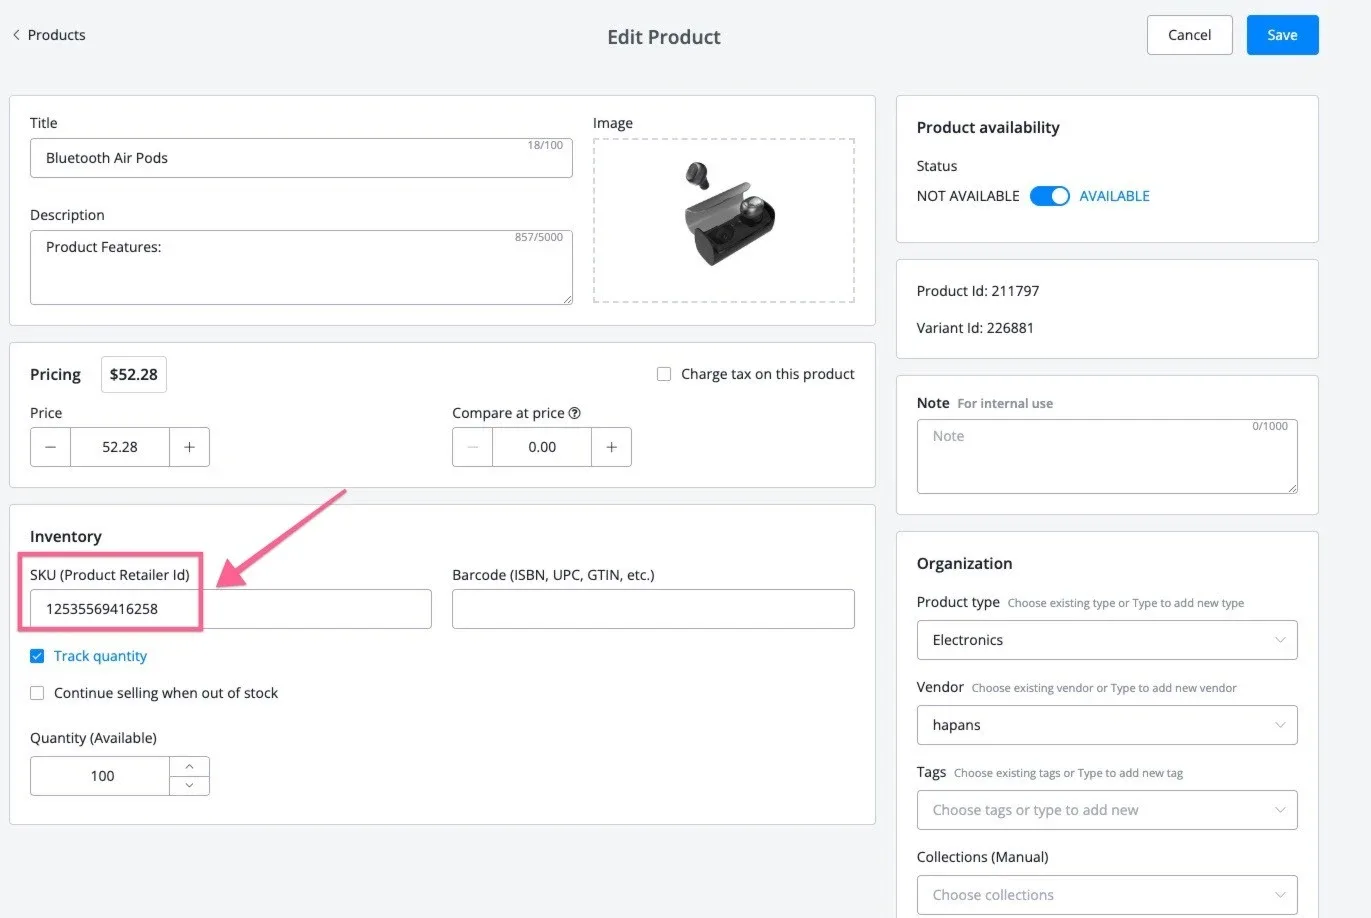
If you open any synced product in NicoChat Ecommerce → Products, you will see that the title, description, images and prices are synced with the Facebook Catalog messages.
You will need the RetailID to send the WhatsApp product catalog message. The RetailID is synced with the SKU, in the products section.
See here for more information on how to build a native ecommerce shopping experience on WhatsApp.
An error occurred while processing this request. Please try again later.
This is the least clear error of all and requires more help. Business account creation may have failed for several reasons.
==> If you receive this error, use an active Facebook account or contact support to resolve it.
You have reached the limit of businesses you can create at this time.
There is a limit to the number of business accounts you can create.
==> Use an existing business account or delete/close unused business accounts.
Your Facebook account is too new to create a business account. Try again in one hour.
New Facebook accounts need to wait a while before they can create a Business Manager account.
=> Use an existing active Facebook account or wait a few hours before using your new account. The new Facebook account can be used normally during the waiting period.
We limit how often you can post, comment or do other things in a given period to help protect the community against spam. You can try again later.
Your Facebook account has been flagged due to suspicious behavior.
==> You need to use an active, existing Facebook account with no previous problems.
You are no longer allowed to use Facebook Products to advertise. You cannot run ads, manage advertising assets or create new ads or business accounts.
You cannot create new Business Manager accounts due to previous suspicious behavior.
==> Use an active, existing Facebook account with no previous problems.
Your payment account is disabled
Your payment account was disabled due to previous suspicious behavior.
==> Contact Facebook for help here
A user can only create one business user at a time
You can only create one business account within a given period.
==> Use an existing business account to complete the integration.
The name you chose for your business is not valid. Consider using xxx.
==> Enter a valid name that matches your company name.
The user does not have permission to create WhatsApp Business accounts.
You do not have the administrator permission required to create WhatsApp accounts in the selected business account.
==> Get administrator access to the business account to proceed, or select an account on which you have administrator permissions.
You can only create a limited number of WhatsApp business accounts before your business and WhatsApp account verification is complete. You can create additional accounts after you are verified.
You tried to create several WhatsApp business accounts in an unverified business.
==> You can only create additional WhatsApp business accounts once the business verification and the WhatsApp account checks are complete. Start the account’s business verification by going to Business Manager.
We cannot verify the Facebook business account you selected. Go back to the previous screen to select another account or go to Facebook Business Manager for support.
The selected Facebook business account does not comply with our WhatsApp Business API usage policies and could not be verified.
==> Go to your Business Manager account for more information about this Facebook business account. If your business verification submission is rejected, you should have received an email notification with the detailed reasons. You can try to resubmit your business verification if you think there was a mistake, or create a WhatsApp business account using a Facebook business account that has already been verified.
Something went wrong. You will need to contact support and try again.
This may be an intermittent WhatsApp issue.
==> You can try the flow again in a few minutes.
This phone number already exists in your phone number list.
You are trying to add a phone number that already exists in your WhatsApp Business account.
==> Go back to the flow or restart the flow to select the existing phone number.
This number is registered on an existing WhatsApp account. To use this number, disconnect it from the existing account. Then return to this page and enter the number again. Note: it can take up to 3 minutes for the number to become available.
The phone number was already registered on our platform (that is, WhatsApp Messenger, WhatsApp Business App or WhatsApp Business API).
==> Go to the “WhatsApp API” settings and unregister the number, if you want to use it, or register a new number.
Your verified name violates WhatsApp guidelines. Edit your verified name and try again.
The name used in the phone number’s business profile does not meet our guidelines.
==> See the Display Name guidelines and try again.
Something went wrong. You will need to contact support and try again.
There was a problem creating the phone number’s business profile.
==> Re-enter the correct Business Profile name according to the guidelines and the remaining details.
Phone number ownership has already been verified.
==> This phone number has already been verified. You can refresh the page to see the change applied.
Your phone number does not appear to be valid. Check it again or try again after 5 minutes.
The phone number provided is incorrect or we do not support numbers in that format.
==> Make sure the number is operational and verified by a telecommunications carrier. At this time, we do not support interactive voice response (IVR) numbers.
You have exceeded the number of attempts.
To block spam, the system allows only a limited number of verification attempts.
==> You must wait about 12 hours before trying again. After this waiting period, go back to the flow and select existing accounts and phone numbers to verify again.
An error occurred while verifying this phone number. Please try again later.
There was a problem with the verification code.
==> Try again later.
You have requested your code too many times.
To block spam, the system allows only a limited number of verification attempts.
==> We limit the number of times you can request a code within a given period. Go back to the flow after the specified time and select existing accounts and phone numbers to request a code again.